[All Adaptavist Apps]
This information is for ThemeBuilder on Confluence 4 or lower. Go to the documentation for ThemeBuilder on Confluence 5+
Migrating from 1.x and 2.x
Migrating from Theme Builder 1.x and 2.x
If you're using an earlier version of Theme Builder, you really need to take a look at what's on offer in version 3!
What's New?
Theme Builder 3 represents about 9 months of effort by the boffins at Adaptavist and adds a vast array of features and enhancements requested by you, our clients.
With over 1000 organisations in 50+ countries now using Theme Builder, we've been able to get lots of feedback on what was good and not so good about earlier versions of the plugin. We've spent a lot of time looking at the most common tasks (such as using the same design for lots of spaces) and
Centralised Theme Layouts
Previous versions of the plugin stored theme configurations (now known as "layouts") separately against each space. Customers who wanted to use the same (or similar) layout for multiple spaces had to constantly export and import configuration data to propagate settings to other spaces which is a real nightmare if you've got 20 or more spaces.
– diag –
In version 3, you define the layouts centrally and can then easily apply them to any number of spaces. Change the centrally defined layout and all the spaces using it instantly update!
Theme Defaulting
Lots of our customers asked for the ability to have the global level theme settings automatically propagate to spaces.
Your wish, our command!
– pic –
The Default Layouts Tab allows you to choose which layout is used by default for Global Spaces and which layout is used by default for Personal Spaces, complete with previews!
This also means that you don't necessarily need to use the layout used at global level (dashboard, etc) as the default used at space level.
Layout Chooser
Customers also asked us to simplify the process of selecting a layout for Space Administrators. Previous versions sent them straight to the theme configuration screen which was far too complex for most people's needs. To solve this we added the Layout Chooser which lists the available layouts and can even display a live preview of what the space will look like with a layout applied:
– pic –
Permissions can be set on layouts to define who can select them - for example, you might only want people in the Sales department user group to be able to select the Sales layout.
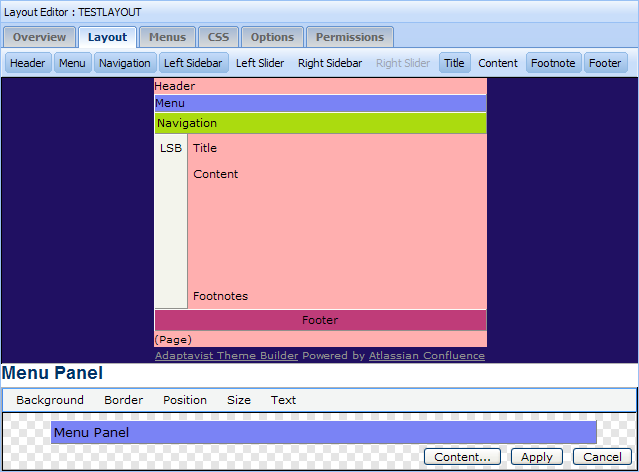
Layout Manager
The Layout Manager is the new place to create your theme layouts. It replaces the old theme configuration screen with a new tabbed interface that makes it much easier to get at all the various features of the theme:
Site Administrators can set privileges to define who can use the layout manager to tightly control editing of theme layouts.
Layout Hierarchy and Inheritance
Another common request of our clients was to have the ability to define a general "look and feel" (eg. corporate branding) layout and then use it as the basis for other layouts. So we added a hierarchical nature to layouts:

A child layout will, by default, inherit all the settings of it's parent layout but can also override any of them! This process is called Inheritance and you can see how it works in our tutorial on Layout Hierarchy.
Theme Administration
Another regular request was for a feature that allowed Site Administrators to centrally manage themes. Enter Theme Administration:
– pic –
Amongst other things, the Manage Spaces Tab (shown above) shows a filterable list of spaces in a sortable grid which allows you to instantly change the theme (Theme Builder, Clickr, etc) and layout (the specific layout used when Theme Builder is selected for that space) by editing settings directly in the grid.
There's even a bulk update tool which allows you to apply specific settings to multiple spaces at the same time.
Completely Customisable Print View
Previous versions of Theme Builder didn't really provide any way to customise the printable view - in most cases it would look almost identical to the normal view which defeats the whole purpose of having a printable view. Not any more:
– pic –
For any given layout, you can specify which layout should be used for the printable view. Because the printable layout is just a normal layout you get the complete range of customisation options and can also have as many printable layout designs as desired.
Permissions
Theme Builder 3 allows you to restrict certain features of the plugin to specific user groups.
Administrators can use the Global Permissions Tab to define who can edit layouts, use advanced options, etc:
– pic –
Layout designers can use the Permissions Tab to define who can select their layout, who can edit panel content, etc:
– pic –
Site Administrators can also "lock" a layout for specific spaces to prevent Space Administrators from using the Layout Chooser.
And the rest...
Some of the other notable new features include:
- Full clustering support!
- Default menus are three times faster thanks to the new compound-menuitem macro
- Layouts can be changed at page level - eg. if you want a specific layout just for the home page in a space
- Users can select a different layout - eg. choosing a more accessible layout to view your wiki
- You can now create Sectional Navigation which changes based on your location within a Space
- Vastly improved colour picker
- Bigger text areas, many of which are now resizeable, when editing the configuration
- Improved caching to boost performance on huge wikis
- And lots, lots more...
We were originally going to release all these enhancements as version 2.1 but our beta testers were so impressed with the vast array of improvements that they demanded that we call in version 3!
Upgrading from Theme Builder 1.x
We strongly recommend that you upgrade to Theme Builder 2.x first and then upgrade to 3.x.
Theme Builder 1.x used a very basic configuration file which made it almost impossible for us to copy across visual settings and these will likely be lost or be incompatible with version 2 or above.
Theme Builder 3.x makes editing layouts much easier and it's probably worth taking the plunge and starting from scratch again to get the best possible results.
Upgrading from Theme Builder 2.x
You'll need to use the options on the Backup Tab to import your old Theme Builder 2.0 configuration files.
– pic –
You can either import an XML file from disk, or import theme configurations already present on your wiki. This process converts the Theme Builder 2.x configurations to centrally stored layouts that can then be used anywhere within your wiki.
Overview
Community Forums
Content Tools
Apps