
Manage Connections
Information on connecting GitLab instances and making changes.
You can find information on connecting GitLab instances and making changes here.
GitLab Cloud connections
Information about the connection GitLab for Miro creates with GitLab Cloud accounts.
The GitLab for Miro app uses OAuth to request permission to access your GitLab account on your behalf. You authorize the app directly on gitlab.com (your password is never shared with the app). The requested scopes are api and read_api, which cover read and write operations.
The connection is tied to your Miro user and is available on all your Miro boards. You can connect more than one gitlab.com account if needed.
Connect your first GitLab account.
In the GitLab for Miro panel, click Connect GitLab.
On the Type Selection screen, click .
A pop-up window opens pointing to gitlab.com. If your browser blocks pop-ups, allow it for this page and try again.
Keep the pop-up open until authorization is complete. If you close it early, restart these steps.
Sign in to your gitlab.com account if prompted, then review the requested permissions and click Authorize. The pop-up closes automatically.
The panel updates to show your connection.
Verify connection
After a successful connection, the GitLab for Miro panel shows your GitLab account in the Connections list. Your connection card displays your GitLab username (e.g., @username) and an OAUTH badge. From here, head back to Get Started to link your first project, or click the panel back/home control to go to the main view.
Connect an additional account
After creating one or more successful connections, to add another:
- In the GitLab for Miro panel, click Manage Connections.
- Click + New Connection.
- Click the GitLab Cloud (gitlab.com) option.
A pop-up window opens pointing to gitlab.com. If your browser blocks pop-ups, allow it for this page and try again.
Tip: Keep the pop-up open until authorization is complete. If you close it early, restart these steps. Sign in to your gitlab.com account if prompted, then review the requested permissions and click Authorize. The pop-up closes automatically. The panel updates to show your connection.
Disconnect a GitLab account
To remove a GitLab connection:
In the GitLab for Miro panel, navigate to the Connections view.
Find the desired connection card and click Remove.
A confirmation dialog appears. If any projects are linked to this connection, the dialog lists them and notes that they will be removed from the app. Work item cards already on your board are not affected, and no GitLab data is changed.
Confirm the removal.
For full connection management options (adding another account, managing team OAuth apps), see Manage Your Subscription.
Self-managed GitLab connections
This section is for Miro users connecting to a company-hosted or on-premises GitLab instance.
This section is for Miro users connecting to a company-hosted or on-premises GitLab instance. Connections made via OAuth application require a GitLab admin for the initial setup. Connections via Personal Access Token are self-serve for any individual user. Both methods give the app the same access: api and read_api scopes on your GitLab instance.
OAuth application vs Personal Access Token connections
| OAuth application | Personal Access Token | |
|---|---|---|
| Best for | Teams | Individual or quick setup |
| Setup | GitLab admin, once per team | Any user, no admin needed |
| Token management | Tokens refresh automatically | You recreate the token when it expires |
OAuth application connection
Information on creating application connections via OAuth.
A GitLab admin at your organization must complete steps 1-7 once. After that, any team member on the same Miro team can connect their own account without repeating the admin steps.
- In the GitLab for Miro panel, click Connect GitLab, then select Self-Managed GitLab.
- On the Authentication method screen, click OAuth Application.
- The Setup OAuth Application wizard opens. It has seven steps, shown by dot indicators at the top:
- Step 1: The wizard confirms what you need: GitLab admin access and your instance URL.
- Step 2 (Access Admin Area): Go to your GitLab instance Admin Area. The URL follows this pattern:
https://your-instance.example.com/admin/applications. - Step 3 (Create new application): In the Admin Area, go to Applications and click New application.
- Step 4 (Fill in application details): Fill in the form with these exact values:
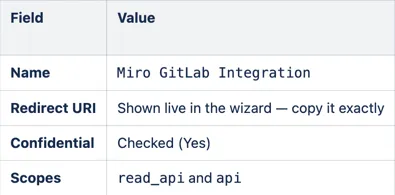 If the Redirect URL in the wizard shows, "Loading...", the app backend is not reachable. Check that the app is installed from the Miro marketplace and that you have an active internet connection.
 - Step 5 (Save the application): Click Save application at the bottom of the form.
- Step 6 (Copy credentials): GitLab displays the Application ID and a Secret. Copy both values now. The secret is only shown once. Do not navigate away from this page unti you have copied and saved it.
- Step 7 (Enter credentials in the app): Return to the wizard and fill in: GitLab Instance URL (e.g., https://gitlab.example.com), Application ID (Client ID), Secret (Client Secret).
- Click Create Application.
The app shows an OAuth Application Saved confirmation screen with the prompt: "Would you like to connect now?".
Click Yes, Connect to authorize your own account immediately.A pop-up opens on your GitLab instance; authorize it, and the popup closes with a SuccessfullyConnected confirmation.
Click No, Later to finish setup without connecting your personal account right now.
Connect a Self-Managed account as a team member
Instructions for non-admin team members to connect Self-Managed GitLab accounts.
Once an admin has registered the OAuth application, other Miro team members see it in their connections view as a card showing the instance URL, an OAuth App badge, and the note "Configured by [username]."
To connect your account:
- In the Connections view, find the OAuth app card for your instance.
- Click Connect (or Connect another account if others have already connected).
- Authorize in the pop-up window that appears.
Remove an OAuth application
How to remove a connection made via OAuth application.
- In the Connections view, find the OAuth app card for your instance.
- Click Connect (or Connect another account if others have already connected).
- Authorize in the pop-up window that appears.
Personal Access Token connections
Information on managing connections made via Personal Access Token.
Administrator access is not required to connect via Personal Access Token (PAT). You'll create a token in your GitLab user settings and paste it into the app. Tokens have an expiry date; when yours expires, you will need to create a new one and reconnect.
Create a PAT and connect
In the GitLab for Miro panel, click Connect GitLab, then select Self-Managed GitLab.
On the Authentication method screen, click Personal Access Token.
The Connect with Personal Access Token wizard opens (6 steps).
Step 1 (Access User Settings): Click your GitLab avatar (top right) and select Preferences.
Step 2 (Navigate to Personal Access Tokens): In the left sidebar, click Personal access tokens (under User Settings).
Step 3 (Fill in token details): Click Add new token and fill in:
Token name:
Miro GitLab Integration(or any name you will recognize)Expiration date: Set to the maximum your admin allows, or about 1 year
Scopes: Check both
read_apiandapi
Step 4 (Create the token): Click Create personal access token.
Step 5 (Copy the token): GitLab shows your new token (format:
Copy the token immediately — it is only shown once. If you navigate away without copying it, you will need to create a new one.glpat-xxxxxxxxxxxxxxxxxxxx). Copy it now.Step 6 (Enter connection details): Return to the wizard and fill in:
GitLab Instance URL (e.g.,
https://gitlab-instance.yourdomain.com)Personal Access Token (paste the
glpat-...value you just copied)
Then click Connect.
The panel shows "Successfully Connected" with a green check. Your connection card in the Connections view shows your GitLab username and a Personal Access Token badge.
Personal Access Token expiration
The app will warn you before your token expires. When it does expire:
Go to your GitLab instance and create a new Personal Access Token with the same scopes (
read_apiandapi).In the Miro panel, go to the connections view and click Add Connection.
Follow the PAT wizard again with the new token.
Revoke a PAT in GitLab
Removing a PAT connection in the app disconnects it on the Miro side, but does not revoke the token in GitLab.To fully revoke access:
Go to your GitLab instance → User Settings → Preferences → Personal access tokens.
Find the
Miro GitLab Integrationtoken in the list.Click the overflow menu (three dots) and select Revoke.