
Fragments Tutorial
Fragments allow you to customize the UI of your Jira instance. Examples are hiding a button, adding a banner, adding a button, or customizing how areas of your Jira instance look.
Before you start this tutorial, make sure you have read the Fragments page for a feature overview. We also recommend that you familiarise yourself with the Atlassian documentation on web fragments.
Continue reading below for an overview of the key terms you see when creating a UI fragment. Once you're happy with your understanding of UI fragments, try out some of the guided examples below.
Key terms
There are many terms used within our UI Fragment documentation that may be unfamiliar to you. The following table explains these terms:
| Term | Description |
|---|---|
Web fragments | A web fragment can be any of the following within the Jira interface:
For example, all menus on the top navigation bar of Jira are web fragments. In addition, the links within those menus are also web fragments. |
UI fragments | UI fragments are web fragments created using ScriptRunner. We have a number of built-in scripts that you can use to create a variety of web fragments. |
| Web item | A web item is a link—this could display as a button or an option on a drop-down menu. |
| Web panel | A web panel is an area of HTML content that typically looks like a banner—this could be a banner that displays an announcement to all users of the Jira instance, or a banner that displays to specific user. Banners can also contain links, however the links within a banner, or web panel, aren't considered to be web items. |
| Web section | A web section is an area within an application menu that can contain web items. |
| Web resource | A web resource allows you to include JavaScript and CSS resources into certain contexts. A web resource allows plugins to define downloadable resources. You can find full details in the Atlassian Web resource documentation. |
| Fragment locations | Fragment locations are where you place your UI fragments. For example, if you want to create a button (web link), or banner (web panel), you need to know where to put it. We have a page on Fragment Locations that you can refer to. Alternatively, if you want a complete list of fragment locations, or if you require binding variables for a fragment location, you should enable the fragment locator. |
| Weight | Some built-in UI fragments give you the option to define a weight. The weight given to a UI fragment determines the order it appears on the screen. For example, if you have created two web items in the same location the weight can determine which fragment displays first. Weight field For some locations, setting the Weight to a number below 9 may cause existing Atlassian elements to be overwritten. If an issue is found, increasing the weight value will likely resolve the problem. |
| Key | Some built-in UI fragments give you the option to define a key. The key is the unique identifier you are giving for that UI fragment. |
Available built-in UI fragments
We have developed a number of built-in UI fragments for you to use to customize your Jira instance:
- Custom web item: Create a custom link or button in a location of your choice.
- Show a web panel: Create a section of HTML content, such as a custom banner, in a location of your choice.
- Create a custom web section: Create a new area, within a location of your choice, that can be used to hold web items.
- Hide system or plugin UI element: Hide buttons, menus, or other UI elements so they are no longer visible for users.
- Constrained create issue dialog: Create a menu item that opens the Create Issue dialog with a predefined project and issue type.
- Planning board context menu item: Create a menu item in the context menu (right-click) of issues in a Scrum or Kanban board.
- Install web resource: Include JavaScript and CSS resources into certain contexts.
- Custom web item provider: Dynamically generate web items according to the current circumstances.
- Raw xml module: Customize your UI using XML alone.
Examples
The following examples walk you through how to use our web fragments feature, starting with simple examples and then moving to more complex examples:
- Create a simple web item
- Create a simple web panel
- Create a drop-down list
- Hide a UI item from certain users
What is Great Adventure?
Great Adventure is the fictitious company we use to help provide use cases and examples of concepts covered. Great Adventure is a company that organizes specialized holidays for the discerning tourist.
Create a simple web item (add a button to top navigation bar that links to a website)
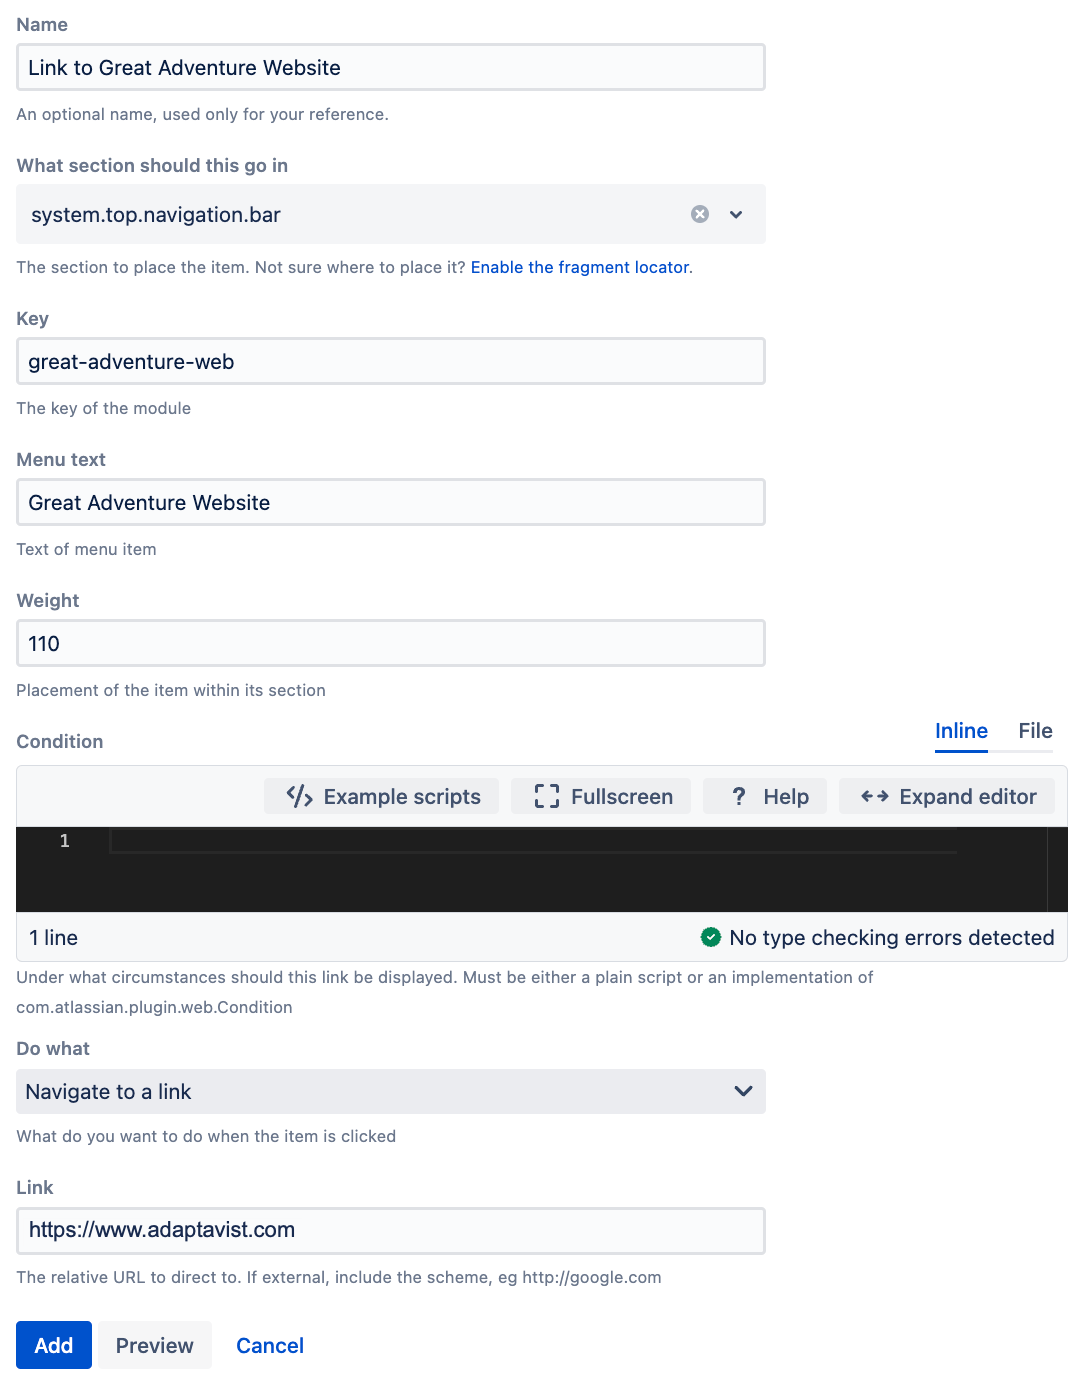
Great Adventure wants to add a button to the top navigation bar of Jira that leads back to their main website. Using the Web Item Locations page, Great Adventure knows that they want to put their button in the system.top.navigation.bar fragment location.
- From ScriptRunner, navigate to Fragments.
- Select Create Fragment.
- Select Custom web item.
- Enter a name for the web item. In this example, we enter
Link to Great Adventure Website. - Select
system.top.navigation.barfor the section this web item should go in. - Enter a key for the web item. In this example, we enter
great-adventure-web. - Enter the menu text for the web item. This is the button text that displays. In this case we enter
Great Adventure Website. - Optional: Enter a weight for the web item. In this example, we enter
110so the button appears to the right of the Assets/Insight menu. - Optional: Enter a condition for the web item. For example, you could make sure the button only displays for certain users.
- Select Navigate to a link from the drop-down list.
- Enter a link for the website. You should use a URL of your choice—in this example we enter a fictitious website URL.
- Select Add.
You can now refresh the page to see if this web item has been added.
Create a simple web panel (create an announcement banner on the Service Desk portal screen)
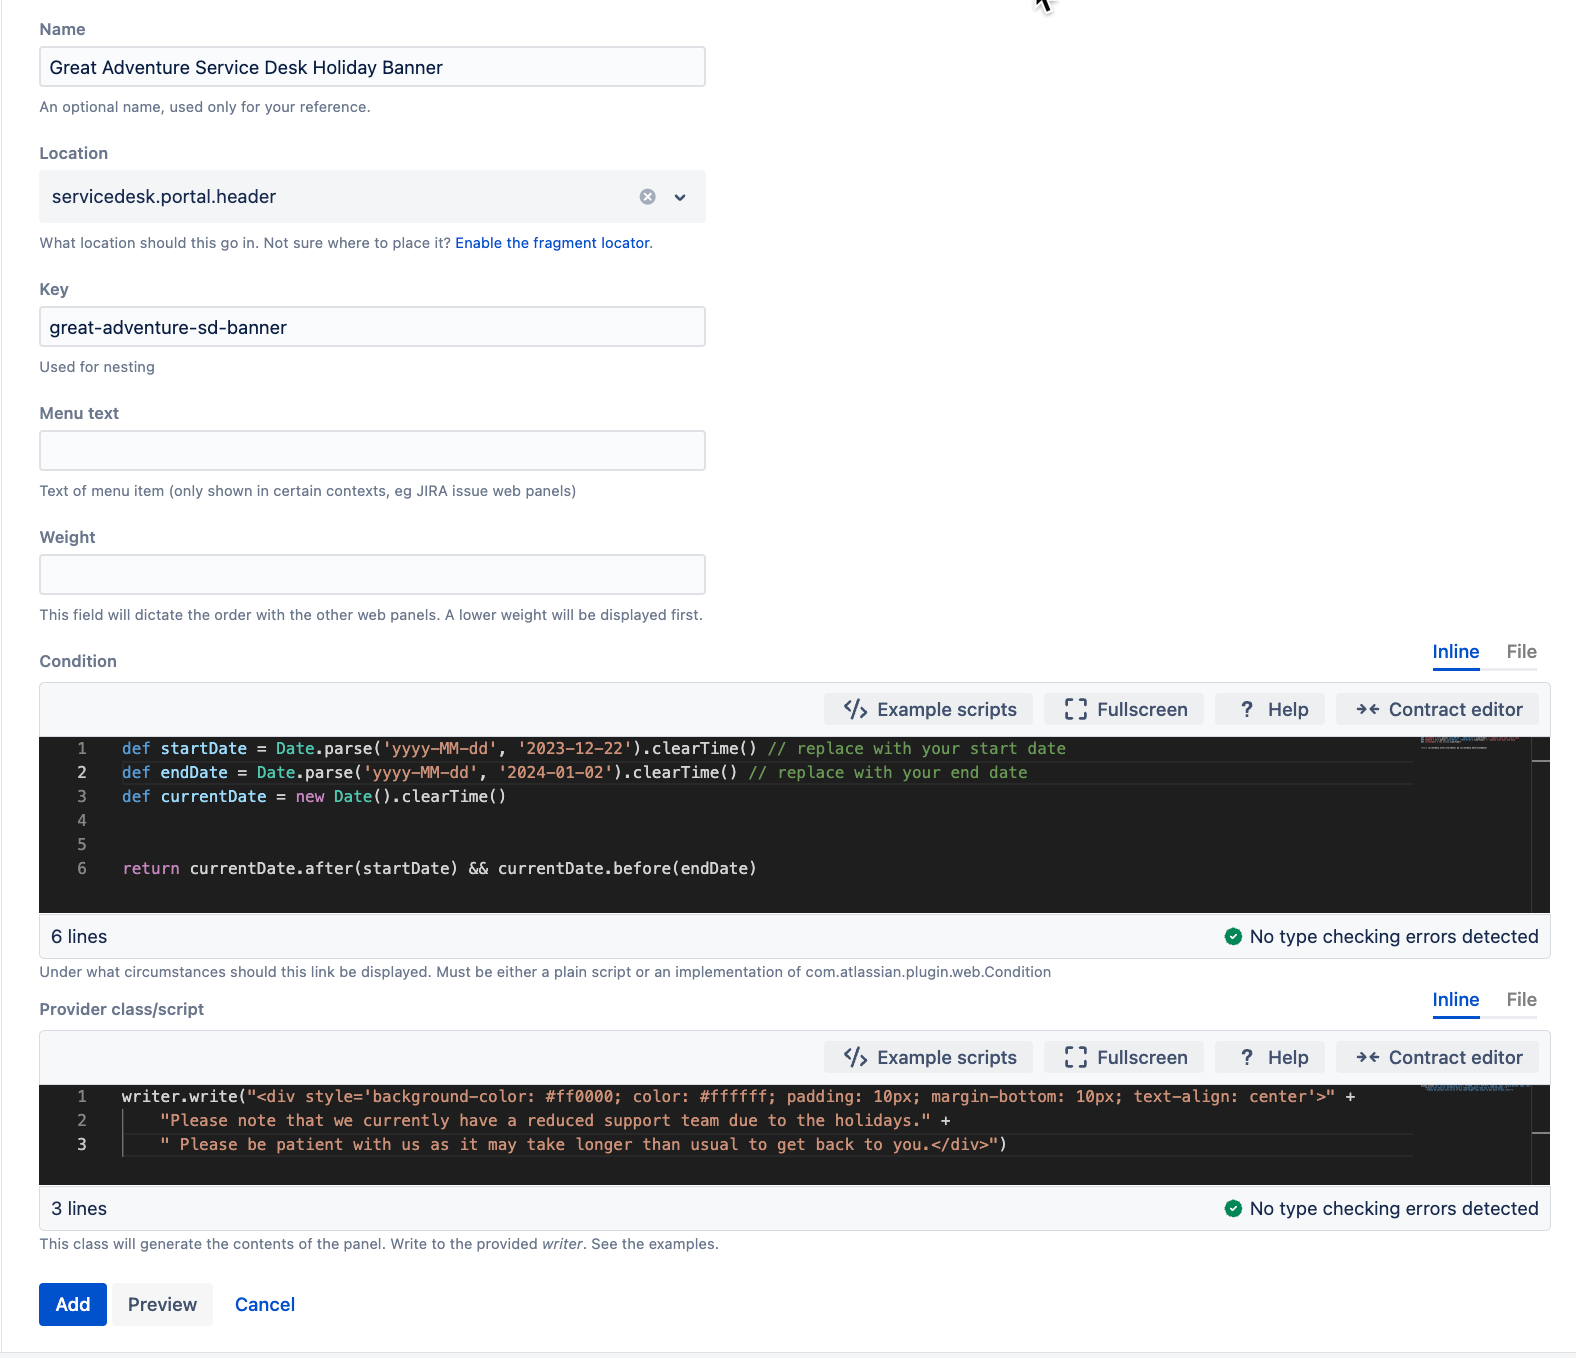
It's coming up to the holidays and Great Adventure wants to put an announcement banner on their Service Desk portal to make users aware that there will be less staff than usual to handle any issues. They also want the announcement banner to only display between a set date. Using the Web Panel Locations page, Great Adventure knows that they want to put their banner in the servicedesk.portal.header fragment location.
- From ScriptRunner, navigate to UI Fragments.
- Select Create Fragment.
- Select Show a web panel.
- Enter a name for the web panel. In this example we enter
Great Adventure Service Desk Holiday Banner. - Select
servicedesk.portal.headerfor the section this web panel should go in. - Enter a key for the web item. In this example we enter
great-adventure-sd-banner. - Optional: Enter a weight for the web panel. Weight is only necessary if you have other banners in the same location and wish to have them in a specific order.
Enter a condition for the web panel. In this example we enter a condition so this web panel only displays during a certain time.
groovydef startDate = Date.parse('yyyy-MM-dd', '2023-11-26').clearTime() // replace with your start date
def endDate = Date.parse('yyyy-MM-dd', '2023-11-28').clearTime() // replace with your end date
def currentDate = new Date().clearTime()

return currentDate.after(startDate) && currentDate.before(endDate)
Enter a script that displays the banner text. In this example we enter the following:
groovywriter.write("<div style='background-color: #ff0000; color: #ffffff; padding: 10px; margin-bottom: 10px; text-align: center'>" +
    "Please note that we currently have a reduced support team due to the holidays." +
    " Please be patient with us as it may take longer than usual to get back to you.</div>")
Select Add.
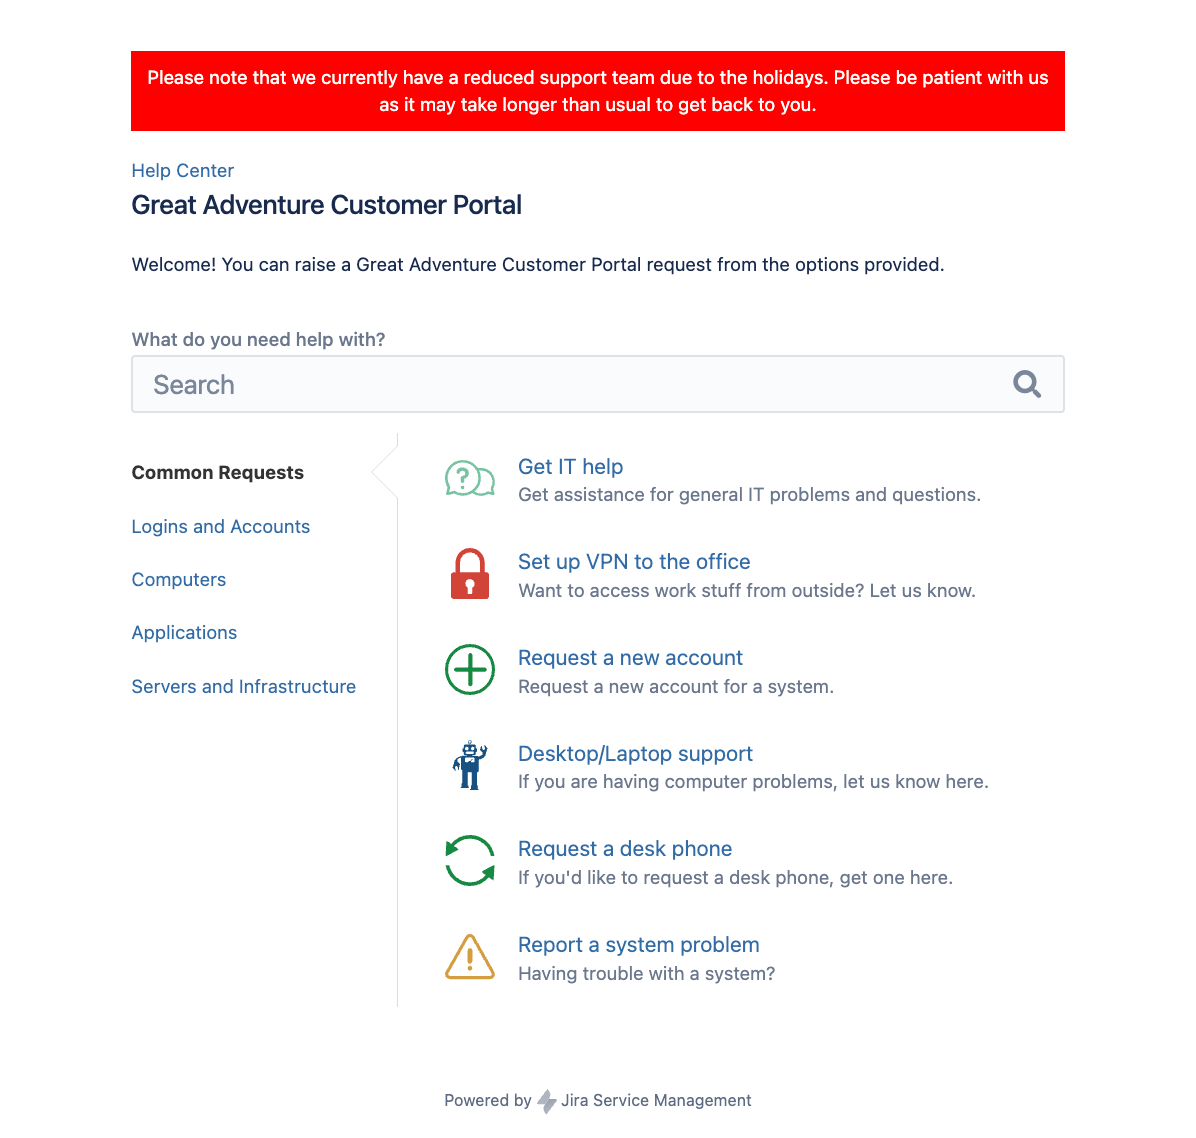
You can test to see if this banner looks correct by adjusting the dates of the condition.
Create a new drop-down list using web items and a web section
Limitations
Due to restrictions within Jira you can only create a drop-down list in the top navigation bar.
Great Adventure wants to create a drop-down list in the top navigation bar with links to other important pages. To create a drop-down list, Great Adventure needs split this task into three main steps:
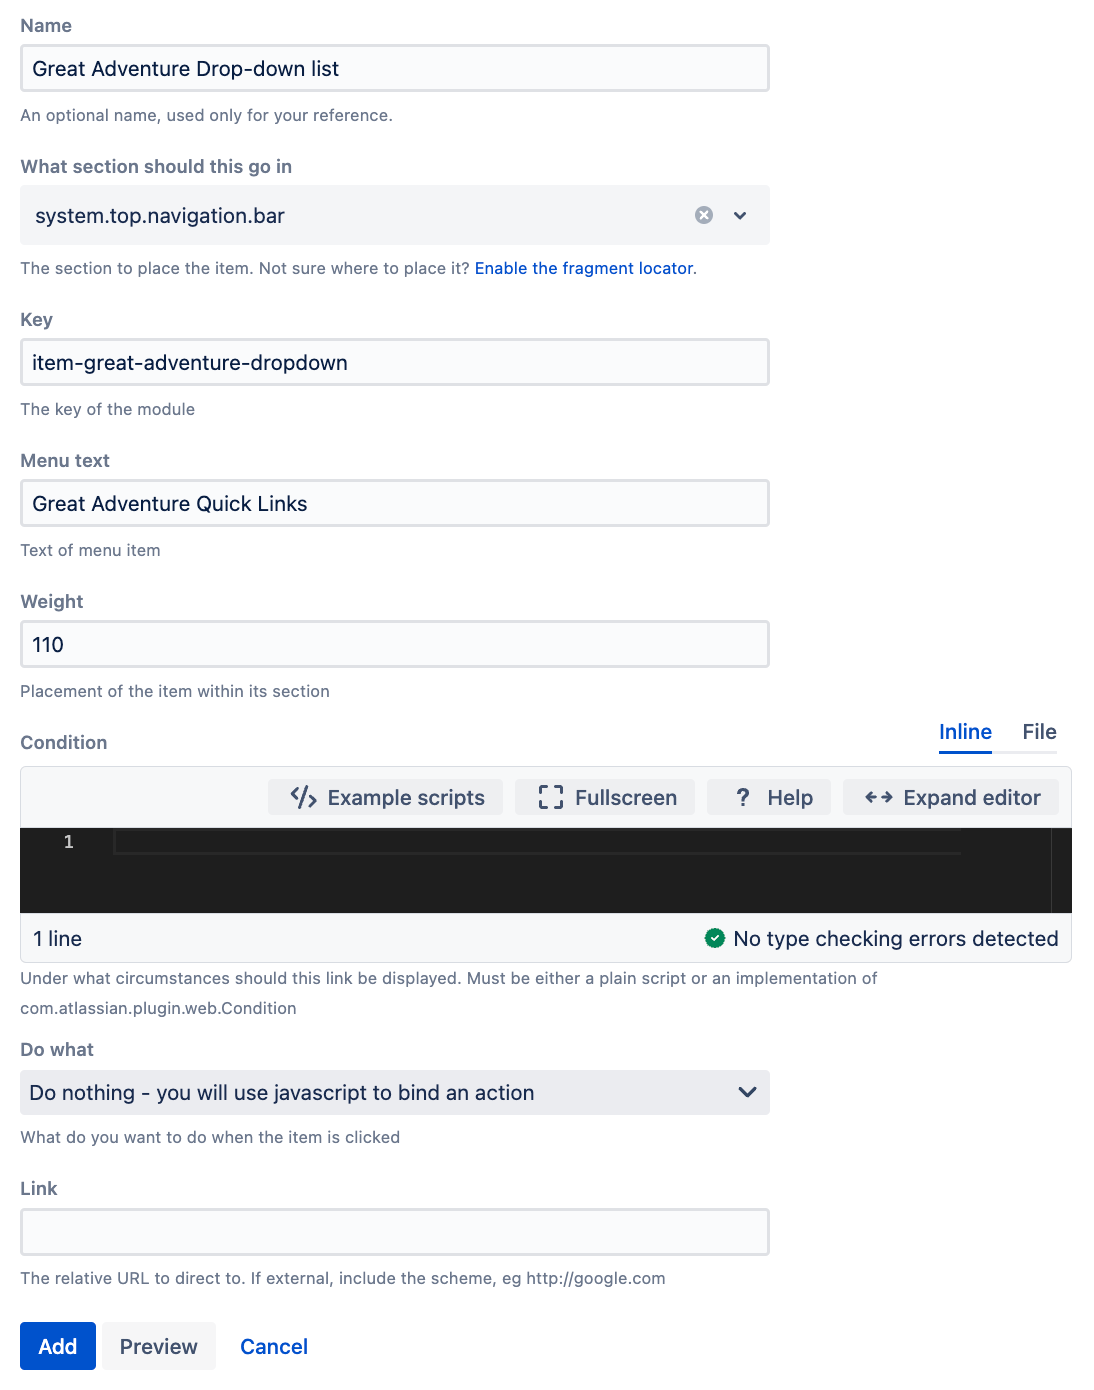
- Add a web item to
system.top.navigation.bar. - Add a web section to web item created in step 1.
- Add web items to the web section created in step 2.
The above steps are described in detail below:
Add a web item
- From ScriptRunner, navigate to UI Fragments.
- Select Create Fragment.
- Select Custom web item.
- Enter a name for the web item. In this example, we enter
Great Adventure Drop-down list. - Select
system.top.navigation.barfor the section this web item should go in. - Enter a key for the web item. In this example, we enter
item-great-adventure-dropdown. - Enter the menu text for the web item. This is the button text that displays. In this case we enter
Great Adventure Quick Links. - Optional: Enter a weight for the web item. In this example, we enter
110so the button appears to the right of the Assets/Insight menu. - Select Do nothing - you will use javascript to bind an action from the drop-down list.
- Select Add.
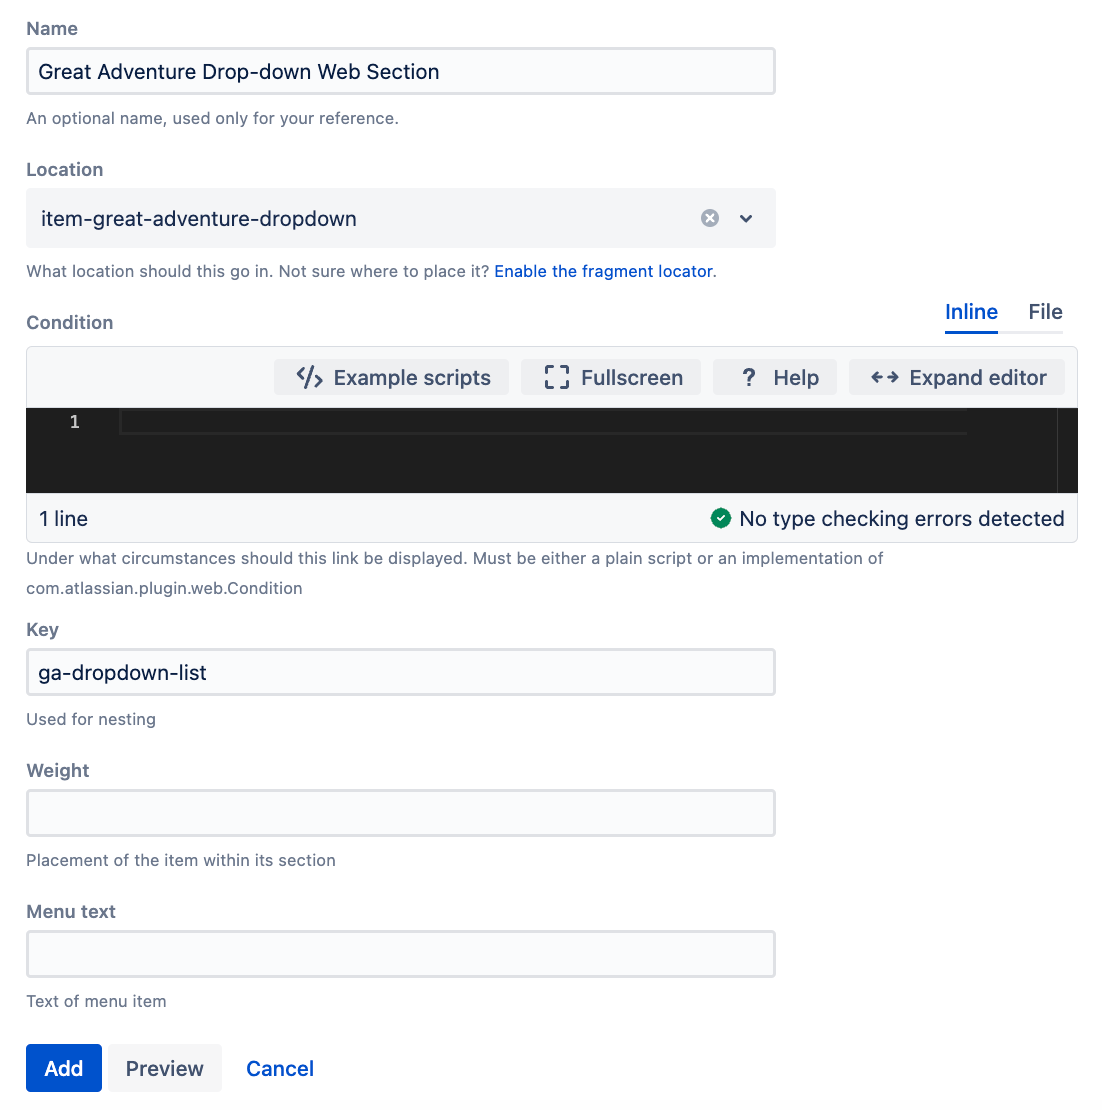
Add a web section to the web item
- Select Create Fragment.
- Select Create a custom web section.
- Enter a name for the web item. In this example, we enter
Great Adventure Drop-down Web Section. - Select
item-great-adventure-dropdownfor the location of the web section. This is the key name we chose in Add a web item. - Optional: Enter a condition for the web section. For example, you could make sure the web item only displays for certain users.
- Enter a key for the web section. In this example, we enter
ga-dropdown-list. - Select Add.
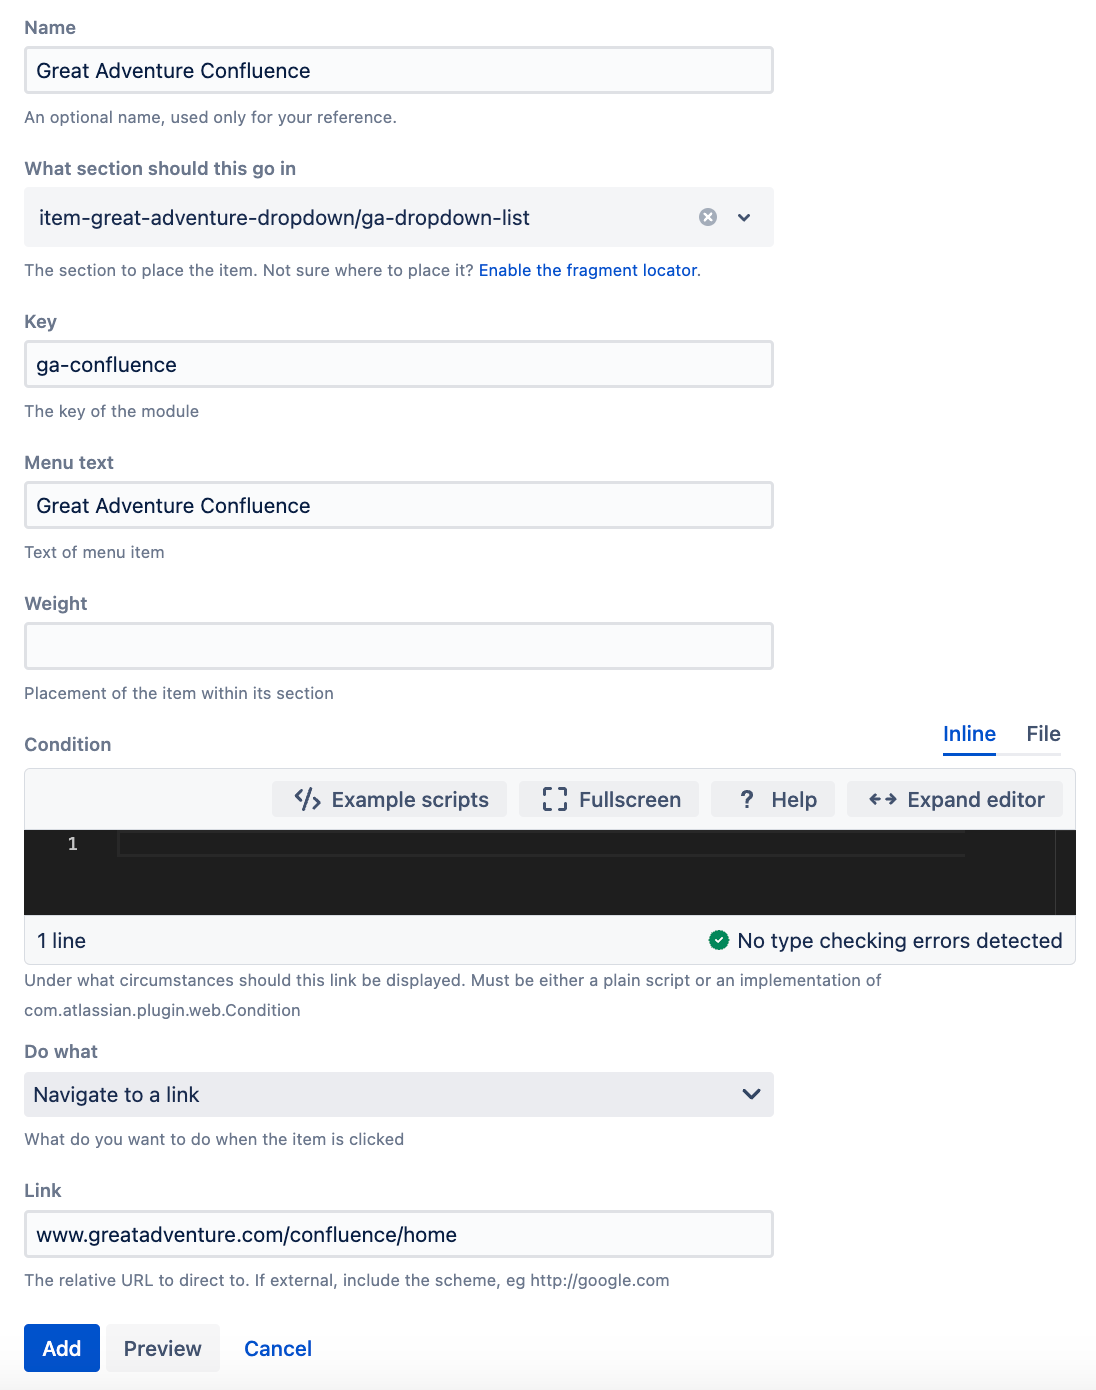
Add web items to the web section
- Select Create Fragment.
- Select Custom web item.
- Enter a name for the web item. In this example, we enter
Great Adventure Confluence. - Select
item-great-adventure-dropdown/ga-dropdown-listfor the location of the web item. This is the location generated from the two keys we entered in Add a web item and Add a web item to the web section. - Enter a key for the web item. In this example we enter
ga-confluence. - Enter the menu text for the web item. This is the button text that displays. In this case, we enter
Great Adventure Confluence. - Optional: Enter a weight for the web item. We recommend you add a weight if you have multiple items in the drop-down and wish to order them.
- Select Navigate to a link from the drop-down list.
- Enter a link for the website. You should use a URL of your choice—in this example we enter a fictitious website URL.
- Select Add.
You can now test this new drop-down list: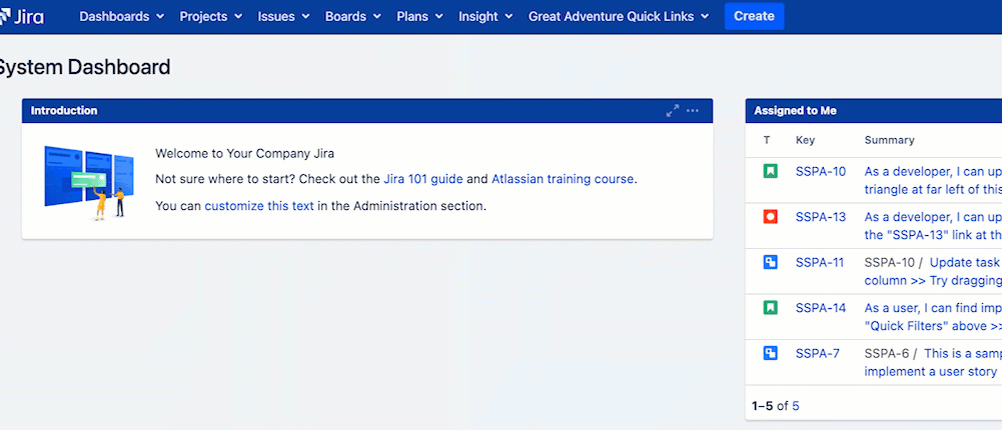
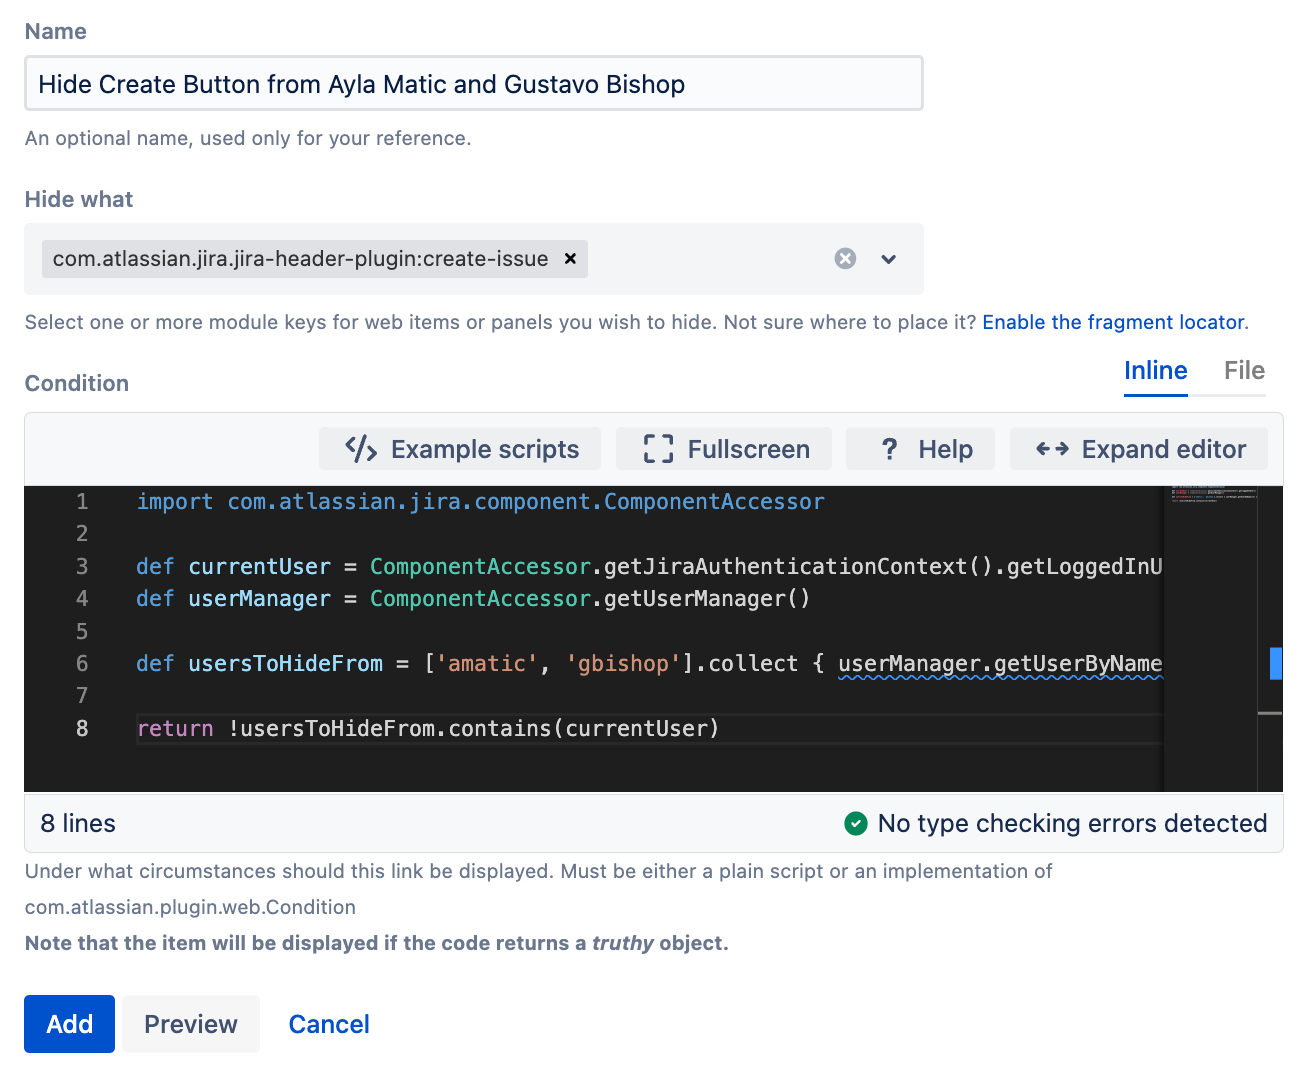
Hide a UI item for certain users (hide the Create button from certain users)
Great Adventure wants to stop certain users from creating issues. To do this, Great Adventure wants to hide the Create button from Ayla Matic and Gustavo Bishop.
- From ScriptRunner, navigate to UI Fragments.
- Select Create Fragment.
- Select Hide system or plugin UI element.
- Enter a name for the UI fragment. In this example, we enter
Hide Create Button from Ayla Matic and Gustavo Bishop. - For Hide what enter
com.atlassian.jira.jira-header-plugin:create-issue. Enter the following condition:
groovyimport com.atlassian.jira.component.ComponentAccessor def currentUser = ComponentAccessor.getJiraAuthenticationContext().getLoggedInUser() def userManager = ComponentAccessor.getUserManager() def usersToHideFrom = ['amatic', 'gbishop'].collect { userManager.getUserByName(it) } // replace usernames return !usersToHideFrom.contains(currentUser)- Select Add.
You can test if this UI fragment has worked using the Switch User feature.