[All Adaptavist Apps]
View and Edit Menus
This tutorial shows you how to customise items on the View and Edit menus in Builder 1.6...
Menu Classes
The menu items on the View and Edit menu each have a unique class name that allows them to be customised using style sheets.
We'll discuss the various style sheets that can be applied later in this tutorial, but first you will need to know what all the class names are and which menus they relate to:
- View Menu Structure – comprehensive overview of the in-built View menu
- Edit Menu Structure – comprehensive overview of the in-built Edit menu
If you require complete control over the View and Edit menus, please upgrade to Theme Builder 2 or above.
Style Sheets
If you want to apply style sheets to all pages within a space, and therfore the menus throughout that space, add your styles to the CSS Custom Styles setting in Theme Configuration.
For example, to hide the News menu item on all pages in a space, add:
.menu-news {
 display: none;
 visibility: hidden;
}
If you want to apply styles to a specific page use the style macro within that page, for example:
{style}
.menu-news {
 display: none;
 visibility: hidden;
}
{style}
If you want to apply the same styles to several pages, you should consider writing a User Macro that simply outputs those styles when added to a page, for example:
<style type="text/css">
.menu-news {
 display: none;
 visibility: hidden;
}
</style>
If you want to apply the styles to specific users or user groups, etc., please see our tutorial on Personalising Menus.
The following examples give just a taster of what can be done with style sheets, and we've applied all of these examples to this page using the style macro so you can see them in action...
Hiding Menus and Menu Items
To hide the News item on the View > Other Pages menu and the Edit > New menu, use:
.menu-news {
 display: none;
 visibility: hidden;
}
Both these items have the same name - in many cases, if you're not adding news you don't want to view it and vice versa.
If you want to be more specific, however, you can specify which menu the item is in as follows:
.sub-menu-other-pages .menu-news {
 display: none;
 visibility: hidden;
}
Never hide the first item on a sub-menu as it will cause subsequent views of the menu to move further and further down the screen, eventually disappearing!
To hide the separator above the Account item on the View menu, use:
.menu-separator-view-1 {
 display: none;
 visibility: hidden;
}
To hide the Account item on the View menu (and therefore the whole Account sub-menu), use:
.menu-account {
 display: none;
 visibility: hidden;
}
Text Prefixes and Suffixes
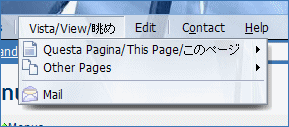
You can add text prefixes and suffixes to menu items if your users have a modern web browser such as Firefox:
Most modern browsers (and hopefully Internet Explorer from version 7 onwards) allow you to add translations or other text to the menus.
To add text before and after the View menu button, use:
.menu-view div:before {
 content: "Vista / ";
}

.menu-view div:after {
 content: " / ??";
}
Note: Some languages, such as Japanese, require availability of Unicode fonts on the viewers computer.
To add text before and after the This Page item on the View menu, use:
.menu-this-page td.label:before {
 content: "Questa Pagina / "
}

.menu-this-page td.label:after {
 content: " / ????? ";
}
Colours
To set the background colour of the Other Pages sub-menu on the View menu, use:
.sub-menu-other-pages div div div div {
 background-color: #FFFFC0;
}
To set the background colour of the Printable View on the View > This Page menu, use:
.menu-printable-view {
 background-color: #C0FFFF;
}
To set the text color of the Other Pages item on the View menu, use:
.menu-other-pages td.label {
 color: #FF0000 !important;
}
Make sure you specify the "!important" flag, otherwise the colour won't change.
