
Behaviours Tutorial
For a video on behaviours, see the Using Behaviours training video.
Before you start this tutorial, make sure you've read the Behaviours page to understand what behaviours are and how to use them. You may also find it useful to learn about the limitations of behaviours.
Continue below for an overview of the screens you see when you're creating a behaviour. Once you're happy with your understanding of behaviours, try out some examples we've provided below.
Behaviour screen overview
When you create a new behaviour, the following sections display:
- Mappings: Where you set the project/issue type mapping. For Service Desk projects this is where you set the project/request type mappings. The mappings determine what contexts trigger the configured behaviour.
Behaviour Settings: Where you give your behaviour a name and description. You can also define a guide workflow.
- Initialiser: Where you define a script that runs as soon as the issue create, edit, or transition screen displays (use to set default field states, values, and options).
Fields: Where you can define field states using simple toggle options. For more advanced control you can use a Groovy script (server-side script). With a server-side script you can define more complex conditions to control the field state, value, and options using Groovy. In addition, you can control how the field impacts other fields when changed.
Hover over each section in the image below to find out more.
When you choose Add Mapping more options display. Hover over each section in the image below to find out more.
If you choose Add a Field more options display. Hover over each section in the image below to find out more.
If you choose Add new condition more options display. Hover over each section in the image below to find out more.
Using multiple conditions on a field
You can set conditions on fields to control when they should be shown or hidden depending on the context provided. When setting a condition you can choose When (the behaviour will happen if condition is true) or Except (the behaviour will not happen if condition is true). When you have multiple conditions on the same field, the behaviour runs provided that:
- No Except conditions are
true, - AND at least one When condition is
true, OR there are no When conditions.
Should I add an initialiser or server-side script?
You do not need to set up an initialiser or server-side script for every behaviour, only when you want the behaviour to run as described below.
When setting up a behaviour you may want to determine when your behaviour runs:
- If you want the behaviour to run when the Create Issue, Edit Issue, or Transition issue page loads, set up an Initialiser. For example, you can use an initialiser in a behaviour to set a default description every time an issue is created.
- If you want the behaviour to run every time a user updates the value of a field, set up a server-side script to react to the user input. The option to add a server-side script appears once you have added a field. With a server-side script you can define more complex conditions to control the field state, value, and options. In addition, you can control how the field impacts other fields when changed. For example, you can use a server-side script in a behaviour to validate if "other" is selected in a select-list and show or hide an additional "other" option field.
Examples of behaviours
The following are simple examples for you to follow so you understand how behaviours work. Check out our Behaviours Examples documentation for more examples.
Create a simple behaviour (make a field read-only except for a certain role)
Before you start this tutorial, create a select list custom field called Customer Type with the following options:
Small Business - For-profit
Large Business - For-profit
General Training License
If you're using a test project, make sure this custom field is associated with the appropriate screens in your test project.
For this activity we're going to build a behaviour that restricts a custom field called Customer Type to only project administrators. You can use this same approach in your lab environment, or you can experiment with a different field or behaviour condition.
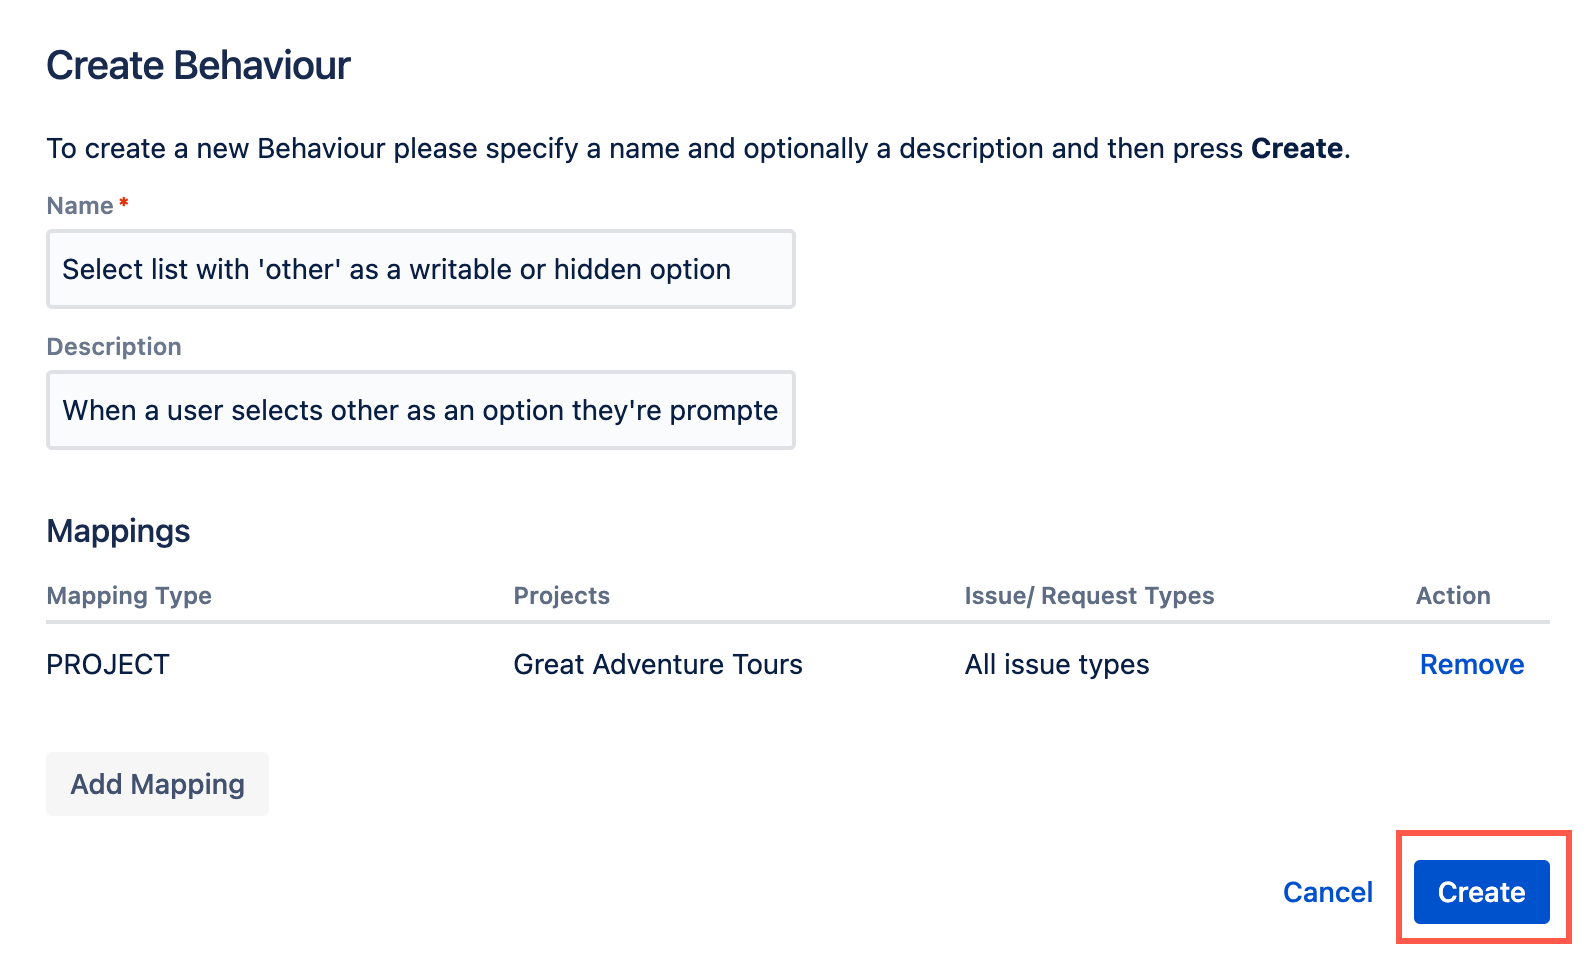
- From ScriptRunner, navigate to Behaviours.
- Select Create Behaviour.
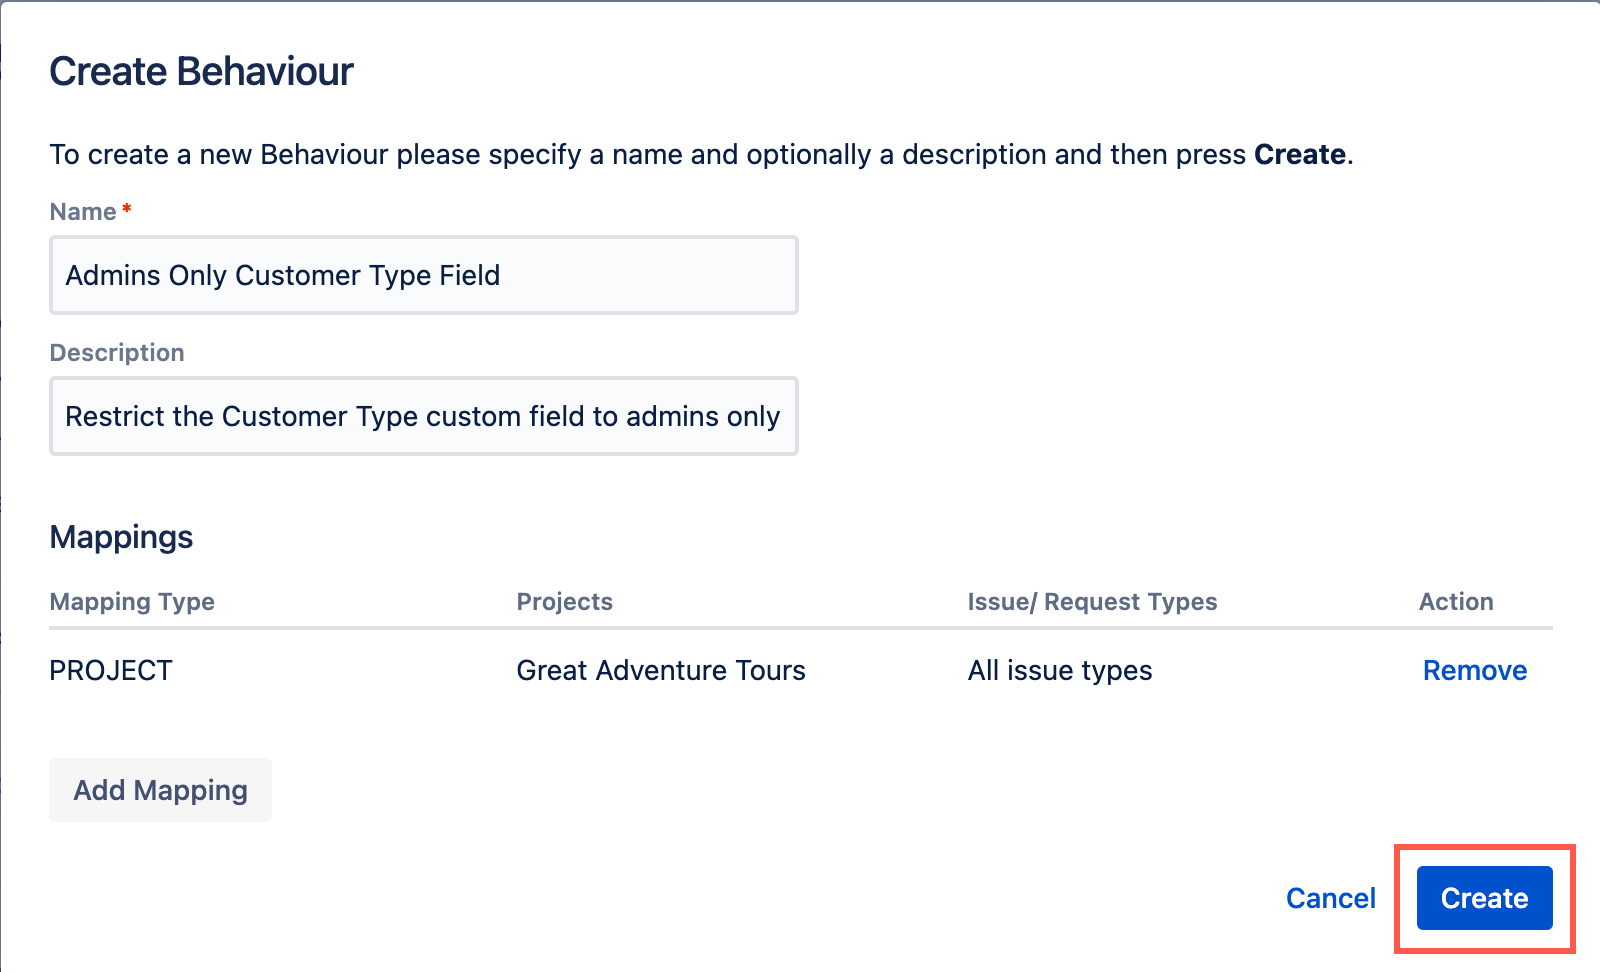
- Enter a name for the behaviour. In this case we enter
Admins Only Customer Type Field. - Enter a description for the behaviour. This field is optional but in this case we enter
Restrict the Customer Type custom field to admins only. - Select Create Mapping.
- Then select the project and issue type(s) to map this behaviour to. In this case we chose the Great Adventure Tours project and All issue types.
- Select Add Mapping to confirm the mapping.
Select Create to create the behaviour.
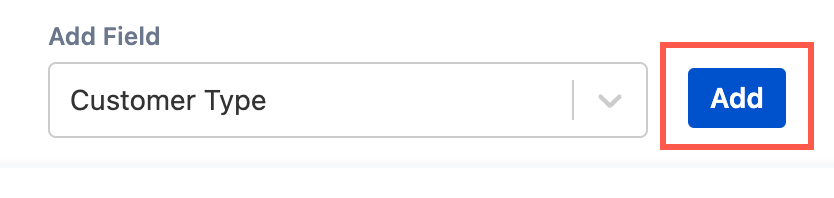
You're taken to a screen where you can configure the behaviour further.Scroll to the Add Field field, select the Customer Type field, and then select Add.
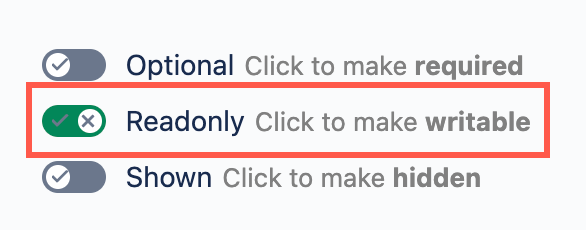
You can now configure the options for Customer Type.- Edit the Writable/Readonly field so it displays Readonly. This makes the field read only.
- Select Add new condition. The Add condition pop-up displays.
- Configure the condition as follows:
- Select Except for Applicability.
- Select User in project role for Condition.
- Select Administrators for Project role.
Select Add.
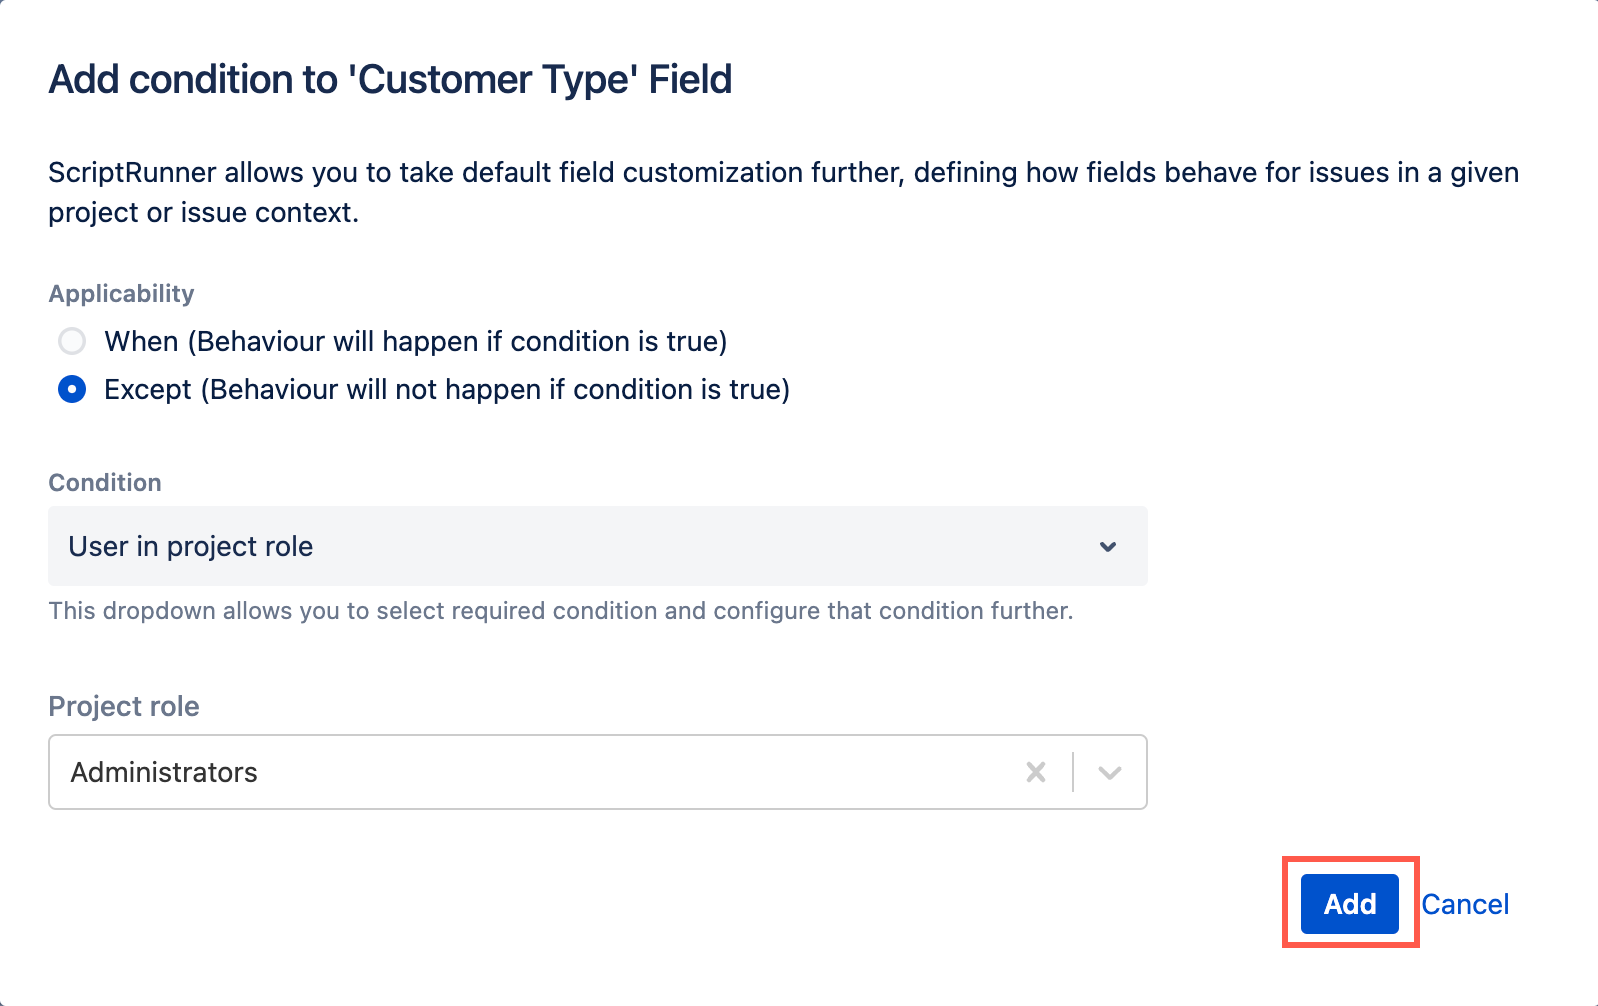
This condition means that the Readonly configuration does not occur if the condition is true. The condition is true if the logged in user belongs to the Administrators project role.If you only had one administrator or had a group specific to Administrators then you could also use the Current user is or Current user in group condition.
Select Save Changes.
Congratulations! You've created a behaviour!You can test to see if this behaviour works by using the switch user function.
Create a select list with 'other' as a writable or hidden option
Before you start this tutorial, create a select list (single choice) custom field called Favorite Fruit with the following options:
Apple
- Orange
- Banana
- Grapes
- Other
Also create a text field custom field called Favorite Fruit (Other). If you're using a test project, make sure the custom fields are associated with the appropriate screens in your test project.
If you want the Favorite Fruit (Other) field to display below the Favorite Fruit field, you may have to configure the screen(s) the fields are associated with.
For this activity we're going to build a behaviour so that when the Other option is selected in a Favorite Fruit select list (single choice), the Favorite Fruit (Other) custom field appears and allows you to type what the 'Other' answer is. Additionally, the Favorite Fruit (Other) custom field is hidden if the 'Other' option is not selected.
- From ScriptRunner, navigate to Behaviours.
- Select Create Behaviour.
- Enter a name for the behaviour. In this case we enter
Select list with 'other' as a writable or hidden option. - Enter a description for the behaviour. This field is optional but in this case we enter
When a user selects other as an option they're prompted to enter the option in another text field. - Select Create Mapping.
- Then select the project and issue type(s) to map this behaviour to. In this case we chose the Great Adventure Tours project and All issue types.
- Select Add Mapping to confirm the mapping.
Select Create to create the behaviour.
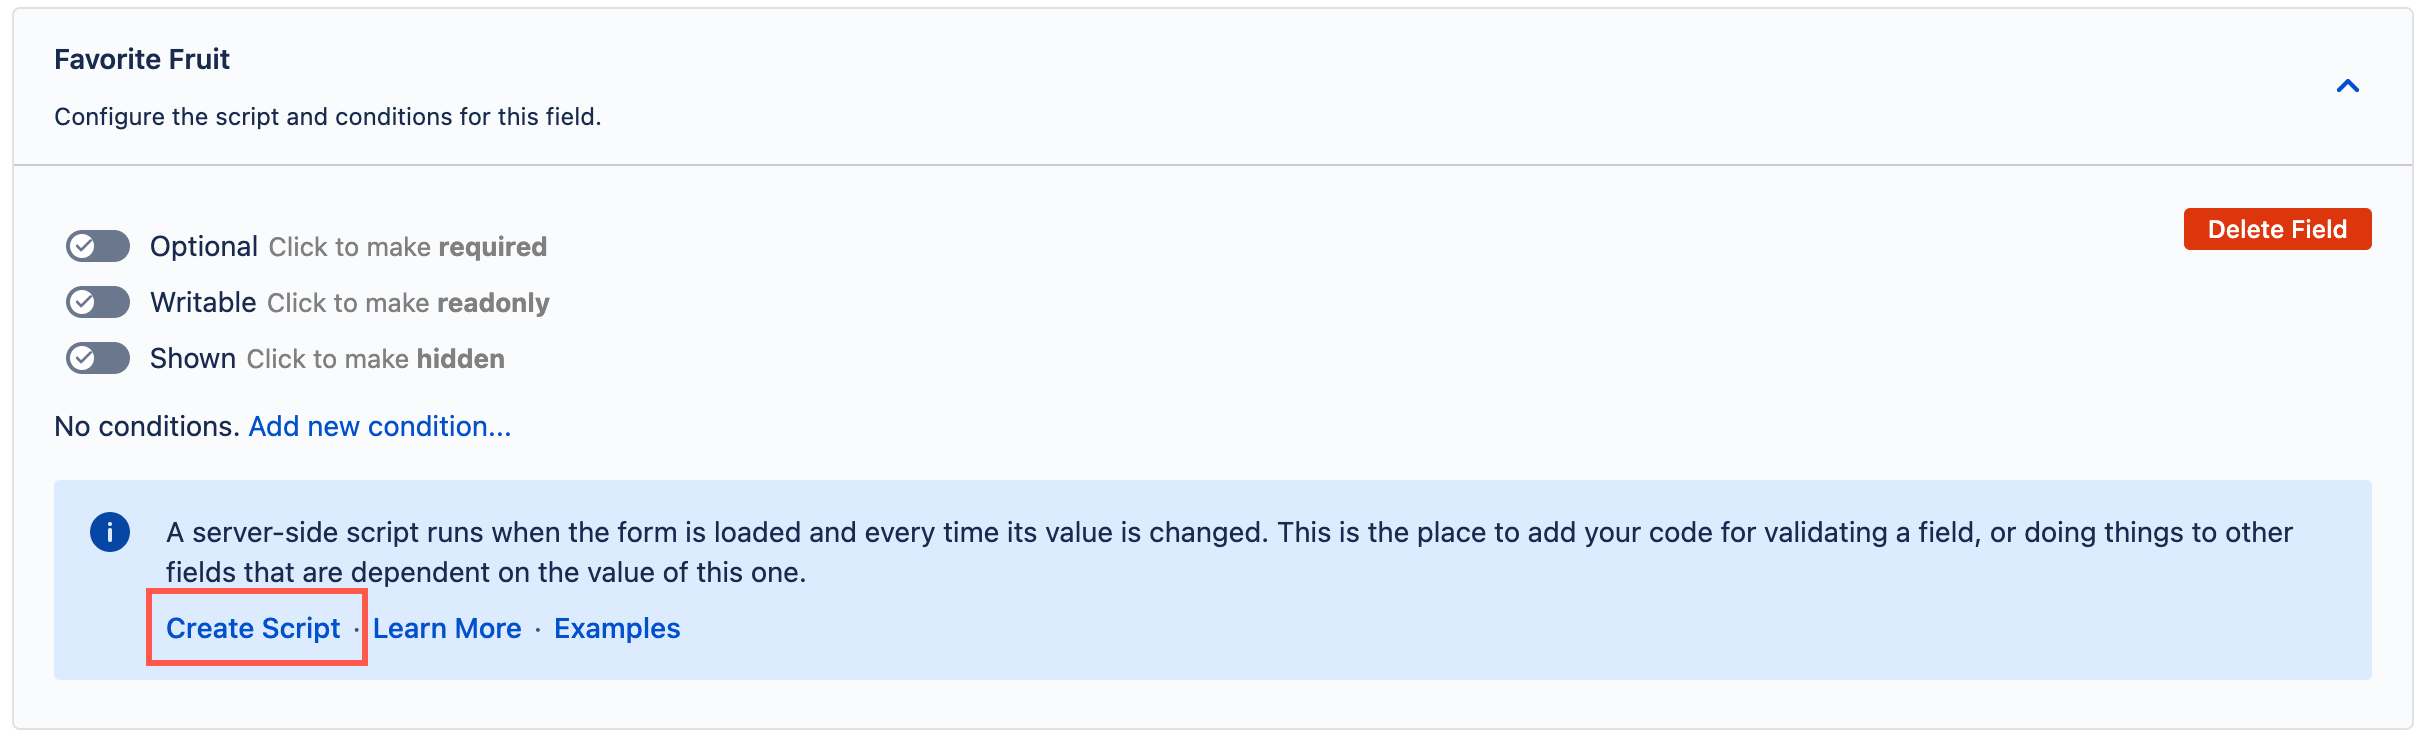
You're taken to a screen where you can configure the behaviour further.- Scroll to the Add Field field, select the Favorite Fruit field, and then select Add.
We now need to add a server-side script to the field for it to show the additional text field when someone selects Other from the Favorite Fruit select list. Select Create Script.
Copy the following code into the inline script editor:
groovydef otherFaveField = getFieldByName("Favorite Fruit (Other)")
def faveFruitField = getFieldById(getFieldChanged())

def selectedOption = faveFruitField.getValue() as String
def isOtherSelected = selectedOption == "Other"

otherFaveField.setHidden(!isOtherSelected)
otherFaveField.setRequired(isOtherSelected)
Be aware if you used something other than the examples we have shown, the script needs to be changed to work for your situation.
Select Save Changes.
Congratulations! You've created a behaviour!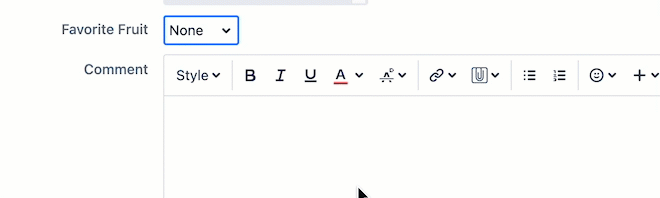
You can now test to see if this behaviour works!
Add a default description when creating an issue
Before you start this tutorial, create a sample project with the name Great Adventure Licensing and Finance.
In this example, we set a default description for renewal issues in the Great Adventure Licensing and Finance project. This description contains set text to help the licensing specialists complete the issues, acting as a template to gather the correct information.
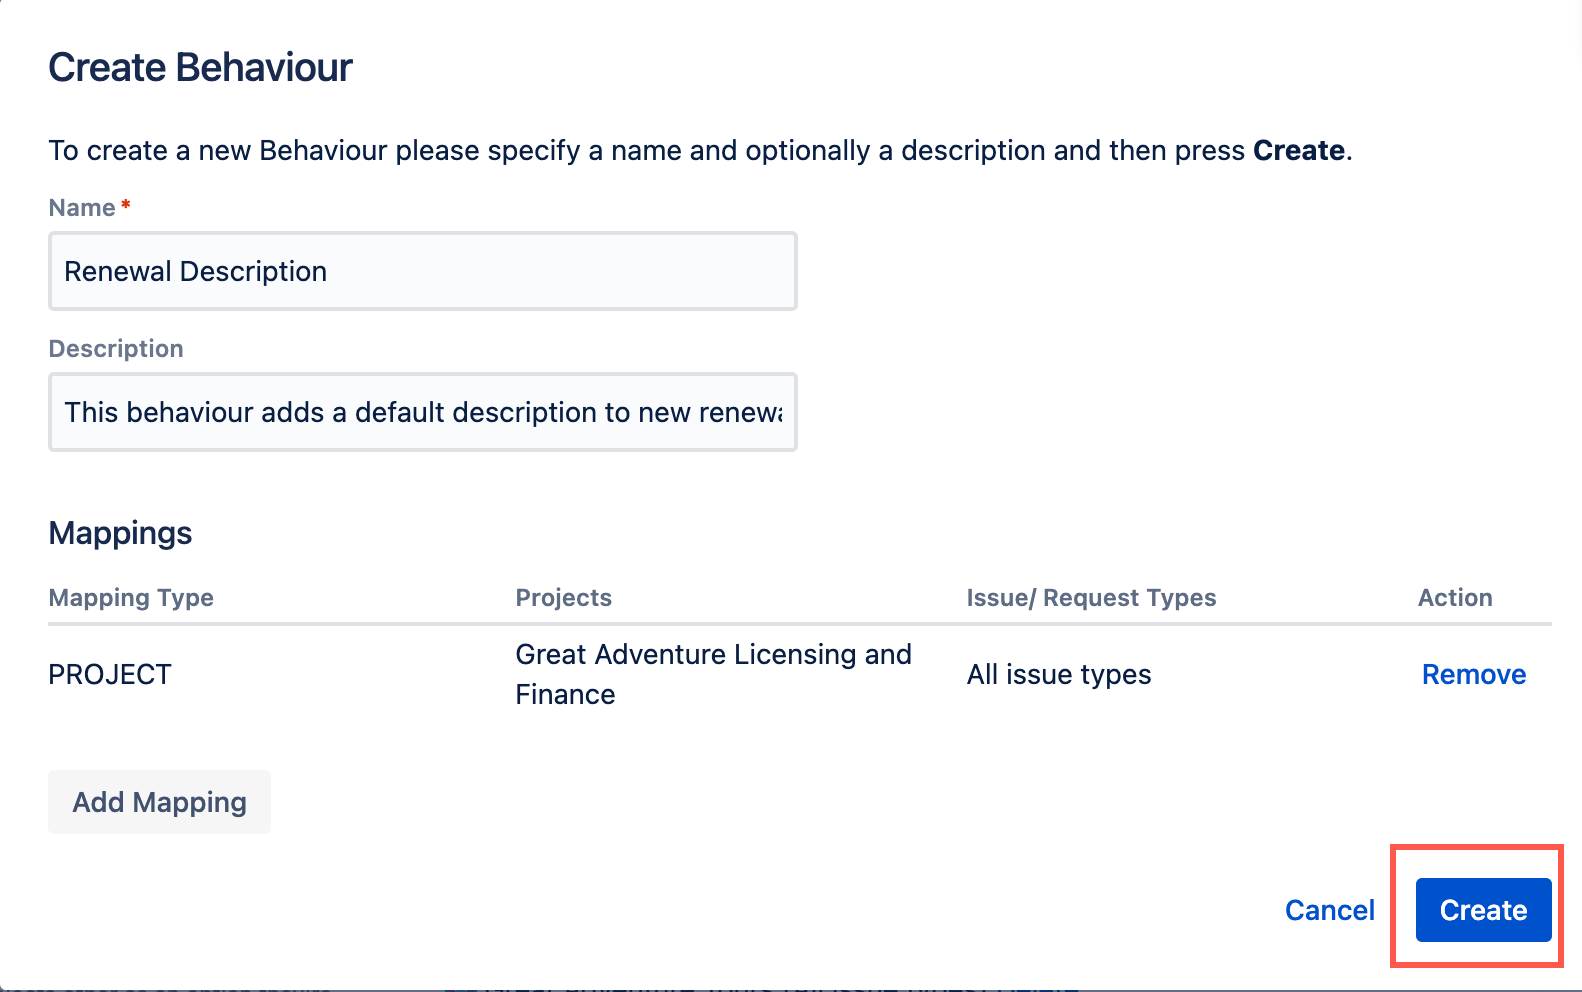
- From ScriptRunner, navigate to Behaviours.
- Select Create Behaviour.
- Enter a name for the behaviour. In this case we enter
Renewal Description. - Enter a description for the behaviour. This field is optional but in this case we enter
This behaviour adds a default description to new renewal issues. - Select Create Mapping.
- Then select the project and issue type(s) to map this behaviour to. In this case we chose the Great Adventure Licensing and Finance project and All issue types.
- Select Add Mapping to confirm the mapping.
Select Create to create the behaviour.
You're taken to a screen where you can configure the behaviour further.- Select Create Script under Initialiser.
- Copy the following code into the inline script editor:
def desc = getFieldById("description")

def defaultValue = """\
        h2. Renewal Information
        * Confirm Company Name:
        * Confirm Existing License:
        * Confirm Number of Users:
        * Confirm Type of License:

        h3. Notes
        Provide any notes on renewal. Copy/pate from proposals and email correspondence as needed.

        h3. Final Actions
        * Update Jira Issue with appropriate information.
        * Assign issue to Licensing lead for approval.
    """.stripIndent()

if (!desc.formValue) {
    desc.setFormValue(defaultValue)
}
Select Save Changes.
Congratulations! You've created a behaviour!
You can now test to see if this behaviour works!