[All Adaptavist Apps]
Example Behaviour: Change Field Name
This example shows you how to change the name displayed for a specific field within the issue creation screen. Specifically, in this example, the field entitled Summary is changed to Ticket Title in response to the preferences of a particular team.
Follow the steps below to create the behaviour:
- Open the Behaviours tab and click the Create Behaviour button.

You will see the Create Behaviour screen displayed: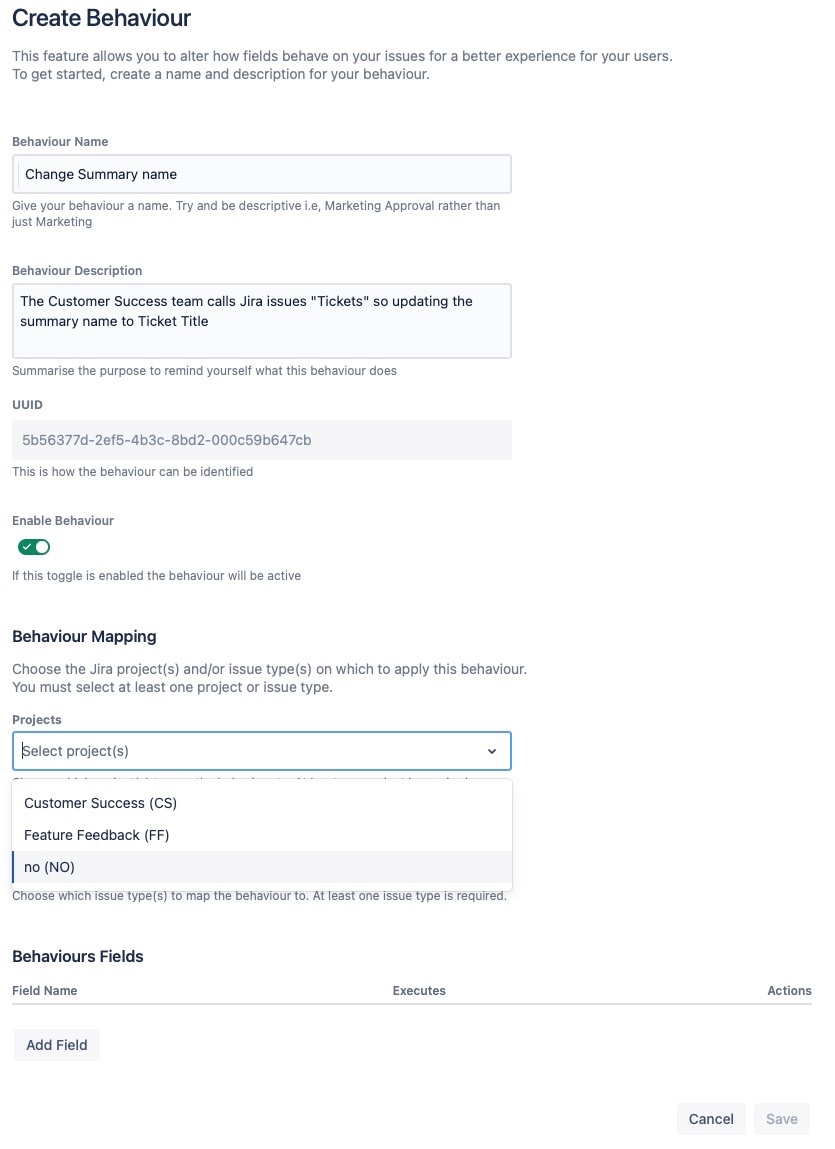
- Enter a name and description for the behaviour. It's good practice to make these as descriptive as possible.
- Ensure the Enable Behaviour toggle is activated.
- Scroll down to the Behaviour Mapping section and select the relevant Project to which this behaviour will be mapped. For this example, choose the Customer Success project.
- Select the Issue Type that will be associated with the behaviour. For this example, choose the Task issue type.
- Scroll down to the Behaviours Fields section and click Add Field.

Choose the field that will change (affected) once the behaviour has been applied. For this example, choose the Summary field.
Click Next. You are prompted to allow access as shown below:

Atlassian’s initial beta release of the UI Modifications API requires each user to allow access to the behaviours app. As such, the first time you create an issue where a behaviour is mapped, you will need to allow access to the Forge app (one time only).
Granting access allows you to create issues on a screen that has been modified by the UI Modifications API. If access is not granted, then you will not be able to create an issue from screens that have been modified by a behaviour.
Granting access is a temporary step; rest assured, Atlassian is working to improve the user experience and remove it. You can follow Atlassian’s ticket here https://trello.com/c/8MMeAM4S
Click Allow Access and then Accept on the following screen:

You are returned to the Edit Action screen.Define when the script should run. This can be when the issue creation screen loads initially and/or in response to a field change. For the purposes of this example, check the On load option.
When Runs On load The script will run when the create screen initially loads.
You'll want to choose this option when you want the affected field to populate immediately upon opening the create screen.
For example, a field name or field description is changed, or a value is pre-populated into the field.
On change The script will run when the specified change happens.
You'll want to choose this option when you've added a condition to the logic and identified a trigger that will update the affected field.
Edit the script within the Script box as required.

- Click Save once you have confirmed the parameters
getFieldById("summary").setName("Ticket Title");.Now that you have created the behaviour to run when the screen loads, you will see the field entitled 'Summary' change to 'Ticket Title' when you create new tasks within the Customer Success project. - Refresh your screen and click on the Create button in order to see the behaviour in action.

- If you wish to revert back to the original field name, simply click Edit from the ellipsis menu next to your chosen behaviour, as shown below:

and deselect the Enable Behaviour button.
Overview
Community Forums
Content Tools
Apps