Custom Script Field
These are a basic functionality of ScriptRunner, they allow you to execute a groovy script every time you view an issue and returning a value that is based on whatever you want. They are designed to calculate values based on other issue fields.
Possible examples of information that could be displayed using script fields, from the easiest to the most difficult:
Link to another project.
Due date based on the priority of the issue.
Link to another platform based on a combination of the issue fields.
Calculate priority based on a combination of issue fields.
Display the Bamboo build status for the development branch associated to the issue.
Limitations
Since the script is executed every time the issue is viewed, that means that the script fields cannot be used to index the issue. What does this really mean?
Imagine the next scenario. You are calculating a text priority, only for display purposes:
- Displays a priority from 1 to 5,
- Based on the date of creation and an external component to Jira, for example a Bitbucket commit date.
And you want to be able to fetch this information in a JQL query, and order by it. This is possible, but the information might be out of date.
The reason behind it is that Jira usually indexes every time there is a change in fields, a transition, or something else. This "indexing" means that it orders the issue based on its fields. However, bear in mind that the script field is recalculated every time the issue is viewed, unless caching is enabled. In order to learn more about catching, check out the documentation article about Script Fields
Example
We are going to create a Script Field that contains information from the issues that have been linked to it. This is quite useful when you want to display your data in JQL filters, or when you want to take a better look at information across issues that are linked.
In order to create this field, follow these steps:
- Fetch all the issues that make up an Epic.
- Collect a certain set of information.
- Display that information in a table within the issue in a Script field.
We will use the following ScriptRunner features:
- Script Fields
- HTML Templates
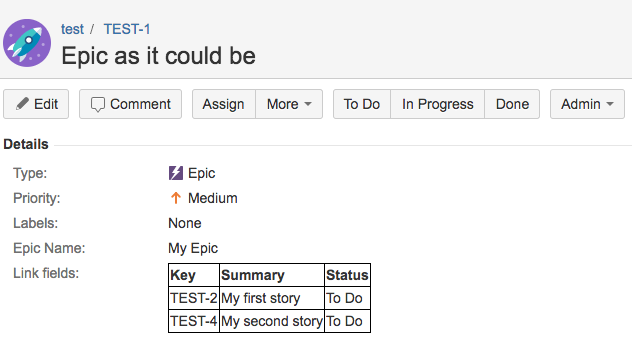
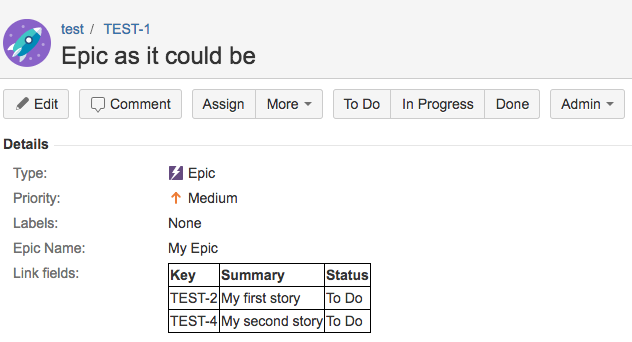
In the end, you will have a fully functional script field, for example:
This field, will allow you to fetch this information in a filter, like so:
You can do something simple, as in this example, or you can even include other complex data, such as estimates, story points, etc. This is very useful to define what a summary of your issues is.
We are going to go through the entire script creating process.
Fetch the linked issues
In this step, we are going to fetch the necessary imports for our code to work, and we are getting the links to the other issues from our Epic.
First of all, we need to fetch the IssueLinkManager, this is the component that is going to allow us to access the links of the issue.
Secondly, on every script field, there is a bound variable called issue. This means that even though you don’t see it, there is a variable called issue, of type Issue that contains the relevant information of the issue that the groovyScript is executed in. We are going to use this variable to ask the IssueLinkManager to give us the links of this very issue, in line 4 of the script. Lastly, we are going to use MarkupBuilder to create our HTML. This is done to avoid using HTML syntax in groovy code, and to avoid possible injection attacks.
import com.atlassian.jira.component.ComponentAccessor
import groovy.xml.MarkupBuilder

def issueLinkManager = ComponentAccessor.getIssueLinkManager()
def links = issueLinkManager.getOutwardLinks(issue.id)

def writer = new StringWriter()
def xml = new MarkupBuilder(writer)
Create the table with HTML templating
In this step, we are going to create the HTML that draws our table. For this, we suggest that if you don’t know anything about HTML or CSS you check out this tutorial about HTML tables. You could also try to delve into CSS, but this is not necessary, since we’re using very simple css here.
First of all, we create the styling of our table, which will be in CSS format. This design will be quite plain, but it will suffice to show the information that we need. First of all we are going to show you the HTML code:
groovy<style type="text/css">
    #scriptField, #scriptField *{
        border: 1px solid black;
    }

    #scriptField{
        border-collapse: collapse;
    }
</style>
Now we will write this using the markupBuilder:
xml.style(type: "text/css",
    '''
         #scriptField, #scriptField *{
                border: 1px solid black;
            }

            #scriptField{
                border-collapse: collapse;
            }
        ''')
To this styling, we are going to add our table layout. The headers will be Key, Summary and Status. Once again, we are going to show you the HTML.
groovy<table id = "scriptField">
    <tr>
        <th>Key</th>
        <th>Summary</th>
        <th>Status</th>
    </tr>
</table>
Now we will write this using the markupBuilder:
xml.table(id: "scriptField") {
    tr {
        th("Key")
        th("Summary")
        th("Status")
    }
We finally just add this to the script, and the resulting state of our script by this stage should look like this:
import com.atlassian.jira.component.ComponentAccessor
import groovy.xml.MarkupBuilder

def issueLinkManager = ComponentAccessor.getIssueLinkManager()
def links = issueLinkManager.getOutwardLinks(issue.id)

def writer = new StringWriter()
def xml = new MarkupBuilder(writer)


if (!links) {
    return null
}

xml.style(type: "text/css",
    '''
         #scriptField, #scriptField *{
                border: 1px solid black;
            }

            #scriptField{
                border-collapse: collapse;
            }
        ''')

xml.table(id: "scriptField") {
    tr {
        th("Key")
        th("Summary")
        th("Status")
    }
Fetch the relevant information, and place a new row into the table
We are going to use a Closure to go through every link that is collected within the variable links in our script, fetch the relevant information that we want to display, and place it within a row of the table.
groovylinks.each {issueLink ->
}
What we are saying here, is that "for every link within the variable links, we’re going to do something."
First of all, we need to fetch the Issue object from the links, since the variable links is a List<IssueLinks> as specified by the return type of the getOutwardLinks() function. Therefore we fetch this object by calling the property destinationObject.
groovylinks.each {issueLink ->
    def linkedIssue = issueLink.destinationObject
}
That object contains all the information that we need: Key, Summary and Status. In order to put it into a column, we are going to extract that information and we are going to place it in the different columns of the row. Each row element must be surrounded by the <tr></tr> tags, and within that row element, and each column element must be surrounded by <td></td> tags.
-linkedIssue.key
-linkedIssue.summary
-linkedIssue.status
The HTML that would go into this one row would be something like this:
groovy<tr>
    <td>{linkedIssue.key.toString()}</td>
    <td>{linkedIssue.summary.toString()}</td>
    <td>{linkedIssue.status.getName().toString()}</td>
</tr>
Using the MarkupBuilder, we would turn the table into this:
xml.table(id: "scriptField") {
    tr {
        th("Key")
        th("Summary")
        th("Status")
    }
    links.each { issueLink ->
        def linkedIssue = issueLink.destinationObject
        tr {
            td(linkedIssue.key.toString())
            td(linkedIssue.summary.toString())
            td(linkedIssue.status.getName().toString())
        }
    }
}
By the end this step your script should look like this:
import com.atlassian.jira.component.ComponentAccessor
import groovy.xml.MarkupBuilder

def issueLinkManager = ComponentAccessor.getIssueLinkManager()
def links = issueLinkManager.getOutwardLinks(issue.id)

def writer = new StringWriter()
def xml = new MarkupBuilder(writer)


if (!links) {
    return null
}

xml.style(type: "text/css",
    '''
         #scriptField, #scriptField *{
                border: 1px solid black;
            }

            #scriptField{
                border-collapse: collapse;
            }
        ''')

xml.table(id: "scriptField") {
    tr {
        th("Key")
        th("Summary")
        th("Status")
    }
    links.each { issueLink ->
        def linkedIssue = issueLink.destinationObject
        tr {
            td(linkedIssue.key.toString())
            td(linkedIssue.summary.toString())
            td(linkedIssue.status.getName().toString())
        }
    }
}
Return of the html element and edge cases
When crafting a script, you should always take into consideration your edge cases, the cases that would make your script break.
But first of all, we are going to return the HTML. All of this time, the xml variable has been linked to the writer. To return this HTML, we simply do this:
groovyreturn (writer.toString())
Now we need to worry about the edge case, which is: What happens when an epic has no links? If you analyze the flow of the code, you will be able to tell that if we leave the script as is, when our epic task has no links, this script will just output a header, which will not look very well on its own.
In order to fix this, we are going to evaluate our variable links right at the very beginning of our code, to check if it contains anything before we add the header. If it doesn’t, we will simply return null and finish the script early.
The final version of our script
import com.atlassian.jira.component.ComponentAccessor
import groovy.xml.MarkupBuilder

def issueLinkManager = ComponentAccessor.getIssueLinkManager()
def links = issueLinkManager.getOutwardLinks(issue.id)

def writer = new StringWriter()
def xml = new MarkupBuilder(writer)


if (!links) {
    return null
}

xml.style(type: "text/css",
    '''
         #scriptField, #scriptField *{
                border: 1px solid black;
            }

            #scriptField{
                border-collapse: collapse;
            }
        ''')

xml.table(id: "scriptField") {
    tr {
        th("Key")
        th("Summary")
        th("Status")
    }
    links.each { issueLink ->
        def linkedIssue = issueLink.destinationObject
        tr {
            td(linkedIssue.key.toString())
            td(linkedIssue.summary.toString())
            td(linkedIssue.status.getName().toString())
        }
    }
}

return (writer.toString())
Setting up the script field
This part might be simple for some, or tricky for others if it’s the first time doing this.
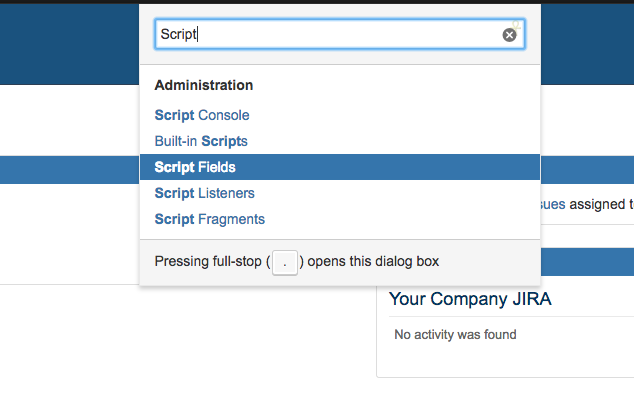
Go to the Script Fields menu. You can do this quite easily by typing "gg" twice in the main menu. This will display the following menu:
If you fill in Script Fields, and press enter, it will take you to the script fields menu.
Click the add new item
Choose custom Scripted Script:
Configure your script fields
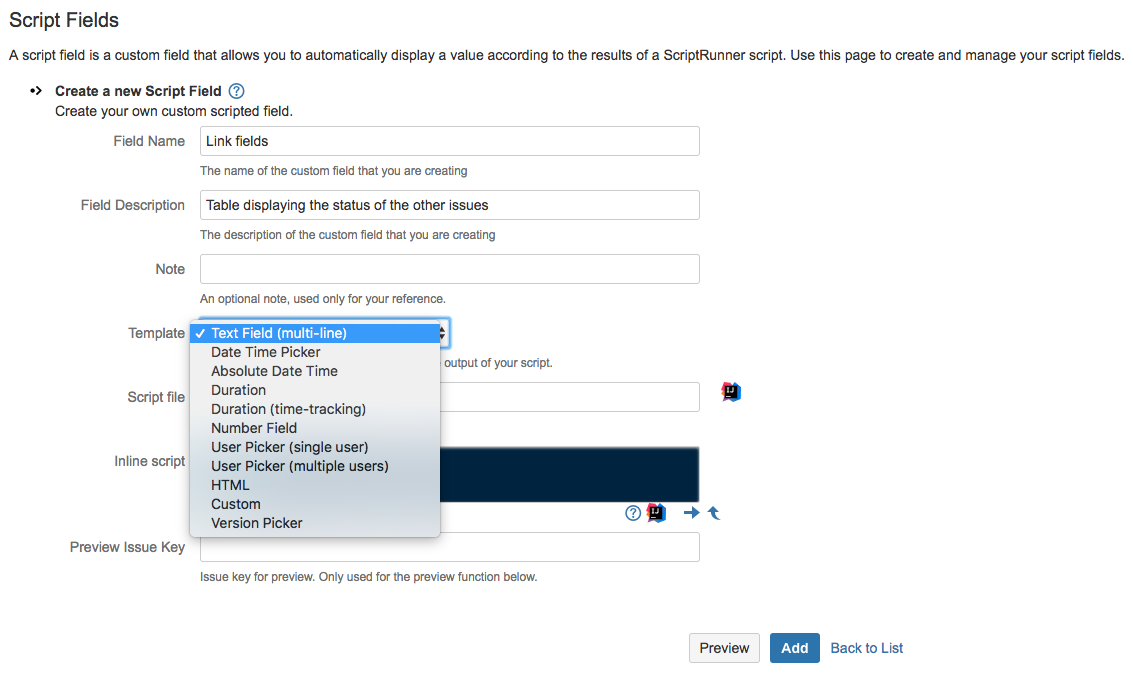
Fill the name and description in whichever way you like.
When you get to the Template, you will want to understand what this field does:
This field is for you to let ScriptRunner know what kind of information it should render into the field. Any HTML item can be shown in a different way, you do not want a date picker to look the same as a simple text field.
In this particular case, we need to let the field know that it will receiving HTML, so that it doesn’t just show a bunch of text, but so that it actually shows the table.
In order to do this, select the HTML template. You can choose to enter your script in two ways, either by having a groovy file in your script roots and add this field in the Script File field, or just enter it as an Inline Script, which is what we will do in this example. Fill the script in the inline field and save it.
Add the field to the relevant screens
At this point you might think you are done, but you need to tell ScriptRunner where you want it to render this Script Field, and in which projects. You might not want to add this field to every project, for example.
So let’s go to the Script Fields main menu. Click on the Actions Ellipses of your Script field, and click Configure Screens:
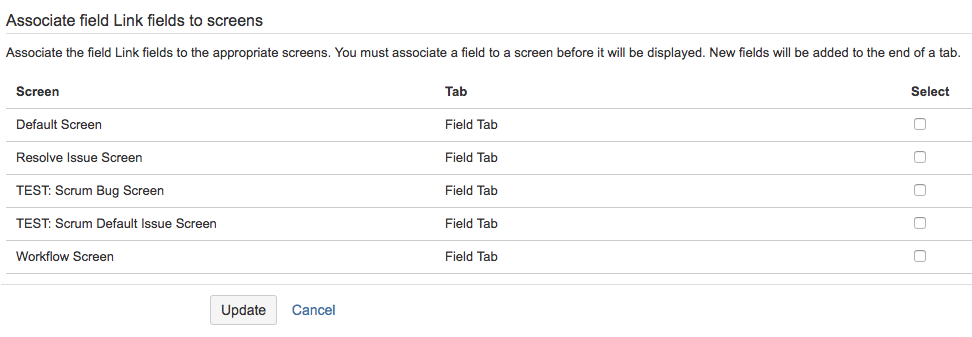
Originally, script fields aren’t bonded to any screen, so they won’t show until you specifically link them to a screen in this screen:
In this case, tick the default Issue Screen for your project, in this case TEST: Scrum Default Issue Screen:
Save the configured field and you are done, your custom field should be working.
Test your field to understand what is happening
An issue without links does not show the field
Let’s setup the next scenario:
Create three issues.
Do not link any of them.
Go to each one, you will see no table.
The parent issue shows the table
Let’s set up the next scenario:
Create three issues, in this case, to make it seem clearer, In this example an epic and 2 stories have been created.
Go to your epic, and link your epic as "relates to" the other 2 issues.
Go to your epic.
A word of caution
If you check the script field, you will notice that we are using the following line:
groovy...
issueLinkManager.getOutwardLinks(issue.id)
...
This shows that we are taking the Outward links of the issue, not the Inward links.
This is quite important. In Jira, the links between issues are Inward or Outward depending on where the link was made.
If the link was made from within the Issue that you are taking the information from: The link is an Outward link, because its origin is within the issue.
If the link was made from outside the Issue that you are taking the information from: The link is an InwardLink, because the origin of the link is another issue.
Let’s illustrate this with an example:
If in 3.2, we had linked the stories to the epic from the stories instead of from the epic, the table would not show anything, because the links would be inward Links, not outward.


