
Scripted Fields

Before you start
![]()
![]()
Visit ScriptRunner HQ to see example scripts.
Watch our Scripted Fields demo video.
Groovy Scripts
Remember, our scripts are written in Groovy! Check out our page on Scripting in ScriptRunner for Jira Cloud for tips
What are Scripted Fields?
You can use ScriptRunner for Jira Cloud's Scripted Fields to customise how the information for an issue is displayed. They enable you to display information that would otherwise be unavailable for an issue by calculating or amalgamating data from one or more existing fields. Check out our examples for more details.
Scripted Fields appear when you assign their associated custom fields to your screen.
Add-on User
All scripted fields are executed as the add-on user. The add-on user is the user who is created for the add-on app and has permissions granted for that add-on. The add-on user is automatically generated upon ScriptRunner installation and added to the Atlassian-addon-group permission group. You can refer to Atlassian's documentation on permissions for Cloud.
Scripts written for Scripted Fields are always executed as the add-on user and, as such, will have the correct set of permissions granted. However, if the permission schemes are changed for the Atlassian-addon-group, then there is a possibility that Scripted Fields will not work as intended.
How to use Scripted Fields
Scripted Fields that trigger Script Listeners, and vice versa
Scripted Fields issues are updated after a script is executed, triggering an issue_updated webhook event in Jira. This event is sent to ScriptRunner but does not cause the script to run again or trigger any associated script listeners configured for issue update events.
Script Listeners that update issues will trigger an issue_updated webhook event in Jira which is then sent to ScriptRunner. If scripted fields are configured for the updated issues, they execute once, updating the issue and triggering another issue_updated webhook event without the need for any further processing.
Scripted Fields are a type of calculated field, allowing you to display a calculated custom field using ScriptRunner scripts that run when an issue is viewed. It's good practice to keep these scripts as simple as possible to reduce loading time. Currently, scripted field results are only updated when viewing an issue and also when an issue that contains a scripted field is updated. Please keep this in mind when using scripted fields in JQL filters.
Scripted Fields work by using the same process as other scripts, such as Script Listeners, where you write code that executes REST API calls to either the Jira Cloud Rest API or your own external REST API call.
Create a Scripted Field
Navigate to ScriptRunner → Scripted Fields.
Depending on whether or not you have already created scripted fields, you are presented with either a landing screen or a list of the previously created scripted fields.Click Create Scripted Field from the initial landing screen if none have been previously created. If you would prefer to make use of our built-in examples, click Add Examples to add two scripted field examples to your instance.
OR
Click Create Scripted Field from the previously created list.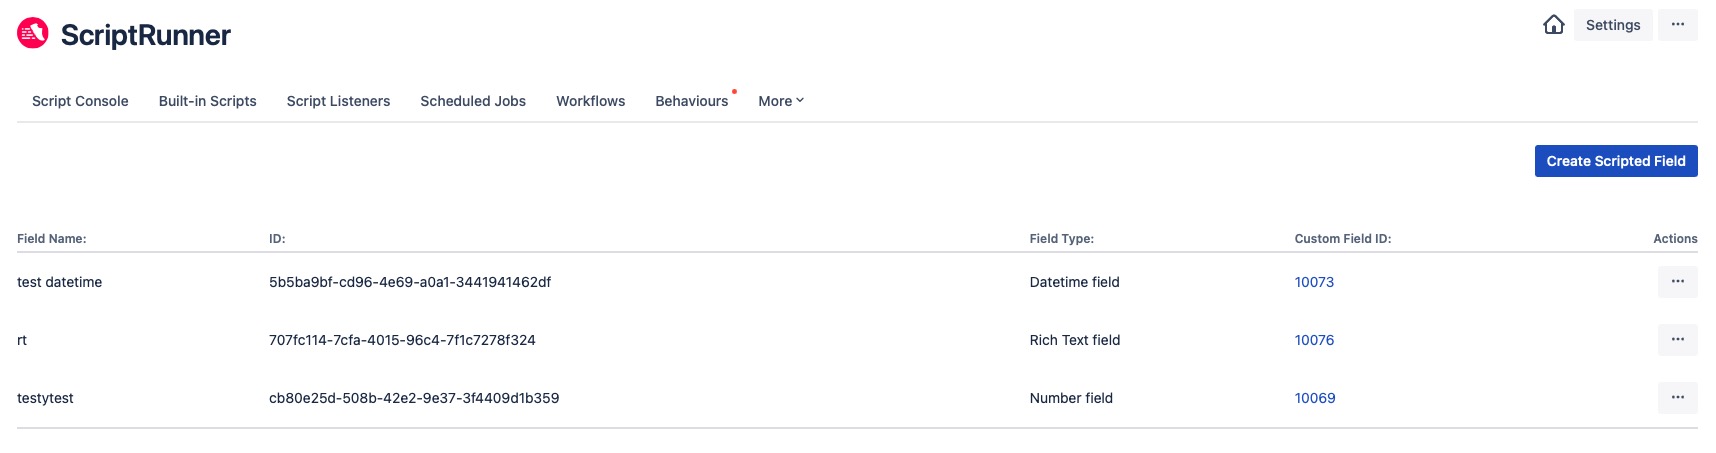
(Optional) Click Edit or Delete for your preferred scripted field via the Actions ellipsis.
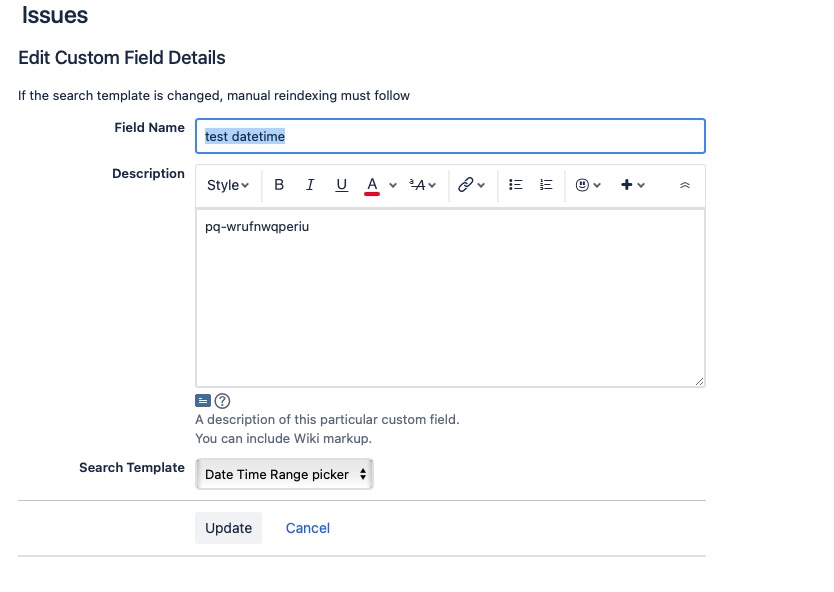
- (Optional) Click the relevant entry in the Custom Field ID column if you want to modify the details of any of the custom fields associated with each scripted field. You are redirected to the Edit Custom Field Details screen contained within the Issues section of the Jira admin. Once edited, click Update to confirm your changes, as shown below:
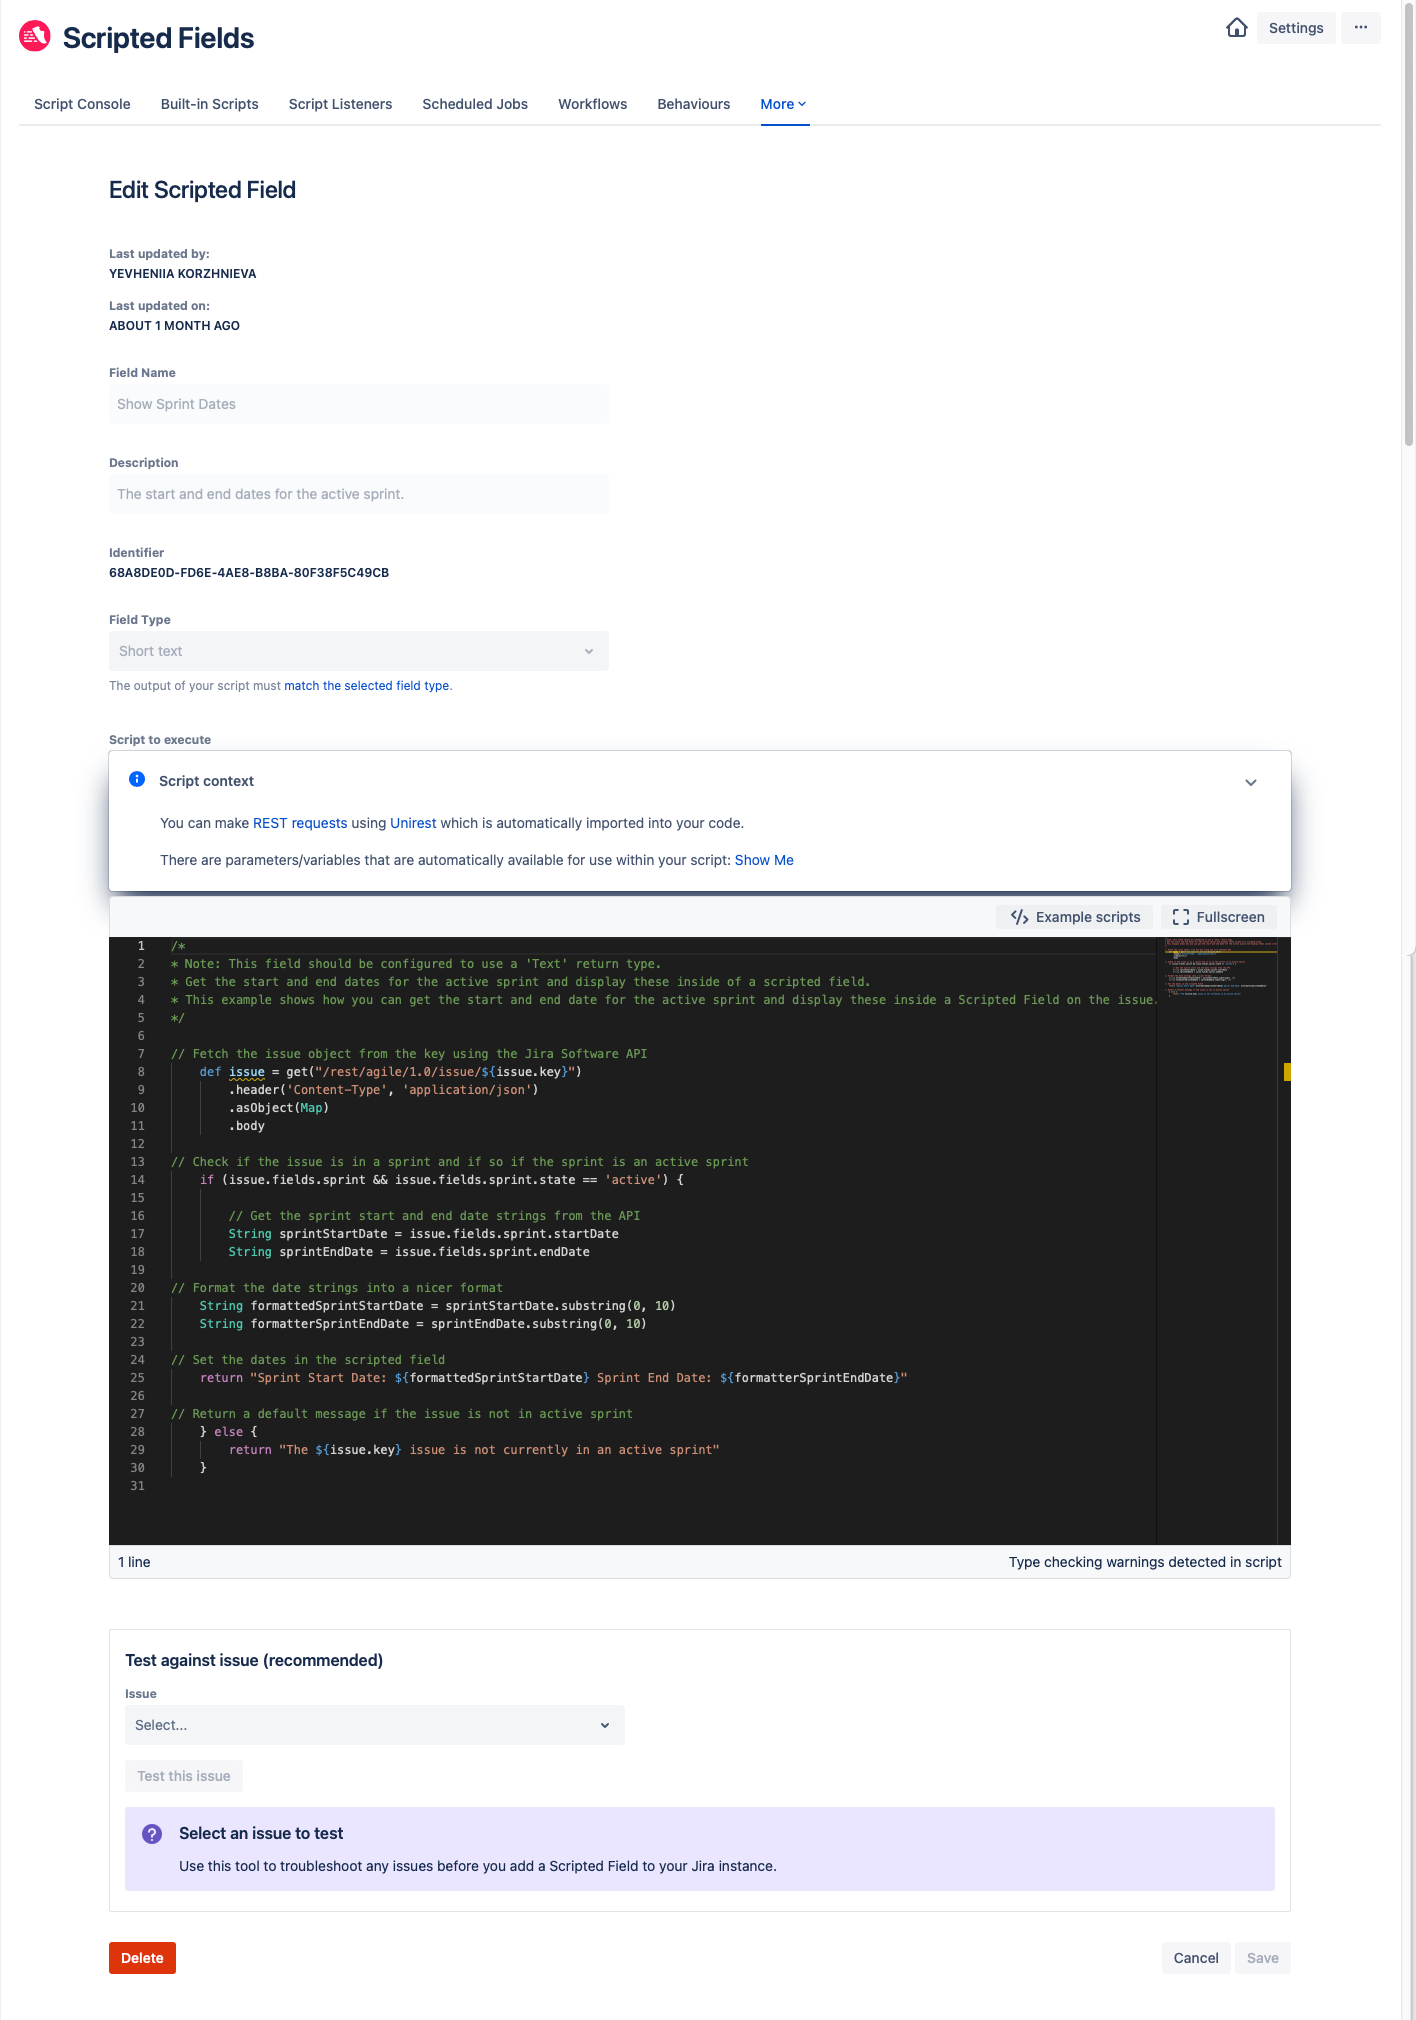
Enter the name of the scripted field in Field Name.
NOTE: The Identifier field shows the unique identification key for the new scripted field.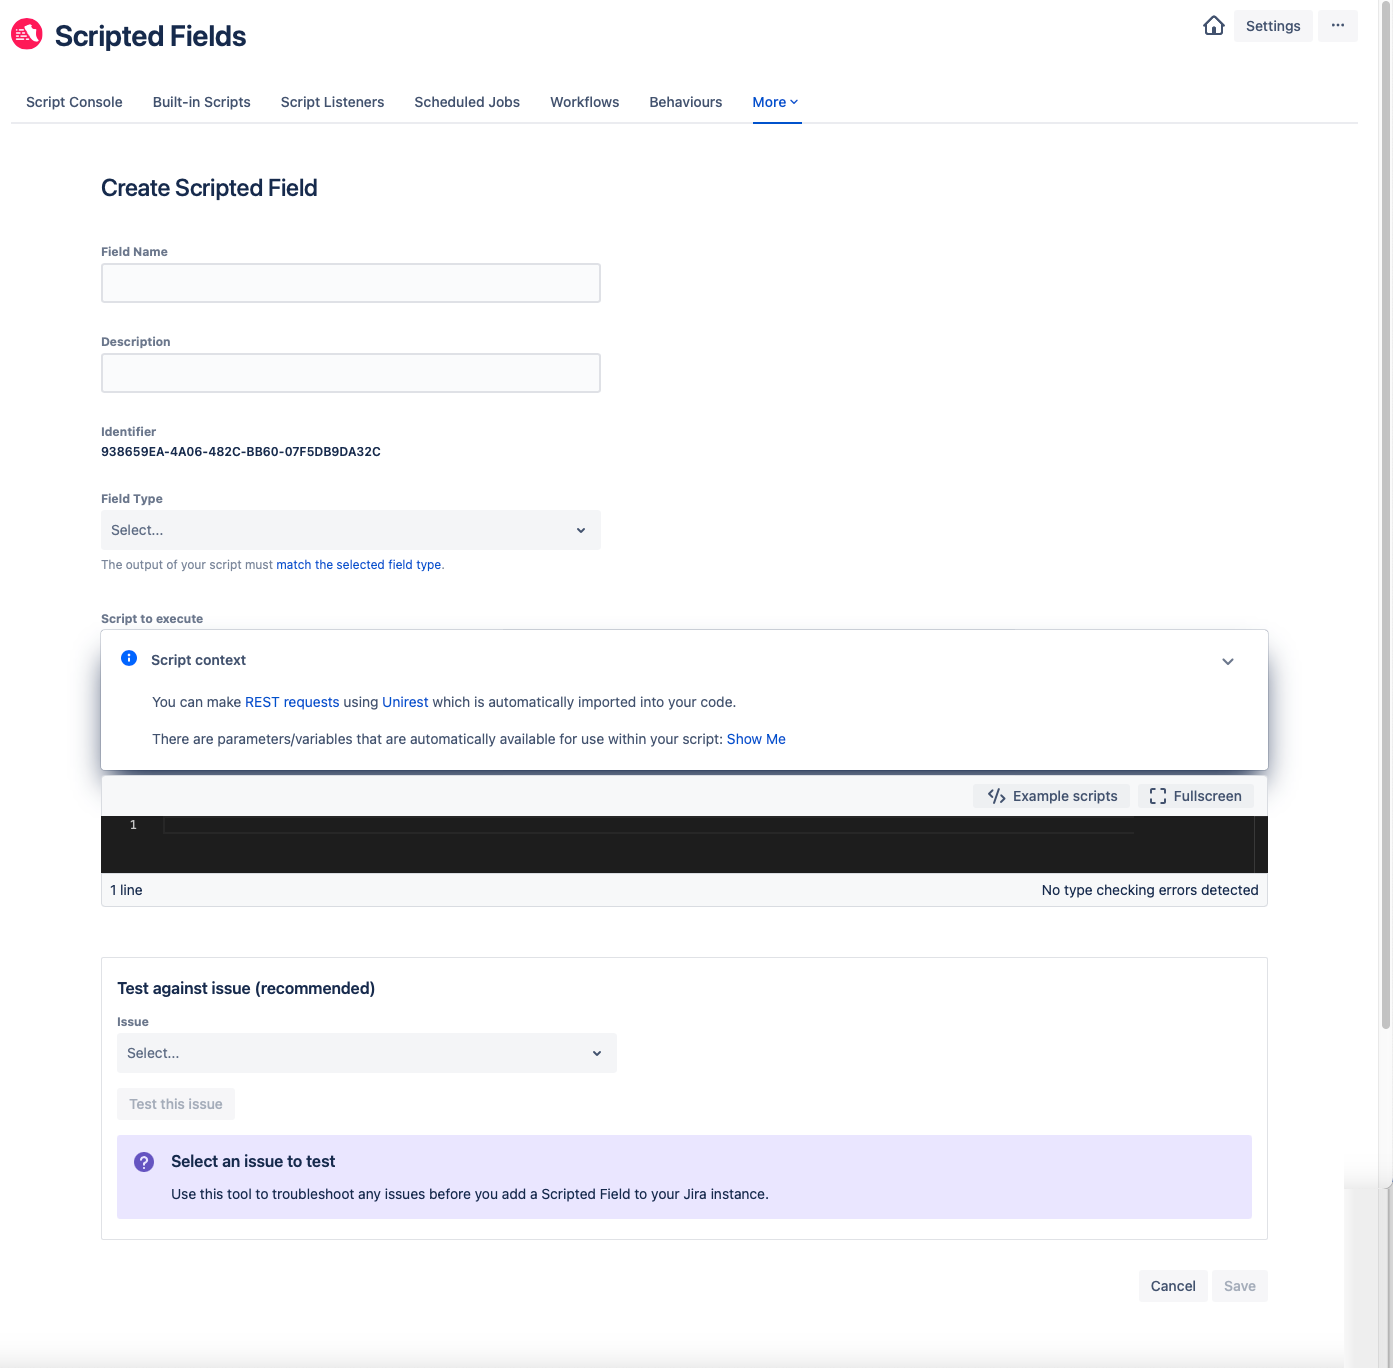
- (Optional) Enter a description for the scripted field that summarises its purpose in the Description field.
Select the scripted field's Field Type. Ensure you pick the correct field type for the data returned by your script. See Return Types for more information.
Enter a Script to execute. This script is triggered when an issue is loaded.
Scripted fields in Jira Cloud do not dynamically update. The script triggers on issue load, and also when an issue that contains a scripted field is updated. Therefore, changes to the field value are not reflected instantly, and the issue must be reloaded.
OR
Alternatively, you can click the Example scripts button to view a list of example scripts related to this feature. So, rather than writing your own script, you can reuse one of the many examples provided, as follows:Choose an example script from the list provided and the code automatically appears. You also have the option to search for a particular script.
- Click Copy Code and then Close.
- Paste the copied code in the code editor.

(Optional) Select an issue in Test against issue to test the scripted field before saving. We recommend carrying out this step.
Any changes to the scripted field's configuration will require a re-test.
Click Save.
Once saved, you will see a new entry in the Custom Field ID column of the scripted fields list that is associated with your newly created scripted field. If you want to modify the custom field, refer to Step 4 above. Scripted fields run only when an issue is viewed, so they must be added to a screen (view or edit) before it runs. To do this:
- Open your preferred project from the Jira admin page and click Project Settings.
- Navigate to Issues → Layout, where you will see the default Issue layout page.
- Drag the newly created scripted field anywhere within the Issue panel, click Save and return to Project Settings.
You can now open any issue and view the scripted field within the layout of that issue.
Edit a Scripted Field
Navigate to ScriptRunner → Scripted Fields. A list of all previously created scripted fields is shown.
Click Edit on the Actions ellipsis of the scripted field you wish to edit. The following screen is displayed:
Edit the fields as required. Remember, you can choose from our list of example scripts for Scripted Fields.
Limited edits for Scripted Fields
There are limits to the changes that can be made here because a custom field has already been created for the scripted field you are editing. If you want to change the Field Name or Description, you need to navigate to the Jira administration section. Also, you must create a new scripted field in ScriptRunner if you want to change the Field Type.
- Click Save after all changes are complete. You can also click Revert to undo those changes
Return Types
The script for your field must return the correct data type.
For a text field, the script must return a single line String. The String returned must be no more than 255 characters and must not contain any newline characters. If you want to return a string of more than 255 characters, you should use a paragraph scripted field.
groovy// This is OK
return "Hello World"
// This is not OK
return "Hello\nWorld"
For a number field, the script must return a numeric type, for example an Integer, Long, Float, Decimal, or BigDecimal.
For a date field, the script must return a LocalDate.
groovyimport java.time.LocalDate
import java.time.Month
return LocalDate.of(2020, Month.JUNE, 25)
For a datetime field, the script must return a ZonedDateTime.
groovyimport java.time.LocalDate
import java.time.LocalTime
import java.time.Month
import java.time.ZonedDateTime
import java.time.ZoneId
import java.time.ZoneOffset
return ZonedDateTime.now(ZoneId.of("America/New_York"))
// or
return ZonedDateTime.of(LocalDate.of(2020, Month.JUNE, 25), LocalTime.of(13, 45, 0), ZoneOffset.ofHours(-3))
For a paragraph field, you can return either plain text or rich text.
You can use plain text if you want to return a single line string of more than 255 characters. You cannot include newline characters in a plain text string.
If you return using rich text, you must use the Atlassian Document Format (ADF). You can refer to Atlassian's ADF Builder for further details. You can also watch our demo video showing how to display tables within scripted fields using rich text.
We've provided some ADF examples below:
- table with headings, 2 rows and 2 columns
groovy[
  "version": 1,
  "type": "doc",
  "content": [
    [
      "type": "table",
      "attrs": [
        "isNumberColumnEnabled": false,
        "layout": "default",
        "localId": "58c619ab-f32c-4dfa-aa54-2b4b39643deb"
      ],
      "content": [
        [
          "type": "tableRow",
          "content": [
            [
              "type": "tableHeader",
              "attrs": [:],
              "content": [
                [
                  "type": "paragraph",
                  "content": [
                    [
                      "type": "text",
                      "text": "Header 1"
                    ]
                  ]
                ]
              ]
            ],
            [
              "type": "tableHeader",
              "attrs": [:],
              "content": [
                [
                  "type": "paragraph",
                  "content": [
                    [
                      "type": "text",
                      "text": "Header 2"
                    ]
                  ]
                ]
              ]
            ]
          ]
        ],
        [
          "type": "tableRow",
          "content": [
            [
              "type": "tableCell",
              "attrs": [:],
              "content": [
                [
                  "type": "paragraph",
                  "content": [
                    [
                      "type": "text",
                      "text": "Row 1 Column 1"
                    ]
                  ]
                ]
              ]
            ],
            [
              "type": "tableCell",
              "attrs": [:],
              "content": [
                [
                  "type": "paragraph",
                  "content": [
                    [
                      "type": "text",
                      "text": "Row 1 Column 2"
                    ]
                  ]
                ]
              ]
            ]
          ]
        ],
        [
          "type": "tableRow",
          "content": [
            [
              "type": "tableCell",
              "attrs": [:],
              "content": [
                [
                  "type": "paragraph",
                  "content": [
                    [
                      "type": "text",
                      "text": "Row 2 Column 1"
                    ]
                  ]
                ]
              ]
            ],
            [
              "type": "tableCell",
              "attrs": [:],
              "content": [
                [
                  "type": "paragraph",
                  "content": [
                    [
                      "type": "text",
                      "text": "Row 2 Column 2"
                    ]
                  ]
                ]
              ]
            ]
          ]
        ]
      ]
    ]
  ]
]
When you are in issue view, this table example appears as follows:

- paragraph
groovy[
  "version": 1,
  "type": "doc",
  "content": [
    [
      "type": "paragraph",
      "content": [
        [
          "type": "text",
          "text": "This is a paragraph"
        ]
      ]
    ]
  ]
]
When you are in issue view, this paragraph example appears as follows:

JSON notations
new groovy.json.JsonSlurper().parseText("""Your ADF"""). See the example below:textreturn new groovy.json.JsonSlurper().parseText(""" { "version": 1, "type": "doc", "content": [ { "type": "table", "attrs": { "isNumberColumnEnabled": false, "layout": "default", "localId": "58c619ab-f32c-4dfa-aa54-2b4b39643deb" }, "content": [ { "type": "tableRow", "content": [ { "type": "tableHeader", "attrs": {}, "content": [ { "type": "paragraph", "content": [ { "type": "text", "text": "Header 1" } ] } ] }, { "type": "tableHeader", "attrs": {}, "content": [ { "type": "paragraph", "content": [ { "type": "text", "text": "Header 2" } ] } ] } ] }, { "type": "tableRow", "content": [ { "type": "tableCell", "attrs": {}, "content": [ { "type": "paragraph", "content": [ { "type": "text", "text": "Row 1 Column 1" } ] } ] }, { "type": "tableCell", "attrs": {}, "content": [ { "type": "paragraph", "content": [ { "type": "text", "text": "Row 1 Column 2" } ] } ] } ] }, { "type": "tableRow", "content": [ { "type": "tableCell", "attrs": {}, "content": [ { "type": "paragraph", "content": [ { "type": "text", "text": "Row 2 Column 1" } ] } ] }, { "type": "tableCell", "attrs": {}, "content": [ { "type": "paragraph", "content": [ { "type": "text", "text": "Row 2 Column 2" } ] } ] } ] } ] } ] } """)
Related content
- Take our ScriptRunner Tour.
- See our Example Scripts for Scripted Fields.