Setting Up a Dev Environment
Who This Guide Is For
We recommend this guide for users who:
Write or maintain a large number (10+) of custom scripts regularly
Collaborate on a team of 3 developers or more
Want to implement standard software development practices (and tools) alongside their scripts, for example:
Version control (Git)
Configuration as code (YAML)
Automated testing (Spock)
Continuous integration
Want to keep their scripts in a centralized place that isn’t simply a script root directory on their server
Want all the benefits of working with IntelliJ IDEA, for example:
Efficient script-writing and less log hunting
Quick access to the Atlassian APIs
Code auto-completion, syntax checks, and other IDE features
This is a quick-start guide for users who could benefit from connecting ScriptRunner to tools such as Git, IntelliJ, and Maven, without mastering them. The goal is to give useful tools to the average scripter without holding back more experienced developers.
This guide is NOT a detailed guide on how to use tools like Git, IntelliJ, and Maven. If you are looking for those detailed instructions, you will have to consult each product’s own documentation.
Requirements
The software and hardware requirements for this guide follow:
Software
- Atlassian-SDK
Atlassian Maven (installed with the Atlassian SDK)
Which Maven
We recommend using the Maven binary shipped with the atlassian SDK as this is Atlassian's own implementation of Maven specifically designed for use with developing atlassian plugins. Standard Maven installations might not be able to resolve all the required dependencies without additional configurations.
You can find how to install the atlassian SDK here:
Windows
Linux/Mac
Once installed you will need to know where the Maven binaries are located (e.g: atlas-mvn). You can find this by running:
atlas-version (Look for the ATLAS Maven Home value)
Inside IntelliJ, you can then configure your Maven configuration to point to the atlassian Maven binaries using the ATLAS Maven Home directory as the Maven home path.
Hardware
Your memory needs vary based on the Atlassian host application that you’re working with. Here are Atlassian’s recommendations:
Jira - 2GB of RAM
Confluence - 6GB of RAM
Bitbucket - 3GB of RAM
Experienced Atlassian plugin developers recommend 16GB of RAM on your development computer if possible, particularly as you run more and more things to test and debug your application (IntelliJ, the Atlassian application, multiple web browsers, etc.).
The ScriptRunner Samples Project
This project contains script plugins for the ScriptRunner Suite (Jira, Confluence, and Bitbucket Server). The following tasks lead you through working with the Scriptrunner Samples project to connect the tools.
Import the Project into IntelliJ
Check out the project and import it into IntelliJ.
The ScriptRunner samples Git URL is:
https://bitbucket.org/adaptavistlabs/scriptrunner-samplesOnce the project has been imported, IntelliJ downloads dependencies.
This takes a while, but let it finish before moving on to the next task.
Set a JDK for the Project
Java Development Kit 8 should be configured as the SDK for the project. There’s a chance the SDK may already be configured, but if not, you can find instructions by clicking the links below.
Configure a Global SDK.
Configure your Project SDK.
Configure your Module SDK.
Each screenshot represents approximately how your configuration should look.
Build and Run Jira/Confluence/Bitbucket with the Sample Plugin
If you have fulfilled the above requirements and tasks, you should now be able to build the sample plugins.
Inside a terminal, you can start each application with its respective command:
Make sure to `cd` into the subdirectory for your required module first
Subdirectory Command jira
atlas-mvn jira:debugconfluence
atlas-mvn confluence:debugbitbucket
atlas-mvn bitbucket:debugbamboo atlas-mvn bamboo:debugThose commands should start a locally running instance of the application at:
http://localhost:8080/<application>and you should see something like this in your terminal:Login using the following credentials:
Username: admin
Password: admin
Complete the application’s setup screens, if prompted.
Test to make sure everything has started properly by following these steps:
Navigate to the Script Console, and then switch to the File tab.
Start typing the name of the sample script that's installed in each plugin (
ScratchScript.groovy), and then click the suggestion.Click Run
You should see the string returned by that script in the Results tab.
Script Roots Information
The base pom adds the following script roots to the development environment only:
<module>/src/main/resources<module>/src/test/resources<module>/src/test/groovy
Any scripts inside these directories can be run from the Script Console (or any other ScriptRunner extension point such as event listeners) without specifying a full path (like you did with the ScratchScript.groovy file above).
When you install the finished plugin in an environment not run with atlas-mvn:<product>:debug you have to access the scripts stored inside your custom plugin using the package names defined inside your scripts.
For example, a script that is created inside the development environment with this structure:
/scriptrunner-samples/jira/src/main/resources/com/myscripts/someScript.groovy
and this package declaration is at the top of the someScript.groovy file:
package com.myscripts
will need to be accessed like this from any ScriptRunner script file reference:
/com/myscripts/HelperMethods.groovy
Note: auto-completion for scripts inside the custom script plugin jar is currently broken SRPLAT-935 so you will need to manually type the path to the file using the above logic.
Advanced IntelliJ IDEA Configurations
Read on for some advanced configuration options that will make your scripting experience even better.
Create Debug Configuration in IDEA
A debugger can be helpful for complex scripts. Follow these steps to create a run configuration for starting a debugger:
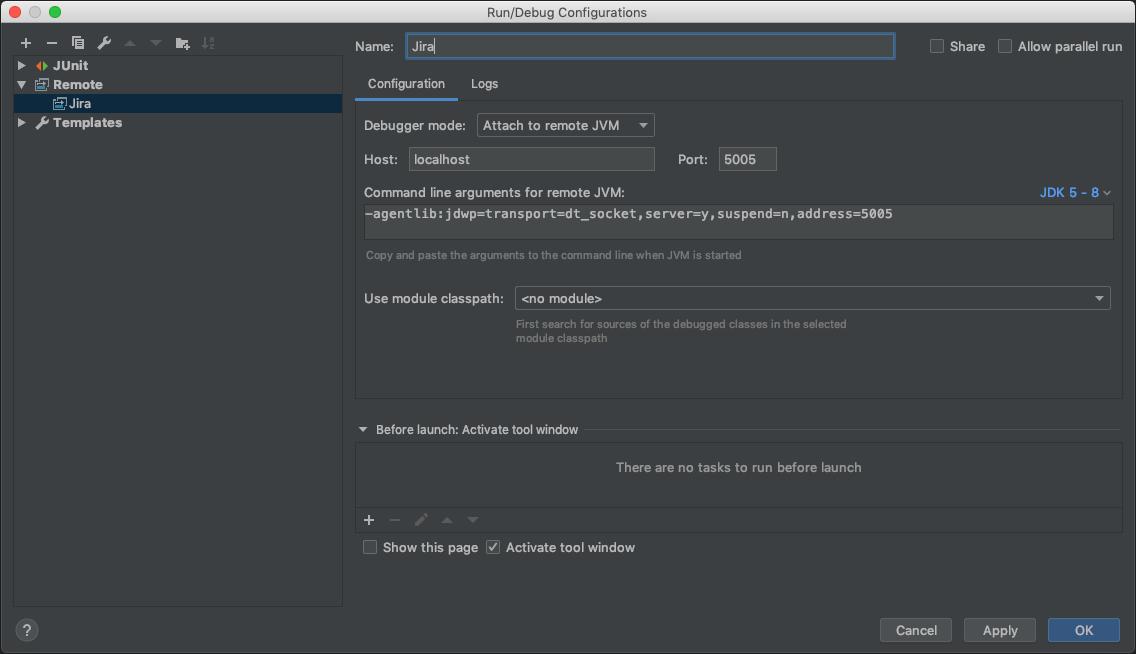
Select Run > Edit Configurations in the top menu bar.
Press the + button, and then select Remote.
Set a name for your debug configuration (e.g. "Jira").
Set the debug port to 5005.
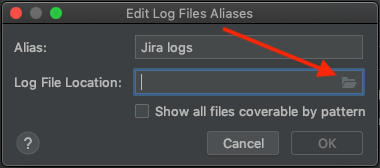
Click on the Logs tab, and then press the + button.
Enter an Alias (e.g. Jira logs).
Navigate to the location of your logs by using the Browse button.
The log files should be at the following locations:
Jira - scriptrunner-samples/jira/target/jira/home/log/atlassian-jira.log
Bitbucket - scriptrunner-samples/bitbucket/target/bitbucket/home/log/atlassian-bitbucket.log
Confluence - The log file is not be present in the target directory, but it is written to the Console tab in IntelliJ when you run
confluence:debug.The
targetdirectory is only present if the application has been previously built. If you’ve followed all of the tasks in this guide, you completed this in the Build and Run Jira/Confluence/Bitbucket with the Sample Plugin section.
Click OK.
The debug configuration should look approximately like this:
- Click Apply, and then click OK.
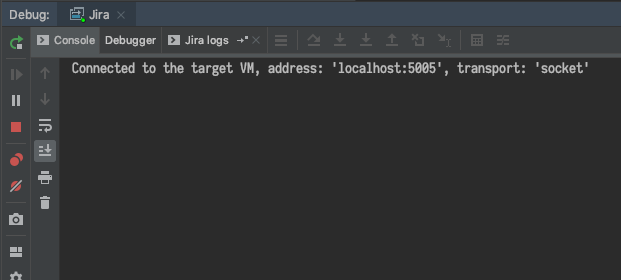
Since you already started the application in the previous steps, click Run > Debug Jira (or whichever debugger you created) to start debugging your application.
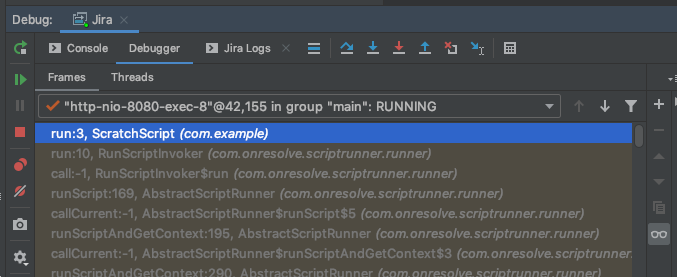
That action starts the debugger, and a window like this one should show up in a lower area of IDEA:
Debug a Groovy Script
You can use the debugger you just created with a Groovy script.
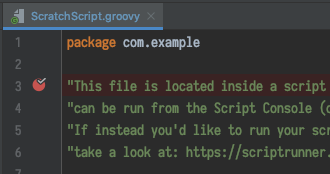
In IDEA, open ScratchScript.groovy.
Each application has its own so make sure you open the correct one.
Set a Breakpoint on the line the string begins on.
Execute your script via the Script Console.
The debugger should stop the execution of the script at the location of your breakpoint.
Use the inspector to:
Step through the code
Mid-execution, look at the values of variables in your script
Mid-execution, evaluate a Groovy code fragment
For other uses, consult JetBrains' Debugging documentation.
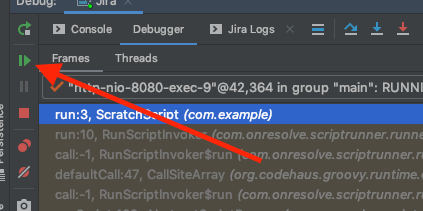
Click the green run button to resume the execution.
Connecting IntelliJ IDEA with the Atlassian Source Code
One of the biggest benefits of writing your code in IDEA is that you can access the JavaDoc directly in the IDE instead of needing to go to the API’s documentation website.
If you have purchased a license from an Atlassian product, you will have access to the Source Download page.
Using Jira as an example, follow these steps to create a new Groovy script to see the connection working:
Create a new file called UsersCount.groovy inside the
src/main/resources/script root.Use the following code in the file:
import com.atlassian.jira.component.ComponentAccessor
import com.atlassian.jira.user.util.UserManager

def userManager = ComponentAccessor.getUserManager() as UserManager
def message = "My instance contains ${userManager.totalUserCount} user(s)."

log.warn(message)
Run UsersCount.groov using the Script Console.
In the Logs tab, you can see a message stating "My instance contains X users."
You should see the same message in the Jira Logs tab of your IntelliJ debugger.
Browse the Java API
The UserManager class can do many different things. Follow one of these steps to explore its capabilities.
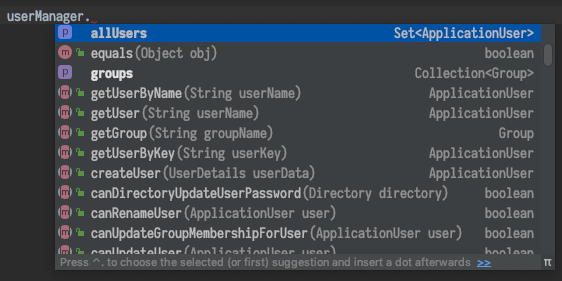
In IntelliJ, type
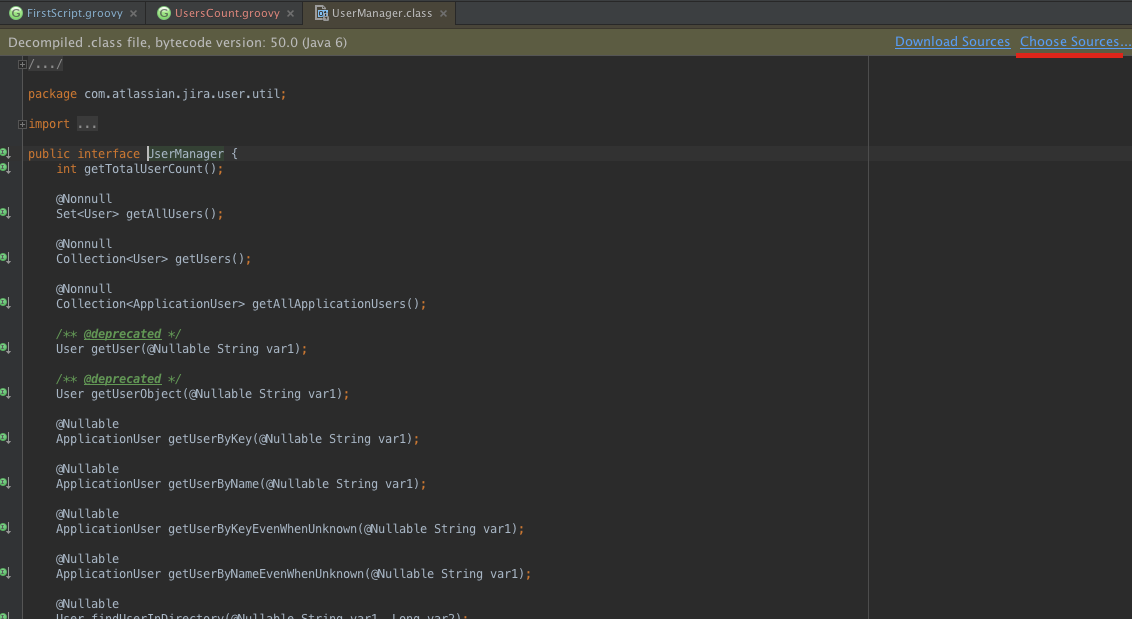
userManager., and you will see the properties and methods available to be used.In, IntelliJ, navigate to the class file itself by holding down CTRL (or CMD in OSX) and clicking on the class name. Try this for the
UserManagerclass located at the end of line 4. You will see something like this:The decompiler already gives you a lot of information about the class, but you can go even further and see the entire implementation of it.
If you click the Choose Sources… link, and then select the folder that contains the application’s source (which you downloaded earlier), the source for the class is shown. Then, the IDE will provide better parameter names and inline JavaDoc.
You may have to do this multiple times, once for each dependency (
jira-software,jira-servicedesketc). In each case, just point to the root of the downloaded sources, select everything, and let IDEA configure it.
Advanced Plugin Configuration
There are a number of settings in the plugin’s pom.xml file that you may want to change to suit your needs while writing your scripts.
Customize Product Versions
The project’s parent pom sets a lot of default values for the versions of the libraries to be used when writing your scripts. Those default values can be changed if you are going to write scripts for a different version of the Atlassian applications. You can change them by editing the <properties> section of your pom.xml.
For example, to set the Jira version to 7.13.11, your properties block might look like:
xml<properties>
    <jira.version>7.13.11</jira.version>
</properties>
Use <confluence.version> for Confluence, <bitbucket.version> for Bitbucket (in their respective pom.xml).
Customize the Scriptrunner version
If you want the development environment to start with a specific ScriptRunner version you can override the default by adding a property to your application-specific local pom file.
For example:
For Jira, if you want ScriptRunner 6.40.0 to be installed when you run atlas-mvn jira:debug you can edit the /scriptrunner-samples/jira/pom.xml file and inside the properties XML tag add:
<scriptrunner.version>6.40.0</scriptrunner.version>Adding Additional Applications
Adding additional applications is done inside the <applications> block.
For example, if you are writing a plugin for Jira, you may require Jira Software, or Jira Service Management. Those two have been added to jira/pom.xml for you, but for others you will need to add them. To make sure they get installed, uncomment out the application(s) you would like. An example of this code is shown below:
<applications>
    <!-- Include Jira Software features -->
    <!--
    <application>
        <applicationKey>jira-software</applicationKey>
        <version>${jira.software.version}</version>
    </application>
    -->

    <!-- Include Jira Service Desk features -->
    <!--
    <application>
        <applicationKey>jira-servicedesk</applicationKey>
        <version>${jira.servicedesk.version}</version>
    </application>
    -->
</applications>
See Configure AMPS to Run Jira Core with Additional Applications Installed for more information.
If you are going to install Jira Service Management, make sure its version is compatible with your Jira version.
Changing the Default HTTP Port
The base pom sets all applications to run on port 8080 for consistency, rather than their defaults. That can be changed by adding a <httpPort> entry to the configuration block of your AMPS plugin (jira-maven-plugin, confluence-maven-plugin, bitbucket-maven-plugin). An example of this code is shown below:
xml<plugin>
    <groupId>com.atlassian.maven.plugins</groupId>
    <artifactId>jira-maven-plugin</artifactId>

    <configuration>
        <!-- Other code here... -->
        <httpPort>2990</httpPort>
        <!-- Other code here... -->
    </configuration>
</plugin>
Go Further
The next time you want to create and debug a new script, you will just need to add a new Groovy script to your IDEA project and run the <application>:debug Maven goal to test it. As your script library grows, you may find you need even more out of your local development environment.
Development Lifecycle
Do you find copying and pasting scripts between IntelliJ and the ScriptRunner web interface tedious? There are two better ways: the Script Editor and a script plugin.
Using the Script Editor, you can edit and create files directly from ScriptRunner’s UI. Check out the ScriptRunner Script Editor documentation for more information.
The whole environment you just set up is actually a full blown Atlassin plugin development. Take a look at the documentation on Create a Script Plugin for more information on how to use that environment to develop and package your scripts for deployment in test and production instances.
Execute Tests
For automated testing in ScriptRunner in the project that you just set up, you can add tests under <module>/src/test/resources. You can then run them with our built-in script located under Administration > Built-In Scripts > Test Runner. See Testing documentation for more information.
Use an External Tool for Running Scripts Against Jira/Confluence/Bitbucket
One handy tool for debugging is adding an external tool in IntelliJ to run an arbitrary Groovy script against ScriptRunner.
If you don’t already have Curl, you’ll need to download and install it.
We will use Jira as an example, but the same can be done for Confluence and Bitbucket.
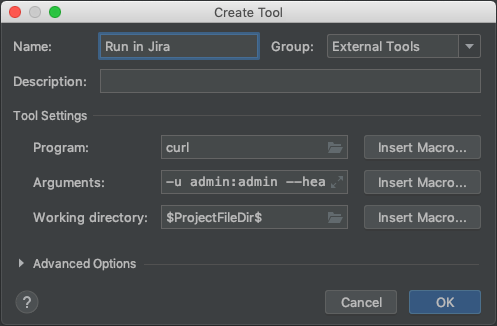
Navigate to IntelliJ Preferences > Tools > External Tools.
Click
+and fill in the following fields:Name:
Run in JiraProgram:
curlArguments:
-u admin:admin --header "X-Atlassian-token: no-check" -X POST --data "scriptFile=$FilePathRelativeToSourcepath$" http://localhost:8080/jira/rest/scriptrunner/latest/user/exec/Make sure your application’s base URL and port are correct.
Working directory:
$ProjectFileDir$The fields should look like this:
Click OK
Invoke the test by running Tools > External Tools > Run in Jira in the top menu bar of IntelliJ.
This will
POSTthe body of the script file you’re working with to your locally running Jira server and execute it, just as if you’d copy-and-pasted the code into the Script Console and clicked Run.
Useful links
See the following links for more information:
Apache Groovy documentation
See the Jira API Reference
See the Bitbucket API Reference
See the Atlassian Answers questions tagged as ScriptRunner-related


