
Deployments and Environments
ScriptRunner Connect makes use of environments, releases, and deployments to allow you to implement a managed release process and be able to deploy your releases to multiple environments.
Consider an environment to be either "production” or "live," "staging” or "UAT," and “dev" or “test". While the terminology and number of environments you use may differ, the most common setup for developing server-side software is to have three environments, usually called prod , stg and dev (or live, UAT, and test). The first environment represents the production environment, the second a staging environment that sometimes is also called UAT, which stands for user acceptance testing, which is an environment where newly developed features or changes are deployed for internal testing prior to releasing them to the production environment, and the last environment is reserved for development purposes which is where the developer is building the software.
As hinted earlier, ScriptRunner Connect aims to implement industry standard release management processes based on server-side software release management principles. This means that when a new software release is ready, that release can be deployed to multiple environments, usually first to staging and finally to production once everything looks good.
Terminology
- Release
In classical server-side software, a release is a bundle of code and/or artifacts that are created at a certain point in time and usually not modified afterward. A release can then be deployed to multiple environments, usually servers. A release in ScriptRunner Connect is a snapshot of the workspace that includes scripts, a readme, and some configuration around the event listeners, API connections, and scheduled triggers that cannot be changed after the release has been created, referred to as release-specific configuration. In this documentation, we also refer to a release as a “version” since releases are identified by a version number. - Environment
An environment, in classical server-side software, is a location, sometimes physical, that can execute the code that was created as part of the release, usually by a server.
In ScriptRunner Connect, an environment is a virtual space that is linked with a release and comes with some environment-specific configuration that is decoupled from the release-specific configuration, making it possible to edit environment-specific configuration after the release has been created for ease of management (more about that later). - Deployment
In classical server-side software, deployment refers to the activity of moving a release into the environment, usually into a server, which starts executing the new code introduced with the release.
In ScriptRunner Connect, a deployment refers to the activity of linking an environment with a release. In this documentation, we also refer to this activity as "target” or "targeting."
All environments must target a release to ensure access to executable code whenever an event needs to be processed.
Default setup
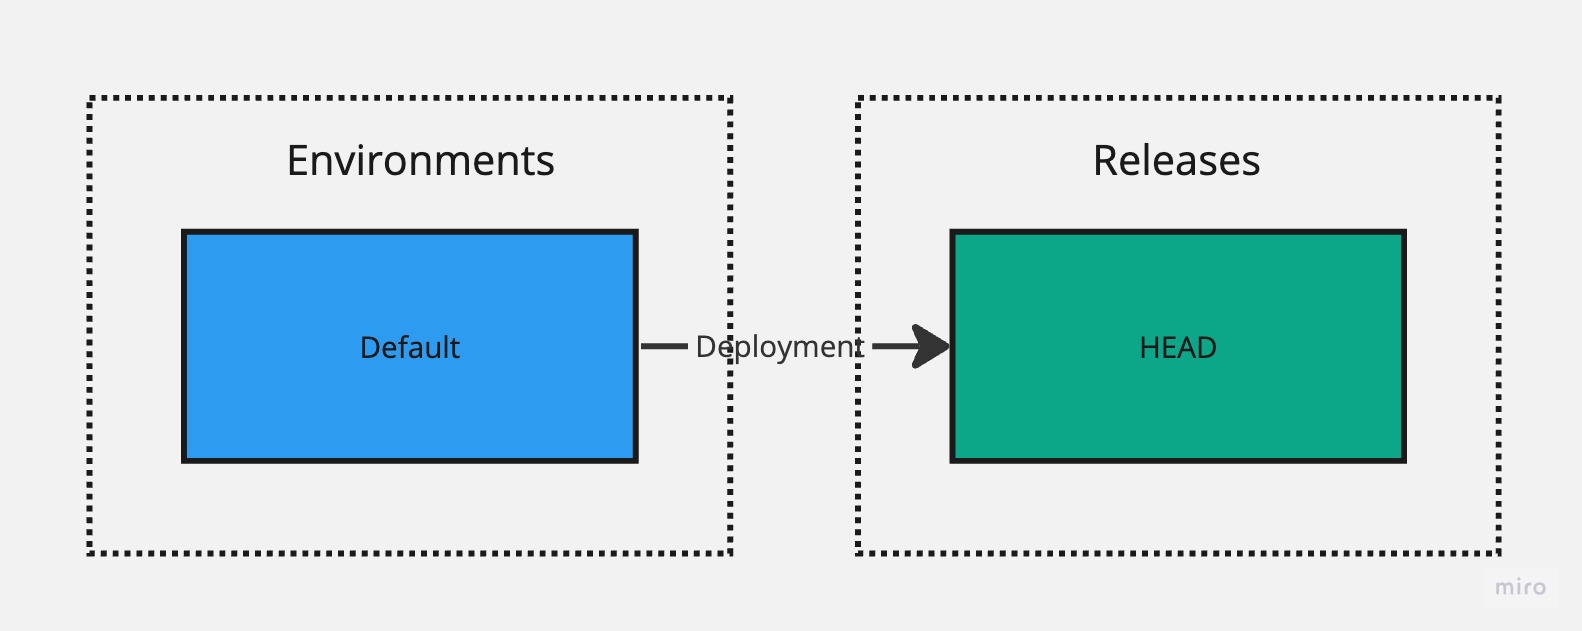
By default, each new workspace starts out with a default environment called Default. This can represent any environment for you, and you can rename the default environment to any name you like. We make no attempt to suggest which environment you should start building out your workspace in, hence the default name.
A new workspace also comes with a special release called the HEAD, which represents a version where you can make (code) changes.
Any release you create, which will be a copy of the HEAD version at the time of creating a new release, won't allow changes after the release has been created other than changes for environment-specific configurations that are decoupled from the release.
The name HEAD was chosen because in Git terminology, the HEAD represents a tip of the main branch and represents the latest changes.
Visually, the default setup can be described as follows:
Building Out Your Integration
You do not need to create new environments and releases when you start building out your integration.
It's quite normal to start building your new integration in the default environment, regardless of the environment you are going to hook it up with, whether it is prod, stg or dev. You also do not need to create new releases to apply changes while developing the integration; in fact, the recommended option is to keep using the HEAD version as long as you can, because if you create a new release, in order to introduce new changes into the (dev) environment, you have to create another release, leading to release pollution, which reduces how quickly you can apply new changes within a development cycle.
Keeping the initial environment that you use for development purposes targeting the HEAD version lets you apply changes immediately without having to worry about release management at all.
No other environments? No problem!
In some cases, when you don't have any other environment to develop against other than production, there is no reason to create releases. You can simply keep the HEAD version targeted for your production environment. However, if you take this approach, be extra careful when introducing new changes, as they will take effect immediately.
It might be possible to partition the production environment into prod and dev parts, for example, by making use of JQL expressions in Jira webhooks to receive only events for certain projects. This would allow you to create multiple environments and use the same connector (such as the production Jira instance) for both environments but instead rely upon JQL filtering on the webhooks side for events partitioning.
Creating a New Environment
Creating a new environment is easy:
- Click on the environment switcher in the workspace header.
- Select Create New.
- Name the new environment.
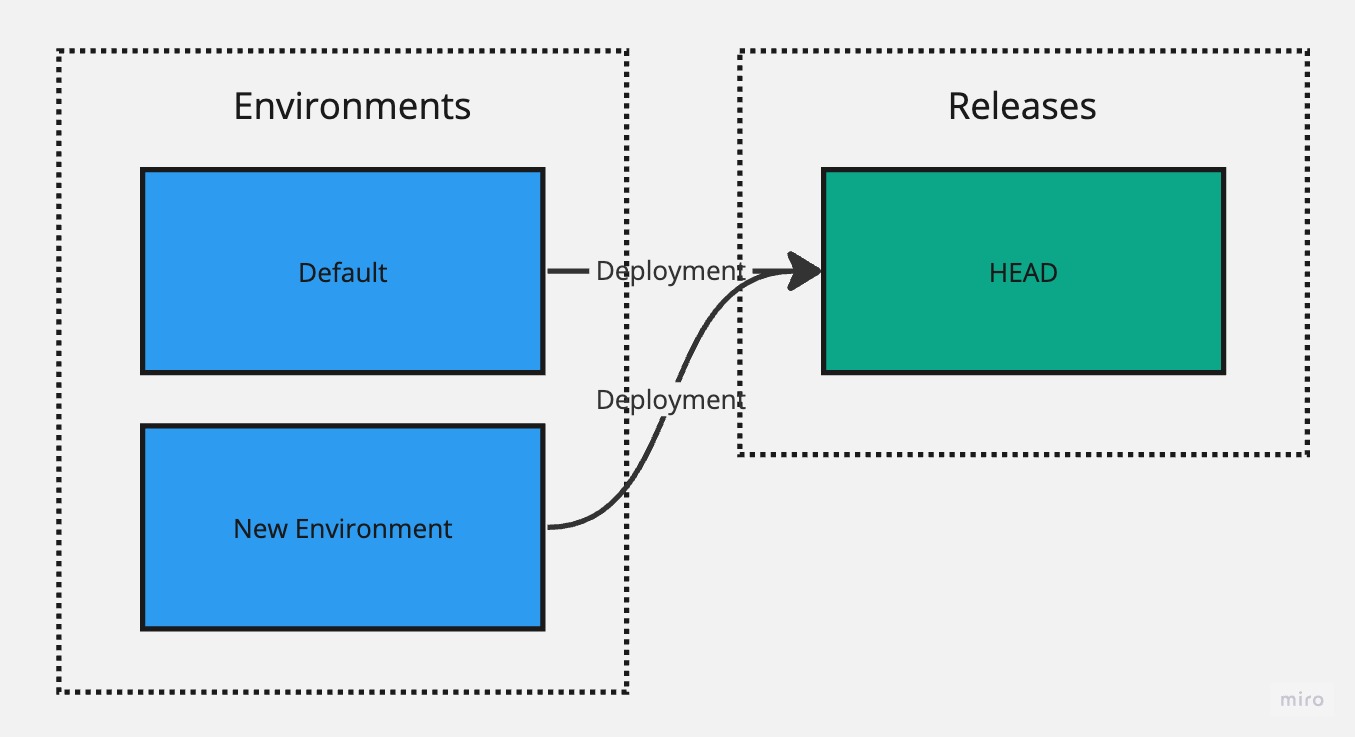
When you create a new environment, the environment-specific configuration is not copied over from the default environment. Instead, you are expected to reconfigure the configuration in the new environment. The new environment also targets the HEAD version by default. You can change this by clicking on the ellipsis menu (three dots) in the workspace header and selecting Deployment Manager, which allows you to change which environment targets which release, including the environment you just created.
We do not recommend having a HEAD version targeted by more than a single environment because making a change in the HEAD version would immediately apply these changes in other environments that are targeting the HEAD version, which can lead to unexpected behavior (unless it is intentional).
Creating a new environment without re-targeting to use a non-HEAD version looks as follows:
Creating a New Release
Whenever you are ready to create a new release:
- Click the ellipsis menu (three dots) in the workspace header.
- Select Release and Deploy.
Next, specify the version for the new release, which becomes the identifier for the release, hence why we also refer to the release as a version. Any version is fine as long as it corresponds to the format of semantic versioning and the new version is higher than the old one.
You can also specify a label for the release, which serves as an additional identifier to help you distinguish this release from the rest.
As an optional final step, you can also deploy this new release into existing environments.
Semantic Versioning
In short, semantic versioning means that the version is made up of three numbers: major, minor, and patch.
- Major - The first number is the major version, which you should increase when you're introducing a major change, often involving a breaking change (backward-incompatible).
- Minor - The second version is the minor version, which you should increase when you're adding new functionality, preferably in a backward-compatible manner.
- Patch - The third version, the patch version, should be increased if the change is related to fixing a bug or is a change that is not considered new functionality, also in a backward-compatible manner.
Environment-Specific Configuration
Environment-specific configuration is a configuration that is decoupled from releases and remains editable, whereas changes to these configuration items will apply immediately to the environment that you have selected. When switching between the environments, you may notice that some configuration items will change; these are the environment-specific configuration items. Some items may remain the same across environments, and it is fully up to you to decide what are the correct configuration values. There are many reasons why some configuration values may need to remain the same across environments sometimes.
Environment-specific configuration items include:
- Connector for the API connection
- Connector for the event listener, including setup instructions, which you will need to carry out separately for each environment
- URL path for the generic event listener
- CRON expression for the scheduled trigger
These configuration items remain decoupled from the releases so they can be changed easily without requiring creating new releases to apply them in environments that don't target the HEAD version.
Environment Switching
In the workspace header, you can find a switcher for moving between the environments. When you switch the environment, the environment-specific configuration will change accordingly.
Since you're not allowed to make any edits to the release once it has been created, only the parts of the workspace that remain editable are the environment-specific configuration items. This also includes the resources you will see, which might not match with the latest state in the HEAD version. For example, if you created a new resource in the HEAD version, then that resource won't be displayed in a non-HEAD version because it is out of scope for the environment that is targeting the older version where that resource didn't exist at the time of release creation. The same is true in reverse when downgrading, meaning that resources that you might have seen before might disappear if those resources didn't exist at the time of creation of the older release.
If you are in an environment that is targeting the HEAD version, then everything remains editable, and any change you make will be applied immediately for all environments that are targeting the HEAD version, which is why we only recommend having a single HEAD version targeted at any given time.
A recommendation 👍🏽
Have at least one HEAD version targeted in any of your environments; otherwise, you won't be able to introduce new changes other than via environment-specific configuration.
Reverting Accidental Deployments
If you accidentally deploy a version to the environment that you intended to keep targeting the HEAD version, you can revert the change by going into the Deployment Manager module and selecting the HEAD version for the environment you need to revert. The Deployment Manager also allows you to downgrade a version if you accidentally deploy a version to an environment you didn't intend or need to downgrade for any other reason, such as accidentally introducing a new bug with the newer version.
By default, console logs are filtered by the environment you have selected in order to filter out noise coming from other environments. You can disable this behavior by unchecking Filter by Environment located in the console header.
Applying New Changes
We recommend the fix-forward approach, meaning that any new change is applied by creating a new release and deploying that release to any environment(s) that need to have the fix applied. This is the industry-standard process for software development, hence why ScriptRunner Connect doesn't allow edits to existing releases. In some circumstances, it's quicker to roll back to the older release. You can do this in the Deployment Manager module, but you must be extra careful and ensure that the rollback won't reintroduce older issues that might have been fixed in the newer versions.
When you create new API connections, event listeners, or scheduled triggers that contain environment-specific configuration, you can only apply environment-specific configuration for environments that are targeting non-HEAD versions after the new release (new release that brings new resources into the scope) has been deployed into these environments.
For the HEAD version, you can apply environment-specific configuration right away when creating the new resource. Once the environment-specific configuration is applied, it remains applied even if the resource (temporarily) goes out of scope. Out of scope means that the resource might not have been created yet or might have been deleted depending on which version the environment is targeting, at which point the resource is not displayed in the resource tree.
Manually Triggering Scripts
When you trigger scripts manually in an environment that is targeting a non-HEAD version, you will be triggering the version of the code that is part of the release, which is the same version that you can see in the read-only code editor. If you wish to trigger the latest editable version of your code, you must do so in an environment that targets the HEAD version, hence why we recommend always keeping at least one environment targeting the HEAD version so you can try out new changes quickly and efficiently.
Outcomes
When you trigger a script manually in the HEAD version, an unsaved version of the script will be triggered if the script happens to be unsaved; otherwise a saved version of the script will get triggered. Externally triggered (through event listeners) or scheduled script executions will always trigger the saved version of the script.
This exception exists to provide you with the flexibility of trying out a change in the HEAD version by triggering the script manually without having to commit to saving the script first.
An Example
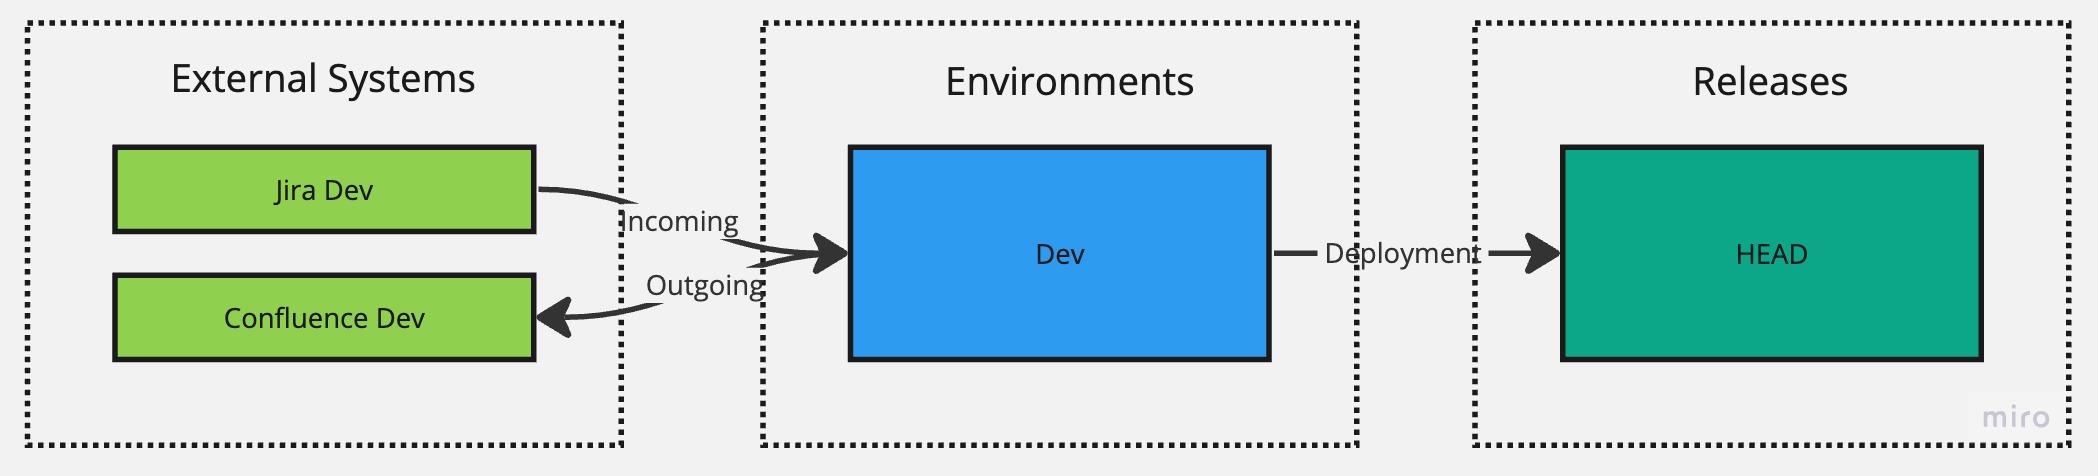
Let's consider an integration scenario that listens to an event from Jira (incoming) and then does something in Confluence (outgoing) and see how environments and releases are used over time to implement the release management process.
To start with the development process, we'll start with a single default environment and rename it to Dev, which represents our development environment. We'll then connect that environment with Jira Dev and Confluence Dev instances that represent instances reserved for development purposes by creating an event listener that listens to an event from Jira Dev and an API connection that connects with Confluence Dev.
The initial setup would look like this:
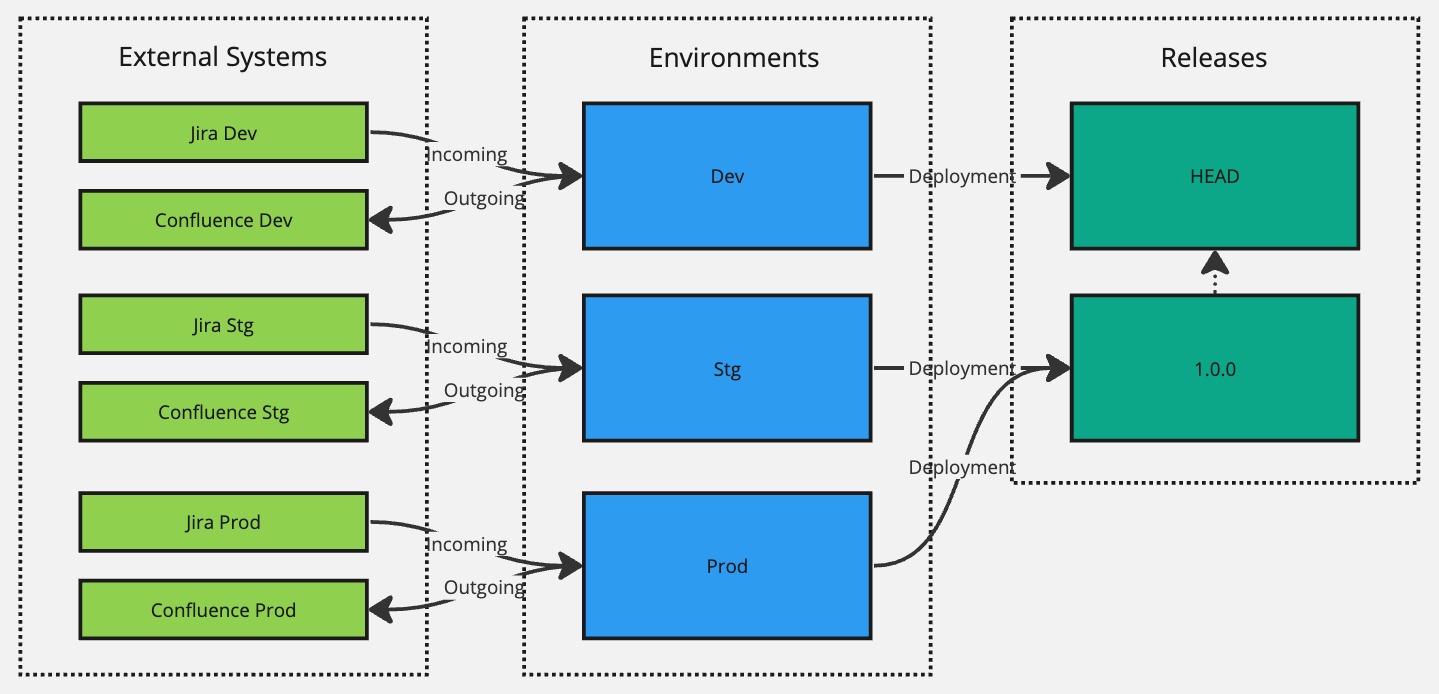
We can continue to use this setup until we are finished with the initial version and are ready to release it for user acceptance testing, at which point we can create a new environment called Stg and hook it up with Jira Stg and Confluence Stg instances that represent our staging instances. At this point, we'll also create our first release, version 1.0.0, and deploy it to the Stg environment while keeping our Dev environment targeting the HEAD version so we can continue with our development efforts there.
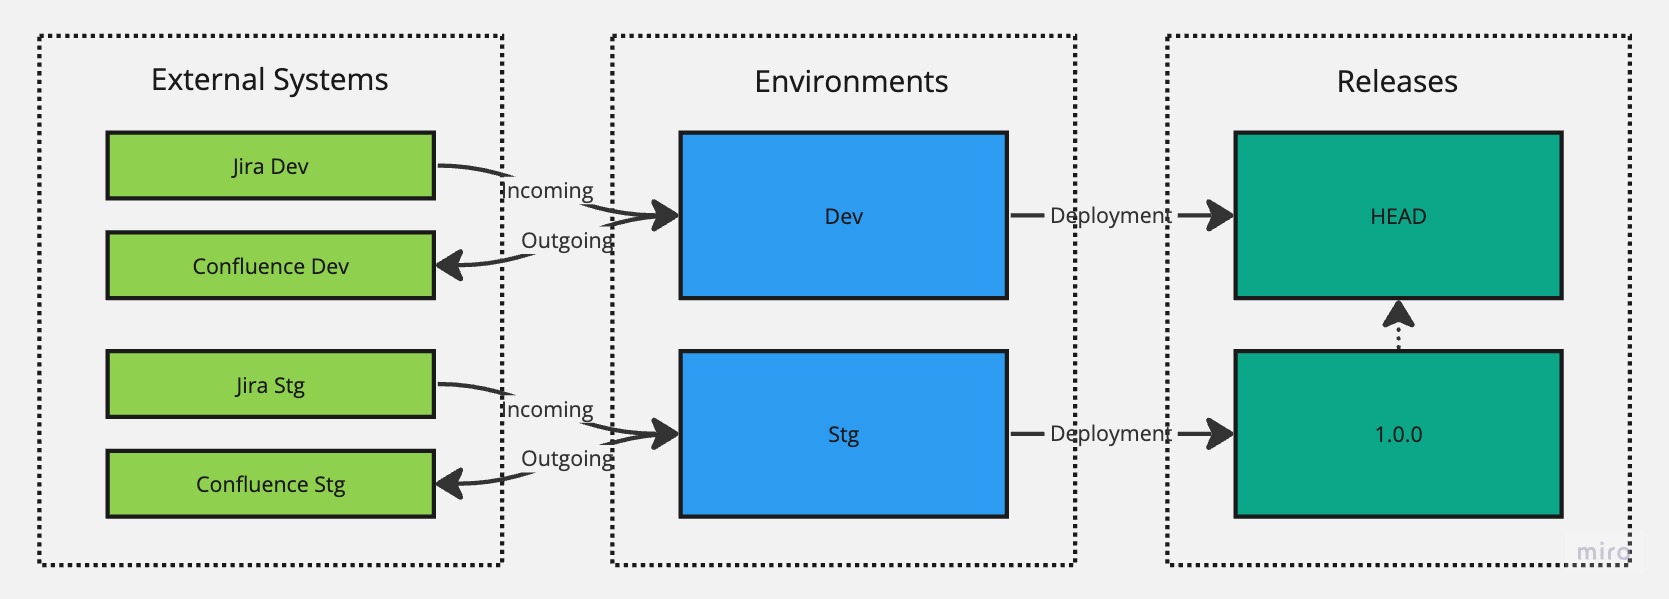
Let's imagine that the 1.0.0 release in staging looks good, and we're ready to launch it to production. We'll repeat the steps as we did for staging and create a new environment for Prod and hook it up with Jira Prod and Confluence Prod instances. However, we can take a shortcut in terms of making a deployment since we can reuse the existing 1.0.0 version to have targeted for production as well. There is no point in creating another release with a higher version just to achieve the deployment since nothing really has changed. Instead, we can use the Deployment Manager module to re-target the Prod environment from the HEAD version (default version it will target when created) to target the 1.0.0 version instead.
Success. Both Stg and Prod environments are now targeting the 1.0.0 version. But let's say that we now need to make a change or fix a bug.
To accomplish that, we would make that change in the Dev environment, test it locally in our development instances, and when it's good to go, we can make a new release with version 1.1.0 and have it deployed to Stg for user acceptance testing.
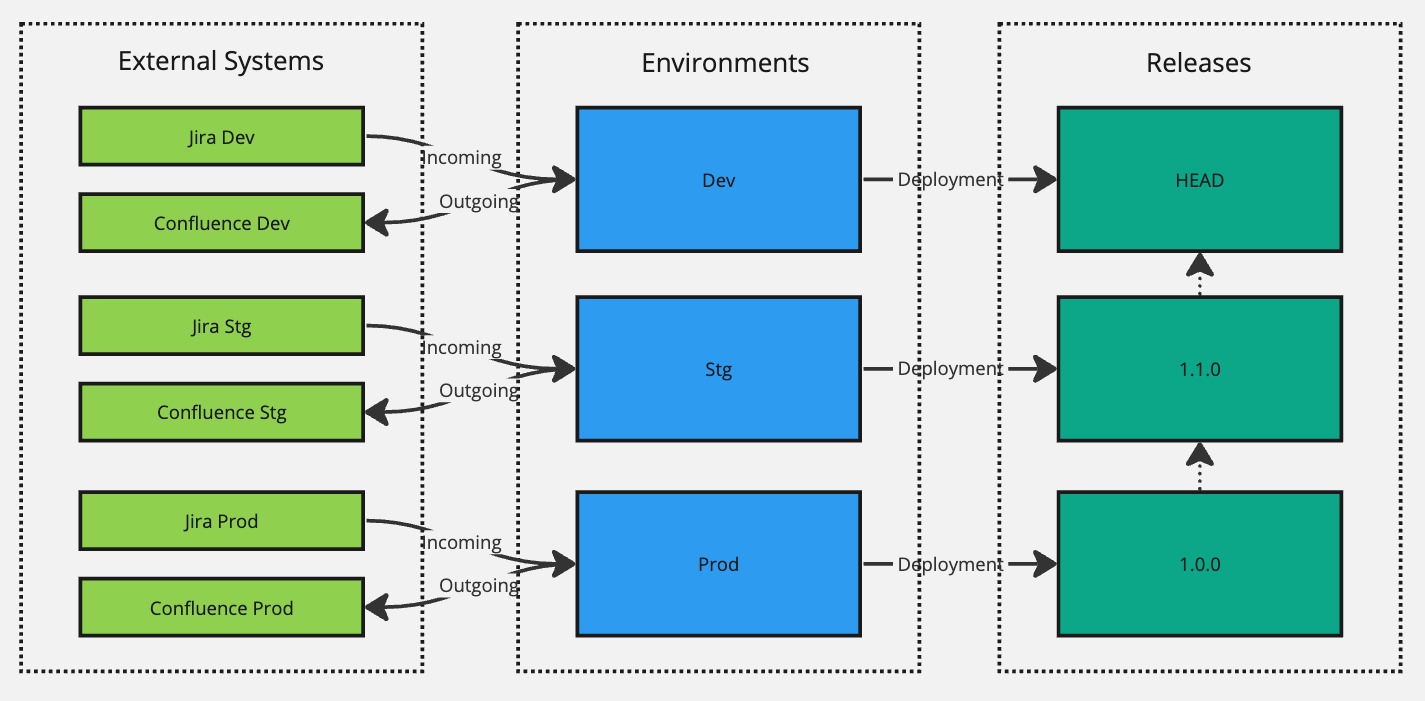
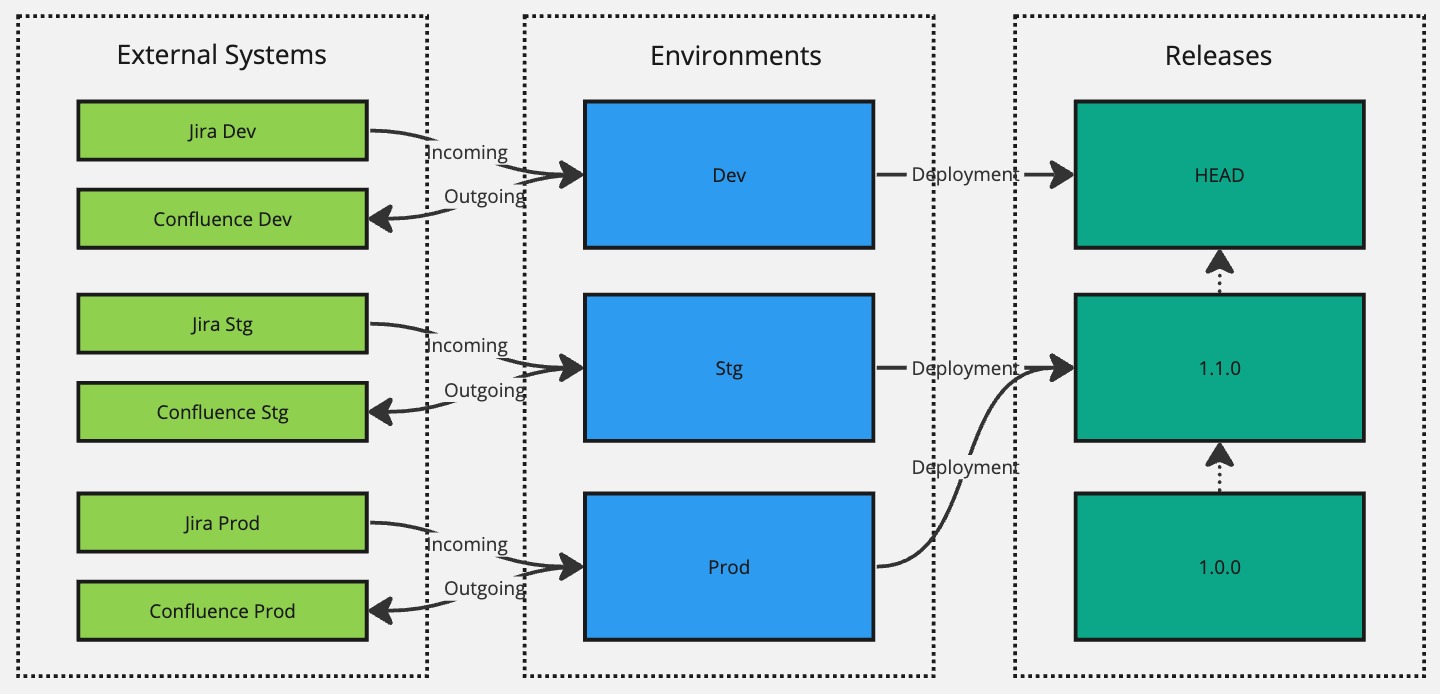
Now we're successfully targeting version 1.1.0 in the Stg environment and 1.0.0 in Prod until user acceptance testing confirms that the changes introduced in version 1.1.0 are good. And when they are good to go, we can again use the Deployment Manager module to re-target the Prod environment to the 1.1.0 version without having to create yet another new release.
Now, let's say that the 1.1.0 version introduced a severe bug that was not caught in user acceptance testing. We should fix it in our Dev environment and create a new release with a version 1.1.1. However, since we know that this bug did not exist in version 1.0.0, we can roll it back the Prod environment to target the 1.0.0 version using the Deployment Manager module while waiting on 1.1.1 hotfix version being verified and confirmed in the Stg environment.
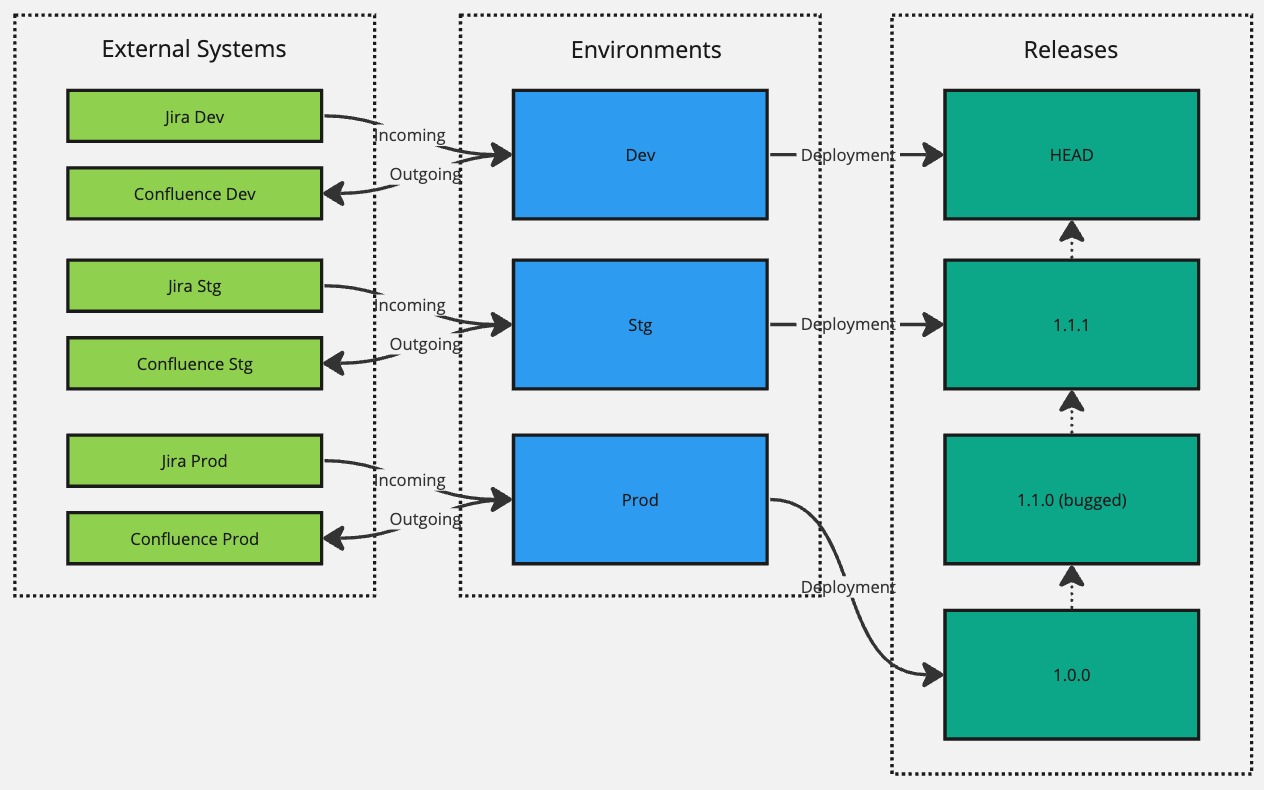
And, finally, when version 1.1.1 is verified to work correctly in Stg, we can re-target the Prod environment to target version 1.1.1.
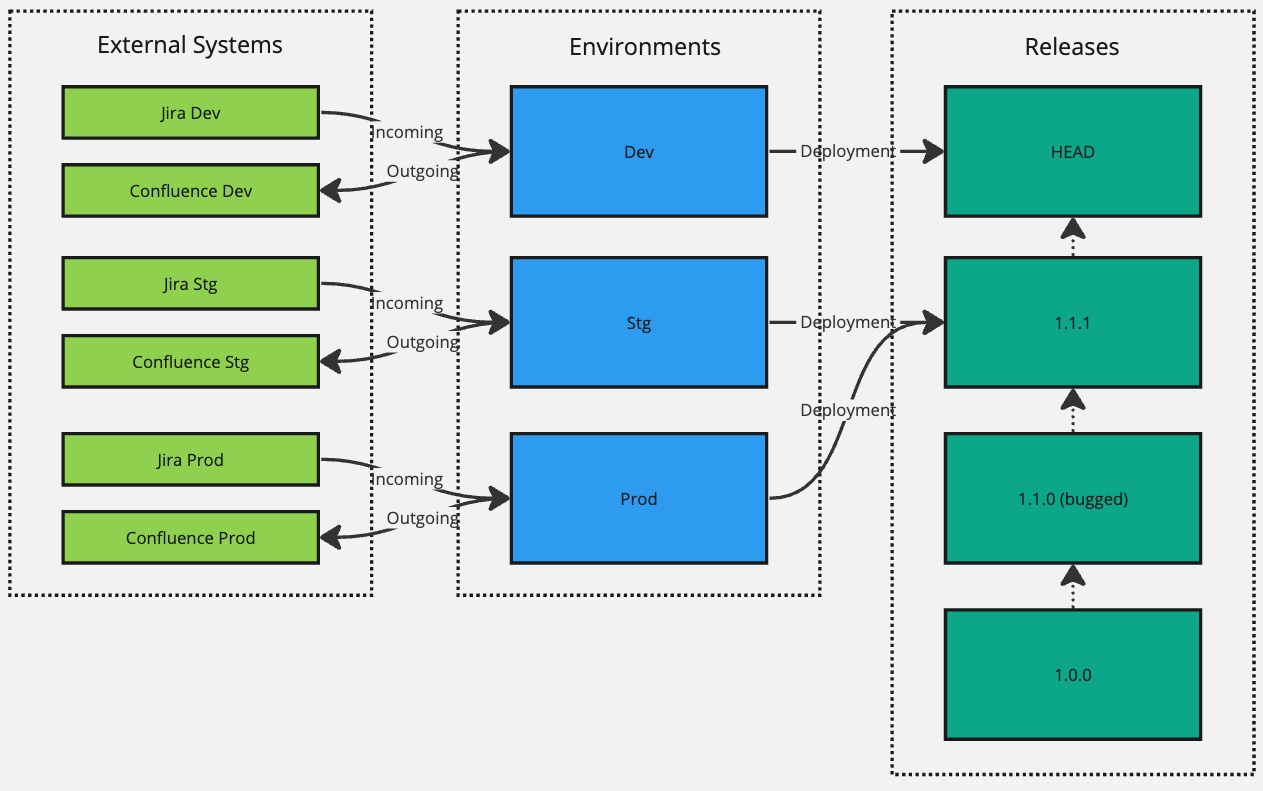
Hopefully, this illustrates how you can use environments, releases, and deployments to roll-out new changes in a controlled fashion.
- Arrows between releases don't have any real significance; they are just there to illustrate the flow of time. HEAD version, the most recent being up top, and
1.0.0version, the oldest being at the bottom. - Although we illustrated full separation in terms of instances being hooked up with our environments, you can mix and match and reuse the same instances across your environments.
Environment-Specific Logic in Scripts
In your scripts, if you need to implement a specific logic that only needs to be executed in a specific environment, you can access the current environment where the script is being executed from context.environment.name.
The context object is always the second parameter passed into your script's entry function.
jsexport default async function(event: any, context: Context) {
	if (context.environment.name === 'Staging') {
		// Do something only when the event was received from Staging environment
	}
}
context.deployment refers to the release that is being targeted in the environment that the script is running in.
context.deployment is undefined if the environment is targeting the HEAD version.