Generic Connector
Out of the box, ScriptRunner Connect offers many connectors that make it easy to call third-party APIs. However, sometimes you may need to connect to something ScriptRunner Connect does not support. ScriptRunner Connect can connect to anything as long as the following pre-requisites are fulfilled:
- Connection to the third-party service can be established. Behind the firewall, services may need to be configured to let the connection from ScriptRunner Connect side go through by either allowlisting our static IP or by setting up a reverse proxy in a less restricted network.
- Third-party service has HTTP-based API that can be called.
The most straightforward way to call a third-party API is to use Fetch API. However, most of the time you'll also need to authenticate the request, and hardcoding credentials directly into the 'fetch' call is a bad practice. To circumvent the need to hardcode any credentials in the code, ScriptRunner Connect offers a concept of the generic connector. The generic connector works with the base URL of the service you want to work with and one or more HTTP headers that need to be passed along with each API request.
Usually, these headers are related to authentication, but technically can be anything that you don't want to repeat or expose in your code.
To add headers, you have two options:
- Add them as Basic Auth, in which case we'll be encoding this header for you so you won't have to.
- Add any other header without any post-processing in the custom headers section.
Once the generic connector has been configured, you can import it like any other API connection and use it in the code.
Generic API connections only expose a 'fetch' function, which you can use like any other Managed API Fetch call.
Example
Even though ScriptRunner Connect comes with a bespoke Connector for Jira Cloud, we could also, for example, use the generic connector to connect to Jira Cloud. First, we need to grab the API Key from Atlassian, and then we can configure a generic connector:
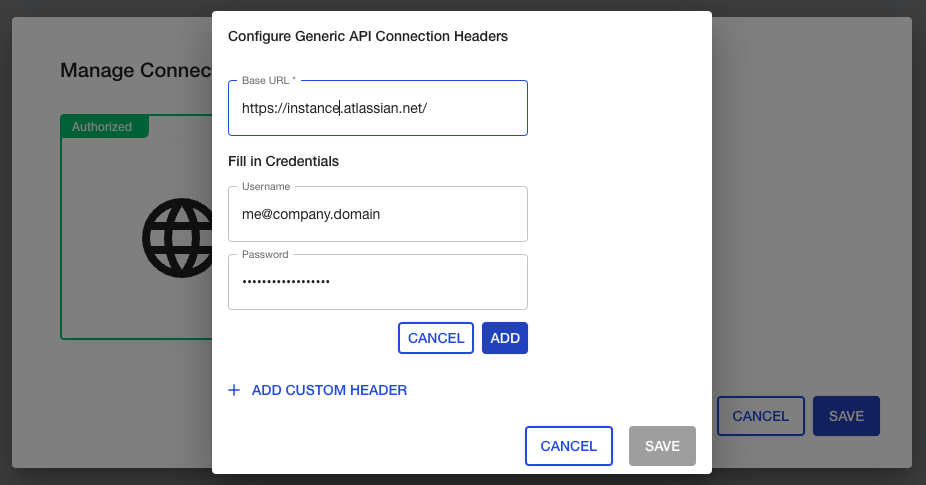
Once the generic connector is configured, we can make an API call in the code.
For this example, let's fetch an issue from Jira Cloud:
jsimport JiraCloud from './api/generic';

export default async function(event: any, context: Context): Promise<void> {
    const issueKey = 'ISSUE-1';

	// Fetch the issue
	const response = await JiraCloud.fetch(`/rest/api/3/issue/${issueKey}`);

	// Check if the response is OK (within 200 range)
    if (!response.ok) {
        // If not then throw an error
        throw Error(`Unexpected response: ${response.status}`);
    }

    // If it is OK, then read the body as JSON
    const issue = await response.json();

	// And then print out the reporter's display name
    console.log(issue.fields.reporter.displayName);
}
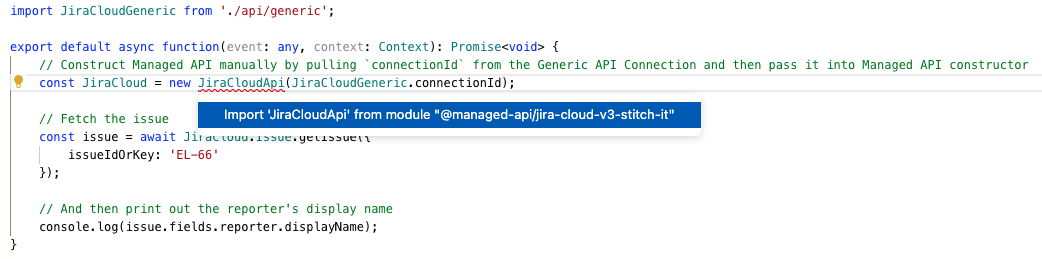
Sometimes you may want to use alternative authentication schemes to what ScriptRunner Connect offers. For example, you may want to connect to Jira Cloud using the API key as shown above but would also like to use managed API rather than a low-level fetch API.
To achieve this, you can construct the managed API manually and use it with the generic connector:
jsimport { JiraCloudApi } from '@managed-api/jira-cloud-v3-sr-connect';
import JiraCloudGeneric from './api/generic';

export default async function(event: any, context: Context): Promise<void> {
	// Construct Managed API manually by pulling `connectionId` from the Generic API Connection and then pass it into Managed API constructor
	const JiraCloud = new JiraCloudApi(JiraCloudGeneric.connectionId);

	// Fetch the issue
	const issue = await JiraCloud.Issue.getIssue({
		issueIdOrKey: 'EL-66'
	});

	// And then print out the reporter's display name
	console.log(issue.fields.reporter.displayName);
}
Importing Managed API Manually
When you use managed APIs via API connections, the construction of the managed API is taken care of for you, which also means you won't have to import them manually. However, when you need to construct it manually, you also need to import them manually. You can find all the managed APIs here, and the ones you need to use include the sr-connect postfix. The convention for the managed API class is `{ProductName}Api` (for example, `JiraCloudApi`).
You can use UNPKG to browse the content of managed APIs if you need to find out the class name you need to import. For example, browsing Jira Cloud's managed API index.d.ts file reveals this information. We aim to make this information more transparent in the future.
You can also use the import-suggestions feature to manually pull in the managed API if you know the import name: