
Script Roots
Script Roots are directories in the Script Editor that ScriptRunner will automatically scan for scripts. The scripts you store here will be available across all of ScriptRunner.
Initial set-up and management
When ScriptRunner is first installed, it creates a directory called Scripts under your Jira home directory and registers it as one of its script roots.
This directory is sufficient for most users, and no other configuration needs to be made. It is a logical place to store your scripts because it is preserved during Jira upgrades and accessible by all nodes in a clustered Jira.
You can create subdirectories for your scripts. You could divide them into the business processes they support. You could also create supporting or utility classes for the subdirectories to use. For example:
- A Script:
- Location:
<jira-home>/scripts/foo.groovy - Script:groovy
import util.demo.Bollo log.debug ("Hello from the script") Bollo.sayHello()
- Location:
- A Class:
- Location:
<jira-home>/scripts/util/demo/Bollo.groovy - Script:groovy
package util.demo public class Bollo { public static String sayHello() { "hello sailor!!!" } }
- Location:
Make sure the supporting and utility classes have the correct package name or you will get a compilation error. For example, for a class in the folder util the package name is util . However, for a class in the folder util/text/examplepackage the package name must be util.text.examplepackage.
In addition, make sure you are aware of recomplation practices when updating classes.
Creating a new script root
You may want to create a new script root that points to a place where you have previously set up scripts. For example, if you want to add /usr/opt/scripts as a new script root, you need a new property that points to your scripts directory:
set JAVA_OPTS=%JAVA_OPTS% -Dplugin.script.roots=/usr/opt/scriptsIf you have multiple roots, make sure you use a comma to delimit them.
Relative paths
You can use relative paths to find scripts stored outside your script root directories. For example, if your default script root is <jiraHome>/scripts but you stored some scripts in <jiraHome>/myScripts, you could use the ../myScripts/myScript.groovy as the file path. However, we recommend you keep scripts within a script root rather than outside of them as it makes future migrations easier. In addition, you may find that the user running Jira does not have permission to access folders and files outside of <JiraHome> when using relative paths.
Searching for your scripts
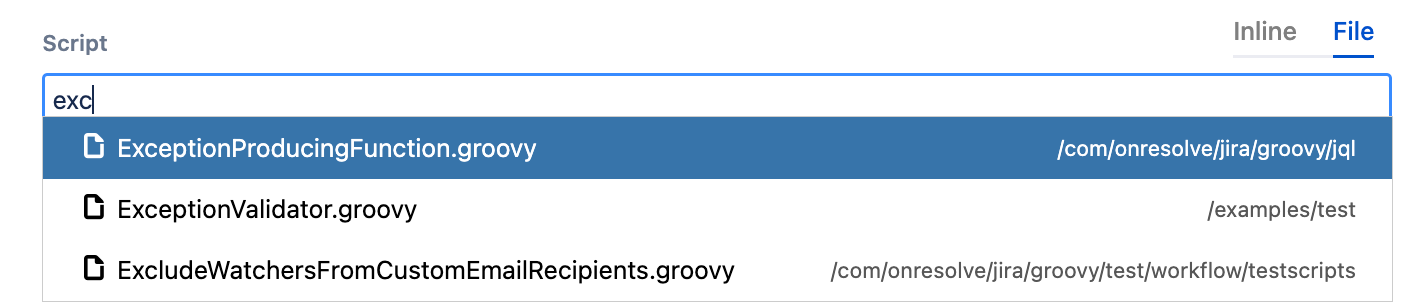
You can search for scripts contained in your configured script roots. Wherever you can enter the path of a script to run, you can search for the script directly in the script file input. You can search by script name, or you can browse the sub-directory structure to find the script you’re looking for.
Find a script by name
When prompted to add a script to a feature, select File and type the filename of the script you wish to use and select it when it displays. The script loads and the static type checking begins to make sure your script is valid.
Browse the script root directory
If you don’t know the name of the file, but suspect that exists somewhere in one of your script roots, you can browse the directory structure under those roots until you find it:
Begin typing the name of the directory you want to search.
As you type, a list of matching directories will appear.Select the desired directory.
You'll now see the contents of that directory (scripts and subdirectories).You can use your mouse (left-click and scroll) or keyboard (arrows and Enter key) to navigate your directories.
Repeat steps 1-2 until you find the script you're looking for.
When you navigate into a directory, the results will only show the scripts in that directory. If you want to search ALL scripts, just remove all characters from the input and start again.
Result Types
The following table contains the different types of result that the search could return:
| Icon | Description |
|---|---|
| An executable groovy script. |
| A directory within one of your script roots. |


Creating utility classes in the script root
When writing scripts you may find that there is certain logic which you reuse over and over. Rather than redefining the same logic in all the places where you want to use it, you could instead create a utility class to store the logic. You can then call that class in all the places where you want to use this logic. In this example, we use the Script Editor to demonstrate how to create a helper class, and then how to call that class from other scripts.
- In ScriptRunner, go to Script Editor.
- Create your helper classes directory structure.
- Add the new class inside the last directory you created.
Make sure your class name matches the file name without the '.groovy' extension. - Give your new class a package name.
The package name must match the directory structure with a '.' separating each level. In this example we have created a Utility class:
- Go to the ScriptRunner function where you want to use this Utility class.
- Import the class into your script using the
importkeyword, followed by the package name, and then the class name. For exampleimport Utils.MessageUtils.MessageGenerator.
- Your script is now correctly referenced and you can proceed with your function or task.
Ensuring proper recompilation by updating dependent classes after dependency changes
For the purpose of this example, we're using the terms dependency class and dependent class. However, you might use different terminology to describe these relationships.
Within script roots you typically work with the following:
- Dependency class: A class that is being called by another class.
- Dependent class or script: A class or script that calls other classes.
If you change a dependency class without triggering an update on the class or script that depends on it, the system will not recompile the dependent class or script. This can lead to outdated code being used.
To trigger recompilation you can make a tiny edit to the dependent class. For example, you can add a space in a comment or add a blank line at the end of the file.
Example
The diagram below illustrates the relationship between a dependent class or script and its dependency classes:
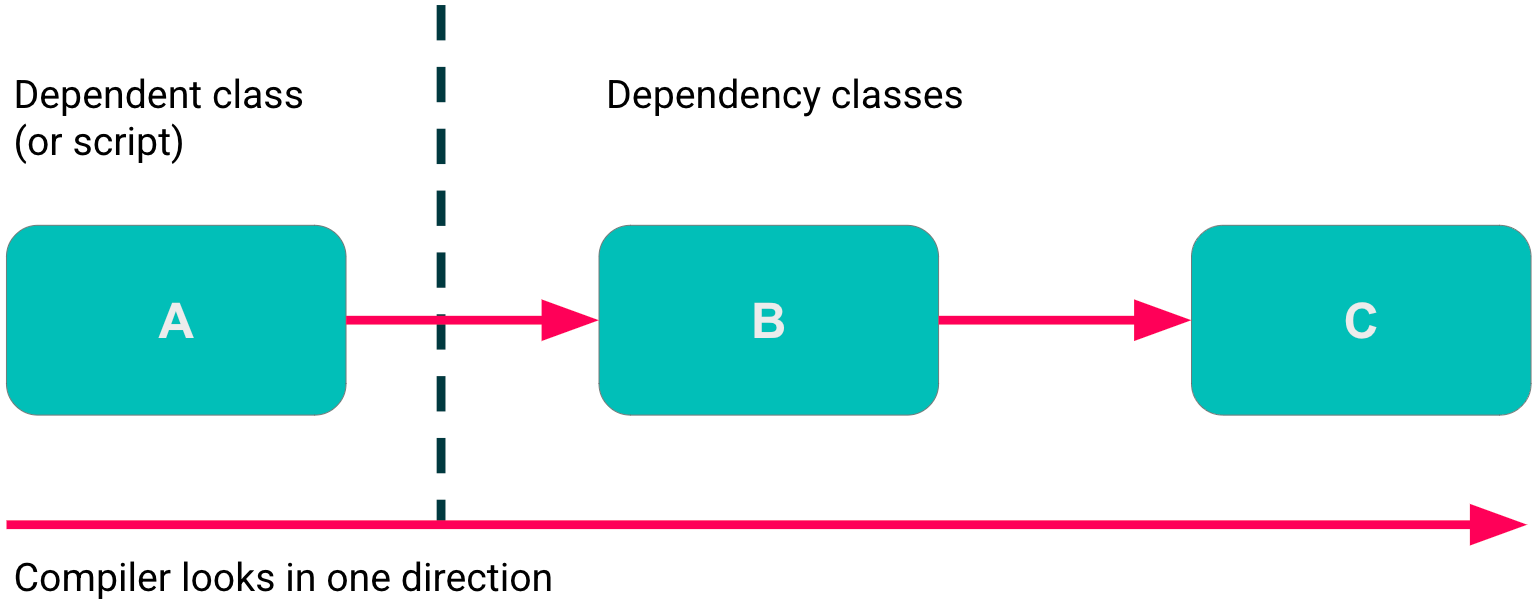
Given this relationship:
Changes to dependency class B or C require an update to dependent class A.
When updating dependency class C, you don't need to manually update dependency class B. This is because:
- Updating dependent class A triggers recompilation.
- During this process, the compiler automatically recompiles dependency class B.