
Web Resource
Web resources allow you to include JavaScript and CSS resources into certain contexts, for example:
in Jira - the view issue page, or admin pages
in Confluence - blogposts or the editor
You can read more about web resource modules for Jira and Confluence.
Setup
Starting with Jira 10, it is no longer possible to configure a custom Web Resource directory for storing your resource files (such as custom JavaScript or css files).
All Web Resources should now be kept in web-resources/com.onresolve.jira.groovy.groovyrunner. This path is located in the Jira Shared home directory if you have a shared home directory configured (such as when using clustered configuration). Otherwise, it will be in the default home directory. For more information on shared home directory configuration please refer to Atlassian documentation.
Modifying CSS
Let's take as an example the task of modifying the CSS only on the view issue page. A better example would be to wire up the buttons of a custom dialog using a JavaScript resource but let's start simple.
Create a resource:
test-resources/red-text.css.Create the
test-resourcesfolder within theweb-resources/com.onresolve.jira.groovy.groovyrunnerdirectory.Create a file named
red-text.css.Edit that file in a text editor.
Enter the following contents:
 body {
    color: red !important;
}
- From ScriptRunner select Fragments > Create Fragment > Install web resource.
- Configure the form as follows:
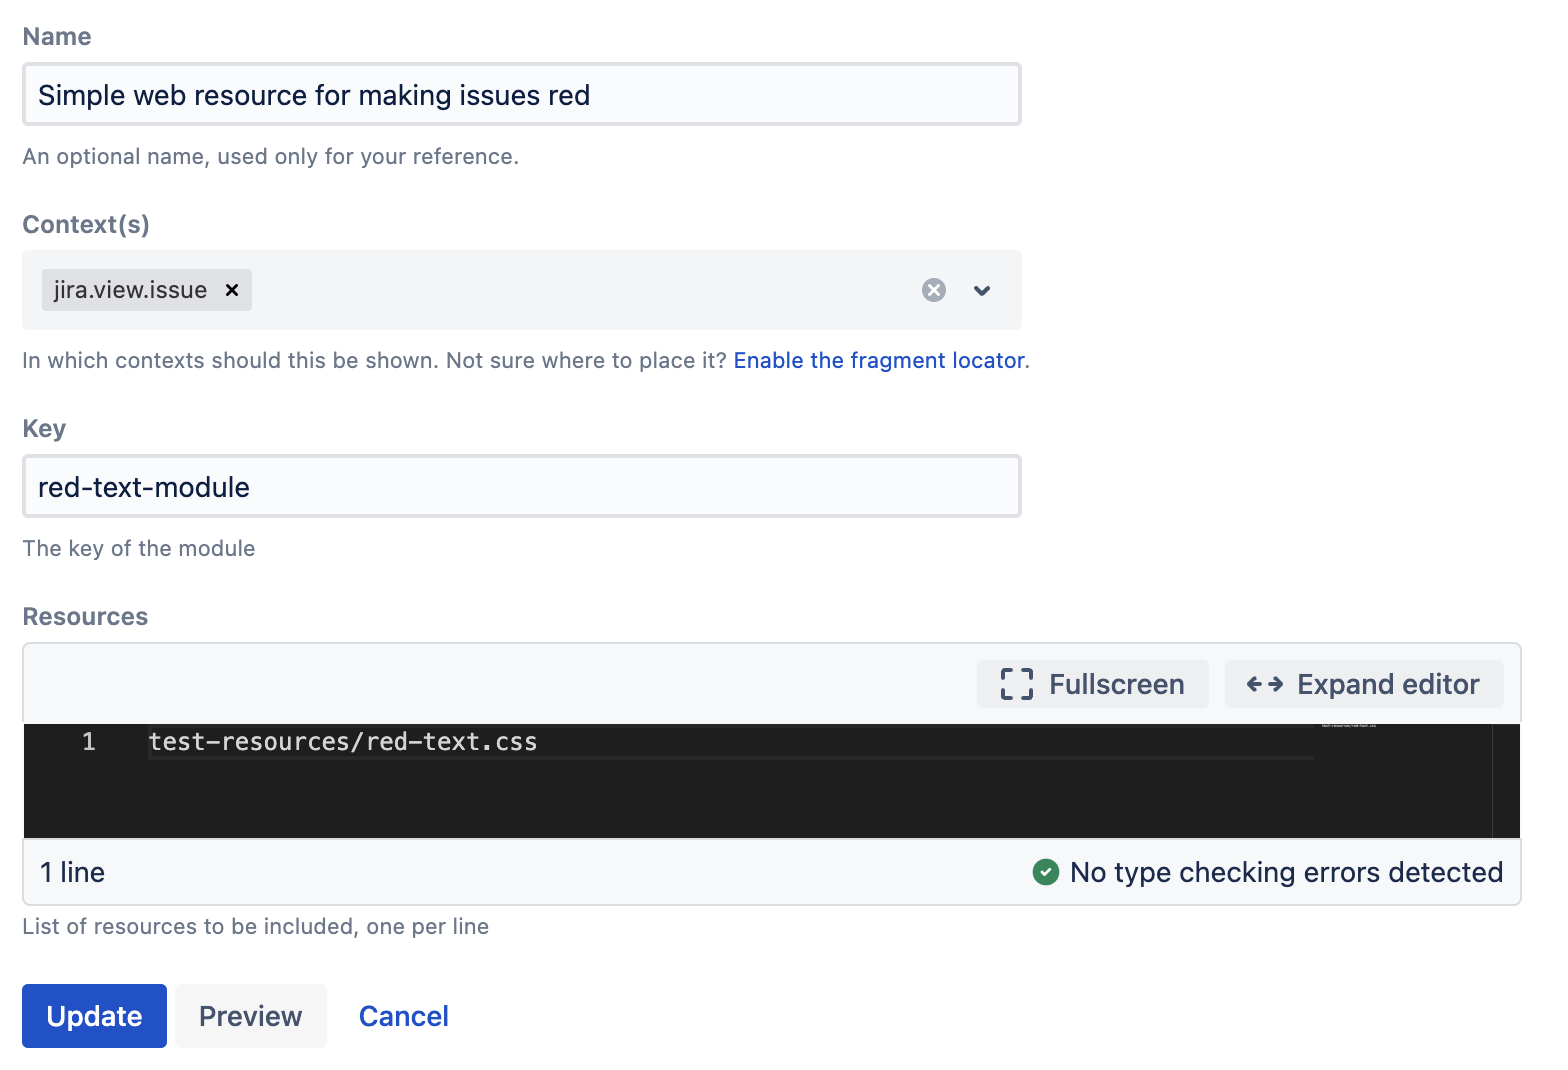
Select Add.
If you get an error, make sure you created the
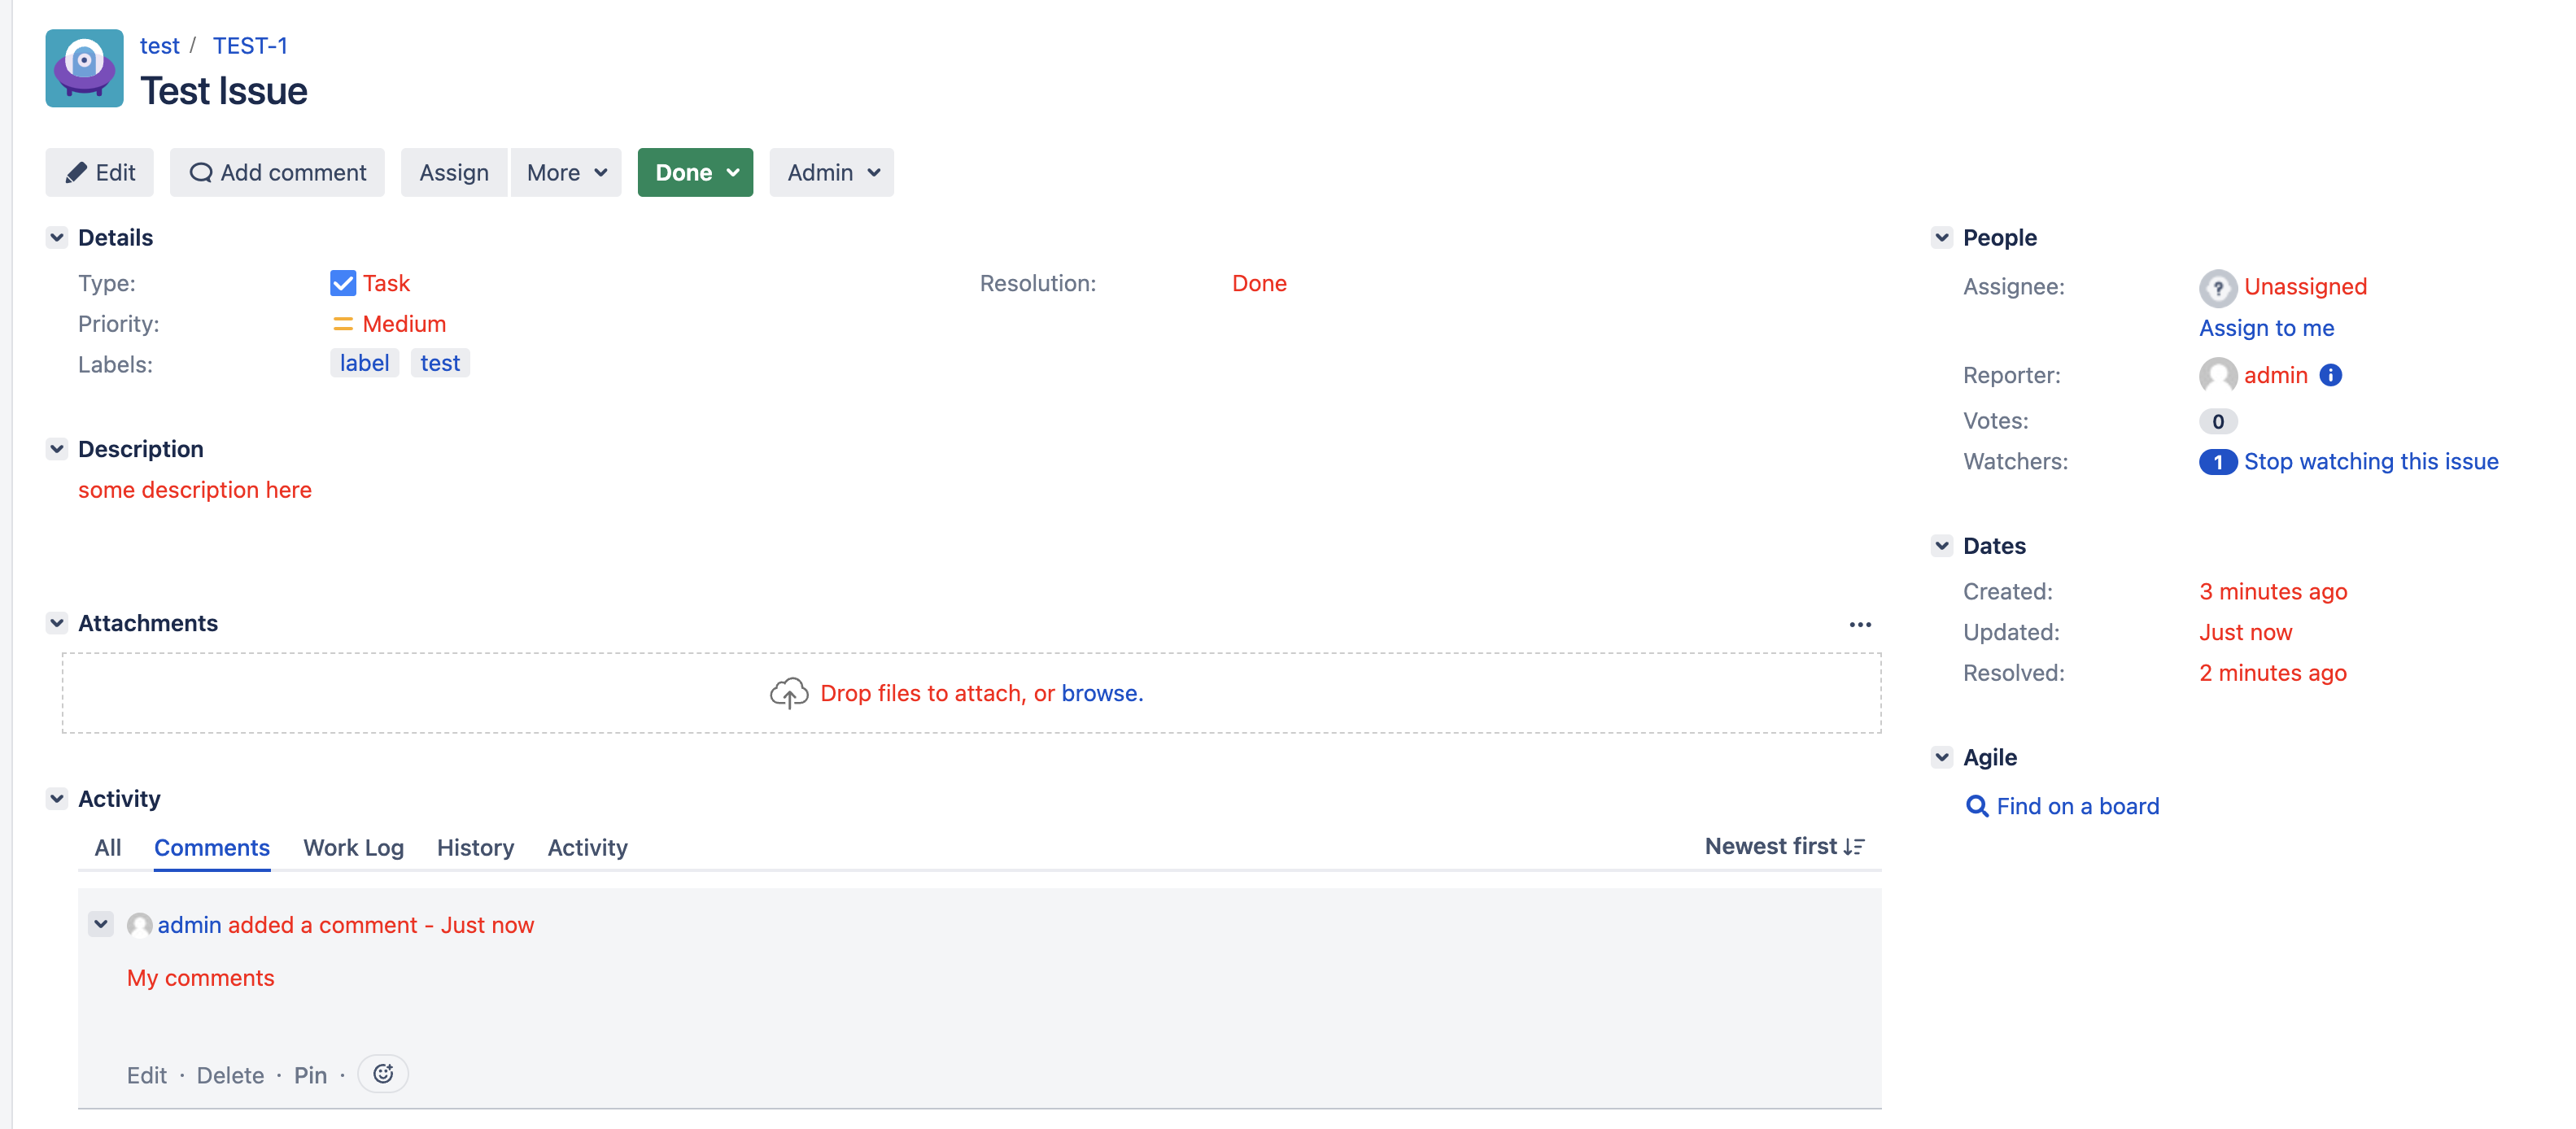
test-resourcessub-folder.Go to an existing issue and it should appear as follows:
Hiding menu button using JavaScript
This is completely superseded by the built-in script Hide UI Element Built-In Script - however it’s here as an example of including javascript and manipulating the UI.
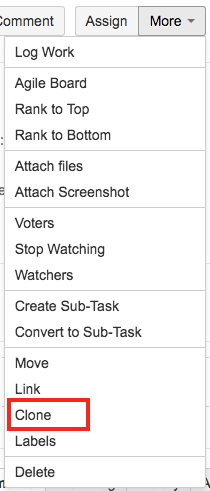
Let’s take an example that uses JavaScript to hide Clone menu button for a specific project. End of this exercise Clone link will be invisible for a project with key JRA. The following image shows the location of the Clone button which we want to hide.
Copy and paste the content in a text editor and save it as
hide-clone-link.jsunder theweb-resources/com.onresolve.jira.groovy.groovyrunnerdirectory.groovy(function ($) { $(function () { /** * Binding is required for link such as * http://localhost:8080/jira/projects/JRA/issues/JRA-4?filter=allopenissues */ JIRA.bind(JIRA.Events.NEW_CONTENT_ADDED, function (event, $context, reason) { if (reason === JIRA.CONTENT_ADDED_REASON.pageLoad || reason === JIRA.CONTENT_ADDED_REASON.panelRefreshed) { hideCloneMenuItem(); } }); hideCloneMenuItem(); }); /** * Hide the clone menu */ function hideCloneMenuItem() { var projectKey = "JRA"; var issue = JIRA.Issue.getIssueKey(); if (typeof (issue) !== "undefined") { var currentProject = issue.substr(0, issue.indexOf('-')); if (currentProject == projectKey) { $("a#clone-issue").hide(); } } } })(AJS.$);Line 7: Bind function in "NEW_CONTENT_ADDED" event. More detail is available here: Working with the NEW_CONTENT_ADDED event.
Line 20: I am using a project key "JRA" for this example. You need to change the key according to one of your preferred project key.
Line 23: Get the project key from the issue key.
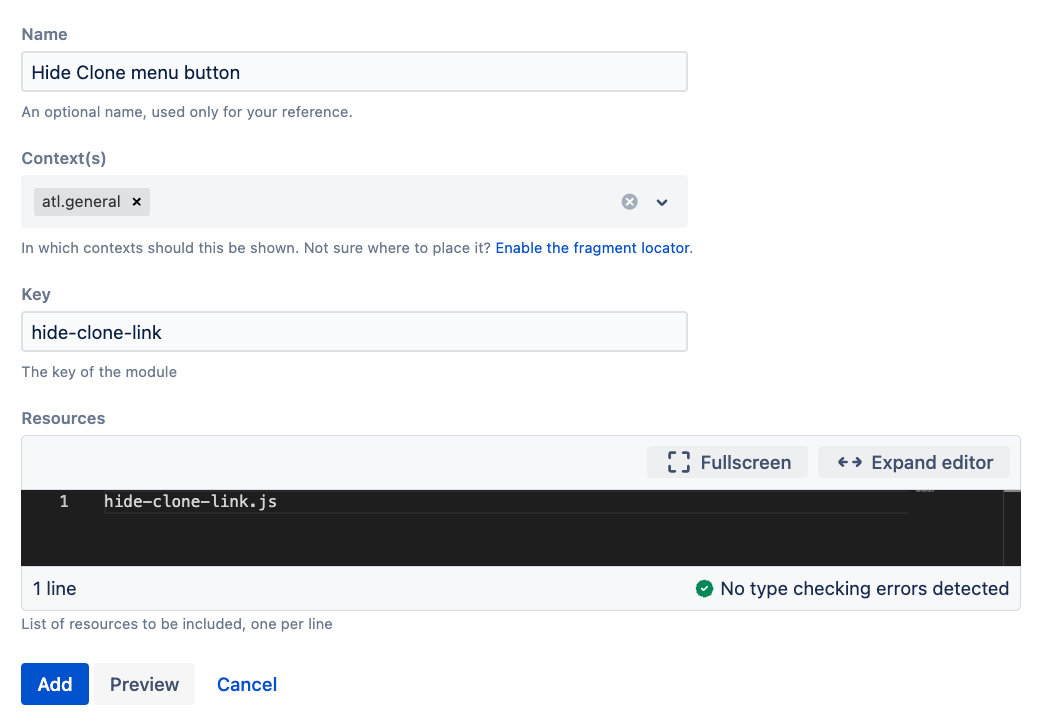
Line 25: Hide the anchor with class "clone-issue" if condition satisfies.- From ScriptRunner select UI Fragments > Create Fragment > Install web resource.
- Configure the form as follows:
- Select Preview. A valid result should display. In case of error make sure the file name and Resources name is the same.
- Select Add. Refresh to check the Clone button is invisible for all the issues in project with key JRA.