Remote Events
A standard event listener allows you to listen for and respond to events that occur in the current application. Remote events allow you to listen for events in a linked Bitbucket, Jira or Confluence instance. Bamboo will be available soon.
Examples of possible usage include:
Provisioning - when a project is created in Jira, create it also in Bitbucket and Confluence.
Synchronize Jira versions between instances - when you create a version in one Jira instance it appears in another
When a Jira version is created, automatically create a page in Confluence
When setting up a remote listener, you will select the linked application, then choose one or more events to handle. Under the covers, when the event is fired on the remote application, it will be serialized to JSON, then sent to the receiving instance. Upon arrival it’s republished as a local event and your listener will then respond to it.
It’s important to note that the event received is just a Map, and not the same type of event that you would get if it you were responding to a local event. The best way to start with remote events is to set up the remote listener, then log the event you get:
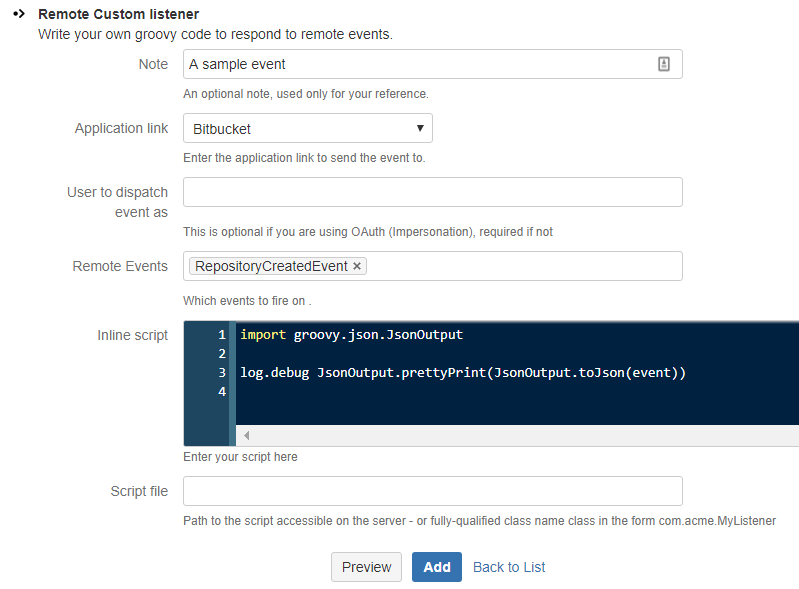
Select the application link which points to the application that you wish to receive events from. For the purposes of this example, we will receive an event from Bitbucket, but it doesn’t matter which event or which application you are using, the same technique applies:
The code sample above is the following. It simply dumps the content of the event to the log.
groovyimport groovy.json.JsonOutput

log.info "Remote event received: "
log.debug JsonOutput.prettyPrint(JsonOutput.toJson(event))
Note on app link configuration.
If you have not configured OAuth (Impersonation), you may be prompted to authorize communication to the remote app in order to retrieve the list of events, on your behalf.
Upon submitting the form, the remote app will contact the app you are working on, to verify it can send the event
as the user that initiated the event. If you are not usingOAuth (Impersonation), you should specify a user that will send the events. We discuss getting the actual user that initiated the event later.
It’s a good idea to create a user called for example bot, that exists on each application. You can then configure remote events to be sent as this user.
To test the handler, we will cause the event to be fired on the remote application, in this case by creating a new repository in Bitbucket.
If everything is set up correctly, on Jira you should see in your logs something like the following:
js{
    "actor": {
        "active": true,
        "displayName": "Mr Admin",
        "emailAddress": "admin@example.com",
        "name": "admin",
    },
    "date": "2017-07-27T20:18:36+0000",
    "eventClass": "com.atlassian.bitbucket.event.repository.RepositoryCreatedEvent",
    "repository": {
        "forkable": true,
        "id": 14,
        "name": "thing",
        "project": {
            "id": 1,
            "key": "TEST",
            "name": "TEST",
            "public": false,
            "type": "NORMAL"
        },
    },
    "uuid": "0979b03b-afb6-464c-bc91-274dac63f937"
}
// some properties omitted
So, the event object is a Map with the properties above. To get the repository name you would use:
groovyassert event.repository.name == "thing"
The project key for this repository:
groovyassert event.repository.project.key == "TEST"
The user name that initiated this event on the remote system:
groovyassert event.actor.name == "admin"
If using OAuth (Impersonation), and you have not specified a user to send events as, the current user when receiving the remote event will be the user that initiated the remote event. You can get that user in the normal way for your application, eg on Jira:
groovyimport com.atlassian.jira.component.ComponentAccessor

ComponentAccessor.jiraAuthenticationContext.loggedInUser
If you have specified a user, you can get the remote user name using event.actor.name.
Example: Synchronize Jira Versions
In this example we have two Jira instances linked together. We’ll assume that there is at least one like-named project on both instances.
When the create version event arrives we will simply create a version in the same project on the local instance.
Line 13: Dump the JSON representation for debugging purposes
Most of this code relates to the fact that we don’t receive the dates as a Date class, so we need to parse them out. Dumping the event map will show you exactly what you are getting. See the documentation on remote events for an alternative way of accomplishing this.


