
Behaviours Tutorial
Jira includes several features that allow you and your team to be flexible in how you gather information to complete your work. One way to accomplish this flexibility is through field configurations. A field configuration customizes how fields behave, based on the issue operation screen they appear on. A behaviour in ScriptRunner allows you to take that field customization further.
Behaviours are part of the overall Jira functionality, so you manage them from the Behaviours page in the Administration menu (Administration>Add-ons>Behaviours). However, each behaviour maps to a field for a project and/or issue type.
A behaviour allows you to define field actions for a specific project or issue context. Behaviours are similar to field configurations but enable you to work with additional options. As a reminder, a field configuration in Jira defines how fields in your instance act and can handle tasks such as setting hidden/visible fields or required/optional fields. A behaviour allows you to create additional requirements or restrictions on the field, and you can do so for specific issue types and/or projects. However, a behaviour cannot override field configurations- for example, if a field is required, you cannot use a behaviour to make it optional.
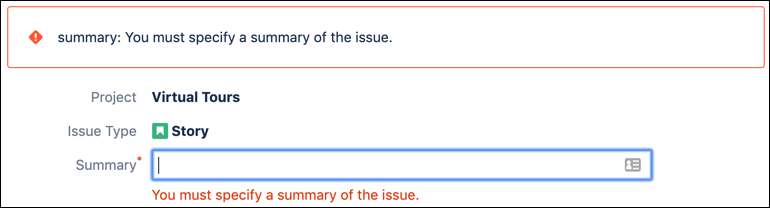
While useful, there are some other things behaviours cannot handle, including making bulk edits, overriding required fields in a field configuration or workflow validators, or setting multiple behaviours on the same field. Another thing to keep in mind is that with a behaviour you can hide a field, but you should never hide a field that is mandatory, like an issue Summary. In this case, the Summary field is a required system field, so if you use a behaviour to hide it on the creation screen, users still get errors that they must fill it out and thus can’t create their issues.
You should also be aware that if you use a behaviour to link to other projects, the user interacting with the behaviour needs the appropriate permissions in those projects to do whatever it is you are having them do. For example, if you create a behaviour that allows a user to link to issues, that user must have the Link Issues permission in the other projects.
Why Use Behaviours?
Behaviours give you more control over your fields in Jira. They let you extend the standard field configuration options and provide you with additional settings so that you can require fields to be completed at different issue operation screens. Some behaviours also let you add additional fields when a particular item is selected. So, for example, a project may need customer information that is very specific, but if it is a new customer, they are likely not in the system yet. Using a behaviour, you can include an option in a select list, that would then cause a new text field to show, where you can add the new customer’s information.
Behaviours also give you more power to get information from users within context. So, when a user needs to create a bug issue, a behaviour could be used to explain what information is needed in the description. Because you can auto-generate additional fields based on input from existing fields with behaviours, you gather information when it is needed and after it is known.
The Parts of a Behaviour
When you create a new behaviour, you need to update three main sections including:
general settings, where you define a guide workflow and set an initialise (if using),
fields, where you set the action for the behaviour, and
mappings, where you set what projects and issue types use this behaviour.
Settings
A Required Name and Optional Description
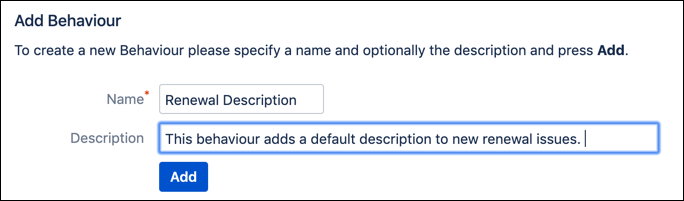
You start your new behaviour with a Name and Description. This required name should identify the behaviour. The description is optional, but it can help other Jira administrators understand the purpose of the behaviour and how they can use it.
Behaviour Settings
The Behaviour Settings define some general options for the behaviour before you get into the specific field settings. The settings include a Use Validator Plugin option, which allows you to check your workflow for the use of a specific validator in Jira Suite Utilities. This option is turned off by default.
You also see a menu for a Guide Workflow. This guide workflow helps when you add a condition to a field, by looking at the workflow steps from the workflow you selected to use as a guide.
Lastly, this section is where you set your initializer, if using. More on that, soon.
Fields
Behaviours allow you to set additional options on fields in Jira. When you select a field, you can work with pre-built options available similar to what you find in a field configuration. These options include optional/required, writable/read-only, and shown/hidden.
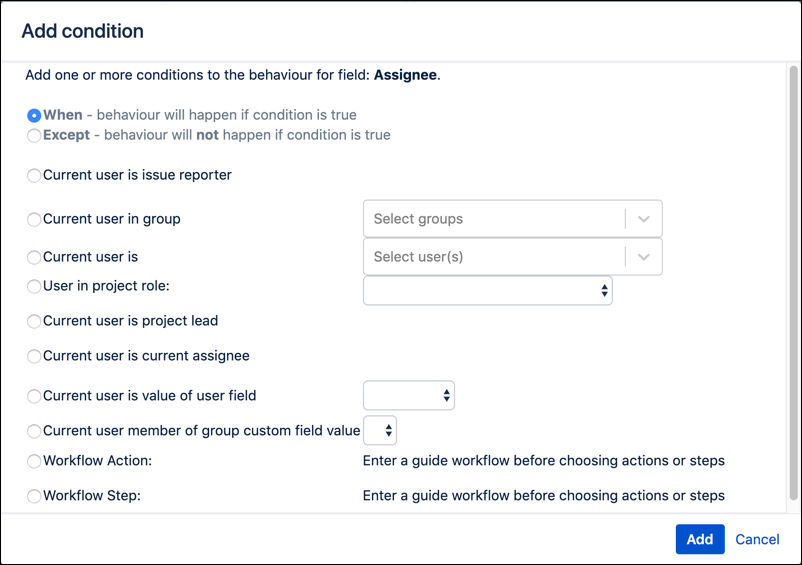
You can also add a pre-built condition on a field that allows you to set additional restrictions or requirements based on the field you choose. For example, the Assignee field may include a Current User in Group condition or a User in Project Role condition.
And lastly, if you need to add a server-side script to run on this field each time a user interacts with it, you click Add Server-Side Script and add your script.
Mapping
This option sets to which projects and/or issue types the behaviour applies. If you are mapping to a Jira Service Management project, you need to use the option Use Service Desk Mapping. Why? Service Management projects work a bit differently than Jira Core or Jira Software projects in that they map to service desks (which are projects) and request types instead of projects and issue types.
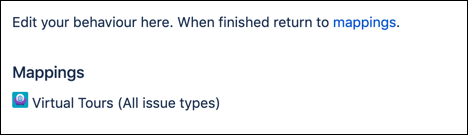
Once you add a mapping, you can view that mapping for the behaviour on the Fields page for the behaviour.
Once or Often?
As part of updating the new behaviour fields, you need to determine how often your behaviour runs. You must set up a behaviour to run one time for a field, or anytime you update a field. If the behaviour runs once, you set a script called an "initializer." In an initializer, the script runs once and only once for each new instance. For example, you can set a Default Description behaviour that adds some guidance in the Description field of an issue the first time a user creates an issue. The script won’t run again if that user edits the issue, because they only need it to run the first time. Not all behaviours need or use an initializer.

The other option for behaviours is to run every time a user edits the field. When you set this option, you choose the field or fields for the behaviour, and then add the server-side script to update the field every time a user interacts with that field.
So when do you use these? It depends on what you need to achieve. If you don’t want information to be overwritten by a behaviour (like in the case of the Default Description example), you probably want to use an initializer function. On the other hand, if you need this behaviour to happen any time the field is edited, you want to add the server-side script to the field.
Examples of Behaviours
Add a Default Description Behaviour
In this example, we set a default description for renewal issues in the Great Adventure Licensing and Finance project. This description contains set text to help the licensing specialists complete the issues, acting as a template to gather the correct information.
From the Jira Administration menu, select Add-ons.
On the Manage Apps page, under Behaviours, click Behaviours (You can also type . to open a shortcut dialog box, and then type
Behaviours).Under Add Behaviour, enter a Name and Description for your new behaviour, then click Add.
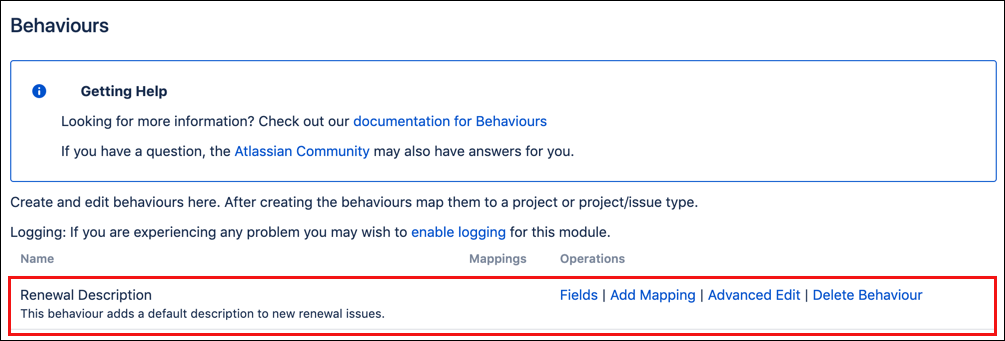
The new behaviour appears on the Behaviours page. Notice that it is not currently mapped.
For your new behaviour, click Fields, the first option in the list under the Operations column.
Now we’re on the Edit Behaviour page. Under Behaviour Settings, there are several options. For this behaviour, we need to add an initaliser, so click Create Initialiser.
An inline script editor opens. Copy and paste the script below into the Initialiser inline script editor.
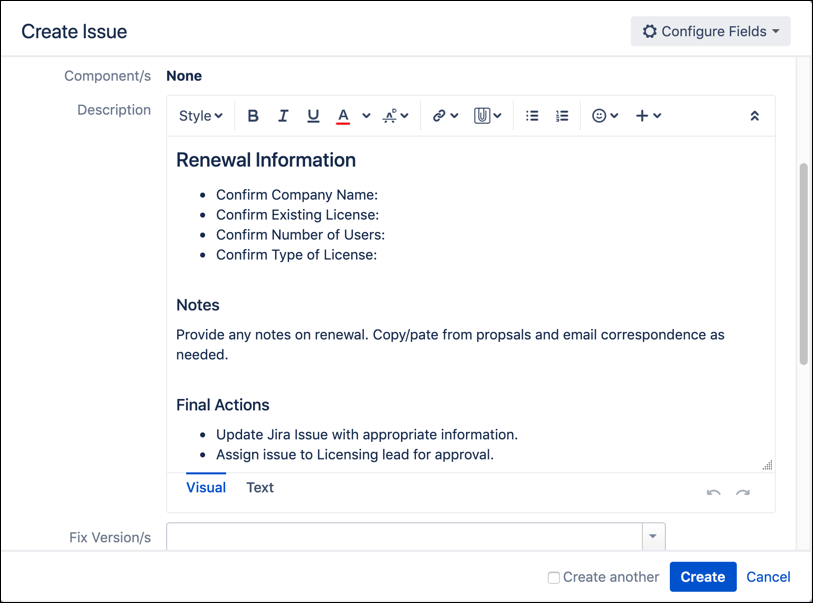
def desc = getFieldById("description")

def defaultValue = """\
        h2. Renewal Information
        * Confirm Company Name:
        * Confirm Existing License:
        * Confirm Number of Users:
        * Confirm Type of License:

        h3. Notes
        Provide any notes on renewal. Copy/pate from proposals and email correspondence as needed.

        h3. Final Actions
        * Update Jira Issue with appropriate information.
        * Assign issue to Licensing lead for approval.
    """.stripIndent()

if (!desc.formValue) {
    desc.setFormValue(defaultValue)
}
This script adds a default value to the Description field in Jira as a sort of prompt or template for users when they create issues. The first portion of the script points to the Description field, and the second portion defines the default value, including formatted text. This script is for the specific example described, but it can be edited.
After you’ve made any changes, click Save and a success message appears.
Near the top of the page, in the blue-outline box titled No Mapping Defined, click Add One Now.
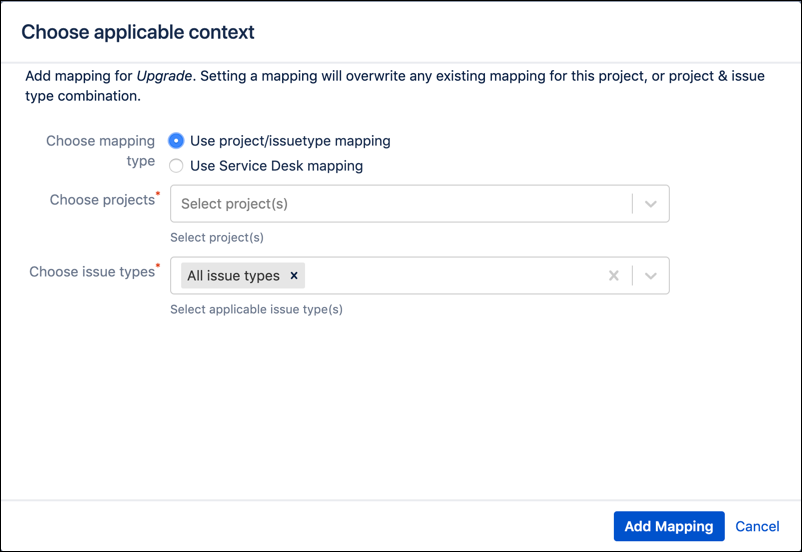
On the Choose Applicable Context window, set your mapping options:
For Choose Mapping Type, select Use Project/IssueType Mapping.
For Choose Projects, select the the correct project(s).
For Choose Issue Types, select applicable issue types. If you want this to apply to all issue types, you can leave it at
Any Issue Type. If you want this behaviour to apply to specific issue types, select from the list. Use (CTRL+ click) or (Cmd+click) to select multiple issue types. .When you are finished, click Add Mapping.
Back on the Behaviours page, the new behaviour now includes mapping. Note that you can still edit all of the options we just set or even delete the behaviour.
Once you have your new behaviour mapped, you should test the behaviour in the project(s) you mapped it to. To check the Default Description, create a new issue in the project and issue type you indicated. If things went as planned, you should see the new default description.
For more examples of behaviours see our documentation or the Adaptavist Library
Built-In Behaviour Options
In addition to using recipes and writing custom behaviours, you can also update behaviours using built-in setting options. The process for these built-in options is similar to working with a script, as we saw in the default description behaviour example. However, instead of adding a script, you manipulate the field through behaviour settings and conditions.
Create a new Behavior by entering a Name and clicking Add.
Add a mapping to the project and issue type you want this behavior to affect.
Click Fields to open this behaviour and view its settings.
Under Behaviour Settings, there are several things you can change.
Leave the Use Validator Plugin set to off.
Look at the Guide Workflow. This setting allows you to pick the right workflow statuses and transitions when you use conditions for the behaviour.
Set an initializer script if needed. Remember, initializers run the first time the issue loads, but they require some Groovy scripting.
When you add a field, there are some specific settings. This area is where you can set field configuration type options for the behaviour and apply certain conditions to the behaviour.
Choose a field and click Add.
There are three options to set: Optional, Writable; Shown.
Next are conditions for the behaviour. These look for the requirements to allow the different configuration options to be true. For example, you could create a condition that uses the condition to allow only project administrators to edit this custom field.
Under Conditions, there is an option to add a server-side script field. If you use a behaviour that does not require an initializer, you would add and update the custom script for the behaviour here, though you don’t have to. Updating the field options and conditions can create a behaviour for the field selected without writing a script.
Finally, at the very bottom, you see that you can add additional fields, so you could create a behaviour with multiple fields for a certain project and/or issue type.
Of course when you are finished, click Save.
For more in-depth info on behaviours see the Behaviours documentation section.