
Behaviours Activities
Make sure you have completed the activity set up tasks before attempting this activity.
Create a Simple Behaviour
For this activity, you use the built-in menu options to change the behaviour of a field, restricting an action that you choose to a specific role. In our example, we build a behaviour that restricts a custom field called Customer Type to only project administrators. You can use this same approach in your lab environment, or you can experiment with a different field or behaviour condition.
Access Behaviours from the the Manage Apps page.
On the Behaviours page, under Add Behaviour, enter a Name and Description for your new behaviour, then click Add.
The new behaviour appears on the Behaviours page. Notice that it is not currently mapped to a project or issue type. In our example, we’ve added the behaviour Admins Only.

Next to the behaviour you added, under Operations, click Fields.
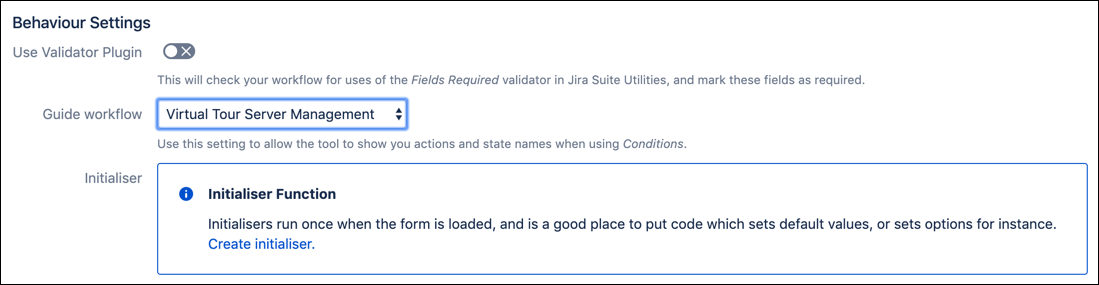
On the new page, update the behaviour settings. If you want to set a guide workflow, select that workflow in the Guide Workflow menu. Depending on your project, you see different workflow options here. Remember that the guide workflow helps you when selecting a condition for the behaviour. In our example, we are not using a validator plugin or an initializer.
Scroll to the Add Field field, select a field to use for this new behaviour, and then click Add. You can select custom fields or system fields. Just remember to not update required fields (like Summary) as read-only or hidden — this will break your issue creation! In our example, we choose the field Customer Type.
Under Fields, update your field behaviour:
Optional/Required - Make the field optional or required. You cannot make required fields from a system configuration optional.
Writable/Readonly - Make this field viewable by users unless they meet a condition, or make it always read only.
Shown/Hidden - Make the field hidden or visible. Do not do this with required system fields such as Summary.
Under these options, you can add a new condition to the field. When you add a condition, you also need to set the options for when the condition occurs.
When - the behaviour happens when the condition is met.
Except - the behaviour does not happen when the condition is met.
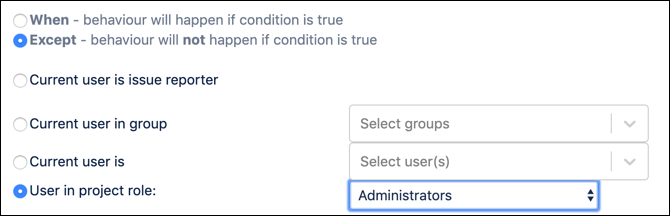
In our example, we chose to make the Customer Type field readonly, set that the user must be in the Administrators project role and used the Except option, so this field appears as readonly to all users expect those in the project administrator role.
When you are finished updating your behaviour, click Save. You still need to map the behaviour.
Scroll to the top of the behaviour after saving, and under Mappings, click Add Mapping.
Then select the mapping type (Project/Issuetype or Service Desk) and then select the project(s) and issue type(s) to associate this behaviour with. For our example, we chose the Virtual Tours team and Story issue type.
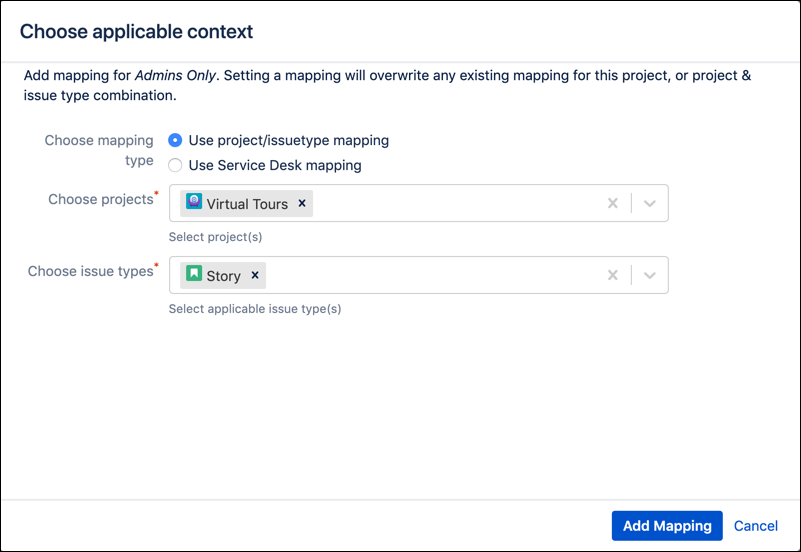
Click Add Mapping to map the behaviour to the appropriate projects and issue types, and then you are all set! Test your behaviour by creating the appropriate issue type, paying attention to any conditions you may need to test.
Create a Select List With Other
For this activity, we create a behaviour that uses an option from a select list to show a text field.
Access Behaviours from the the Add-Ons page.
On the Behaviours page, under Add Behaviour, enter a Name and Description for your new behaviour, then click Add.
The new behaviour appears on the Behaviours page. Notice that it is not currently mapped to a project or issue type. In our example, we’ve added the behaviour Select List.
For this example, you need to add the custom field Favorite Fruit as a select list and Favorite Fruit (Other) as a text field, or you can experiment using existing fields in your test instance.
Next to the behaviour, click Fields.
On the Edit Behaviour page, in the Add Field menu, select the select field you plan to use for this behaviour. For this example, we select the Favorite Fruit field.
Now, we need to add a server-side script to the field for it to show the additional text field when someone selects Other from the first select list. Click Add server-side script and copy and paste the following in the inline script editor.
You won’t do anything with the Favorite Fruit (Other) field as part of this behaviour - it is all taken care of in the script.
groovydef otherFaveField = getFieldByName("Favorite Fruit (Other)")
def faveFruitField = getFieldById(getFieldChanged())

def selectedOption = faveFruitField.getValue() as String
def isOtherSelected = selectedOption == "Other"

otherFaveField.setHidden(! isOtherSelected)
otherFaveField.setRequired(isOtherSelected)
Make sure you get the green success circle in the bottom right of the editor that indicates your script is correct. Be aware if you used something other than the examples we laid out, the script will likely need tweaking to work for your situation.
Click Save to save your new behaviour and make sure to map the behaviour to the appropriate project and/or issue type.