
Write/Run Tests
ScriptRunner makes easy things easier and allows experienced users to perform advanced tasks. You can do anything in a script that you could do in a plugin, usually without the overhead of understanding the host of software development tools and methodologies that a typical plugin developer would have to worry about.
If you’re using ScriptRunner extensively to write a lot of custom code or small amounts of custom code that heavily is relied on, you’re getting into the development platform portion of the product. Even if your formal job title or role is not in software development, that’s okay! You can write and run tests of your code to make sure it’s functioning.
Automated tests help complicated testing tasks, like:
Detailed testing plans to make sure custom scripts work after upgrading linked instances of Jira and Confluence with repetitive tasks that need to be completed throughout the upgrade cycle
Verification to make sure script works as you develop it, without having to click through several steps in the UI every time you make a change.
Not every ScriptRunner user needs to write tests, but when you feel that you need them, you should start writing them. For example, this need could be from doing repetitive work to tests scripts or fielding concerns from others about the reliability of custom scripts. Anything that makes you say, "I wish I had a quicker way to test this…" is a good reason to start writing automated tests for your scripts.
An Aside for the Initiated Developer
Automated tests are integration tests, so they test your code within the context of a running Atlassian host application. The supported testing framework is Spock.
A unit test only tests your code, which typically means isolating your code by mocking any Atlassian managers and services. You could write a unit test, but it would be expensive to mock everything, and scripts are frequently simple enough that your logic isn’t complex enough to require testing.
The goal of automated testing is to make sure the script still works after you’ve made a change to the script or the environment where it runs.
If you’re building a script plugin with a host of custom classes that have deep business logic of their own, you may have different needs that require a unit test suite.
If you do build unit tests instead of using automated testing, make sure you’ve got enough integration tests in place to be prepared for changes to Atlassian’s API in the next major release.
Writing and Running Tests
Avoid running tests on a production server. Most tests create data to perform tests on, change bits of the host application’s configuration, and do other things that you wouldn’t want done on a real live system with users milling about.
You can set up a test instance and/or local development environment where you can run your tests. You can get a development license to set up a test server where you can run a cloned instance of your Atlassian application.
ScriptRunner includes a testing library, Spock. Like ScriptRunner, it is from the Groovy ecosystem, and it makes automated tests more readable, maintainable, and approachable.
A basic Spock test looks like this:
groovyimport spock.lang.Specification

class MyVeryOwnScriptSpec extends Specification {

    def "test that my script does what I say it does"() {
        setup: "create any test data I need (projects, issues, etc.)"

        when: "I invoke run my script"
        //write code that makes your script run here

        then: "my script makes the changes I expect"
        true //Each line is an assertion
        1 == 1 //Anything that returns true will let the test pass
        "a" == "b" //Anything that returns false will cause the test to fail
    }
}
Fill in the lines beneath setup:, when:, and then: blocks with code that tests your script. The particulars of doing that will vary a bit based on what you’re testing (an event handler, a REST Endpoint, a Jira workflow function, etc.).
See the child pages of this page for some key particulars.
Once you’ve written your test, you can save it to one of your script roots and run it using the Running Tests task.
Test-Driven Workflow
When starting on a new feature, Adaptavist often uses a test-driven development workflow. This is the process:
Write a test for a desired outcome.
Run the test.
The test probably fails.
This indicates that the feature isn’t working yet.
Implement the feature until the test passes.
Do any required code cleanup.
Refactor.
Make sure the test still passes.
Peer review.
Make suggested edits.
Test to make sure the code is running as expected.
Running Tests
There are two ways that you can run automated tests: through the Test Runner built-in script or via your IDE.
Test Runner Built-in Script
You can use the Test Runner built-in script to run JUnit and Spock tests on the current Jira instance through ScriptRunner. The script creates custom test packages, and selects which tests to run from the checklist, simplifying the testing process.
From ScriptRunner navigate to Built-in Scripts > Test Runner.
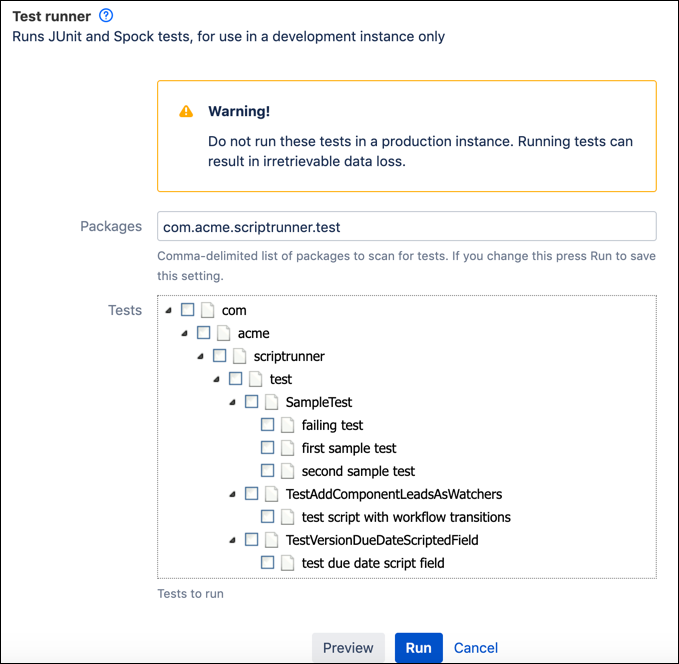
Enter the name of the package(s) you want ScriptRunner to scan in Packages.
Packages should follow the format
com.yourcompany.scriptrunner.test, with all tests classes saved in thecom/yourcompany/scriptrunner/testdirectory in your script root.The first time you open Test Runner, there is a pre-filled sample package
com.acme.scriptrunner.test. This package contains sample tests. Run these tests to see an example of successful and failed tests. Running the pre-packaged tests creates a project with the key SRTESTPRJ, a workflow, and a workflow scheme.All these can be deleted, and they are recreated each time the test is run.
Select which tests to run from the Tests list.
This list shows all available tests in the specified package.
Optionally, click Preview to see details of which tests will be executed.
Click Run to run the selected tests on the current instance.
Do not run tests in a production instance.
The outcome of tests can be viewed under the Results tab.
To use the included tests as a basis for custom tests, check out the source code for the sample plugins. Alternatively, unzip the ScriptRunner jar itself and edit the tests. Make sure you are using a source control system, so that you can test on your dev instance, commit your changes, then update your working copy on your production system.
Running From an IDE
You can run tests from your IDE. Adaptavist has only tested with Intellij IDEA and recommend it.
A test runner executes the tests via REST in the running application (Jira, Confluence, Bitbucket etc). In order for the IDE to know which runner to use, you must annotate your test class using the @RunWith annotation.
For example:
groovyimport com.onresolve.scriptrunner.canned.common.admin.ScriptRunnerTestRunner
import org.junit.runner.RunWith
import spock.lang.Specification

@RunWith(ScriptRunnerTestRunner)
class TestRunnerSampleSpec extends Specification {

    def "test something"() {
        expect:
        true
    }
}
When you add a new test class, you must build your project (mvn package). Since the tests are invoked locally, and the compiled class must be available, the IDE cannot know which test runner to use. After this initial build, you can add new test methods and execute them without rebuilding.
IDEA Configuration
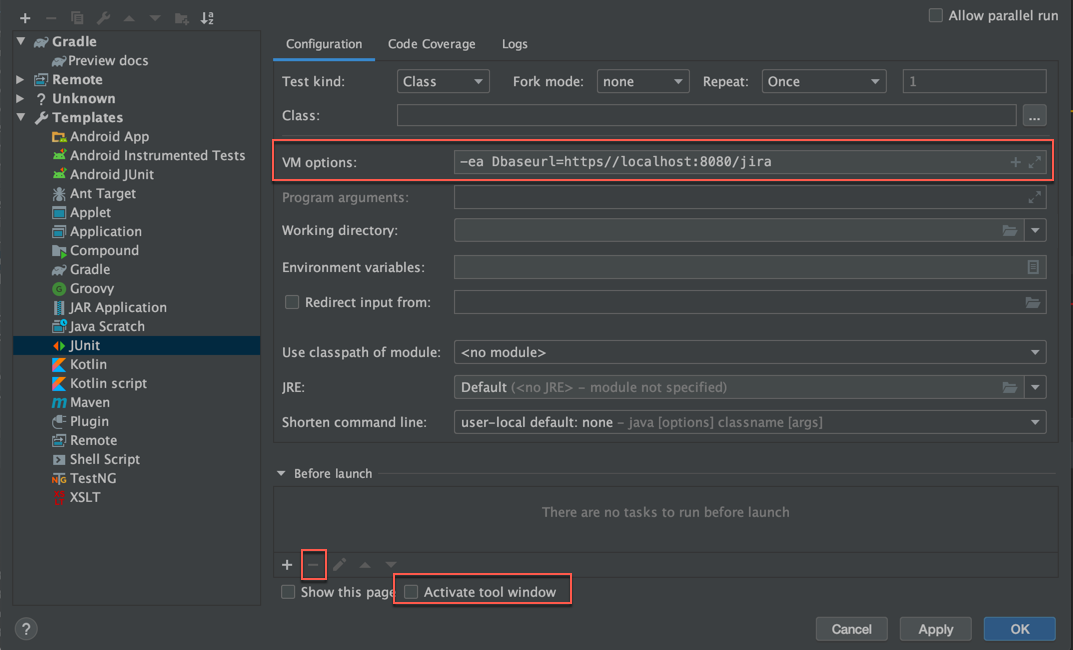
The IDE runs your test locally, which executes a REST call to the app. Therefore the IDE needs to know the address of your running application, so it can tell the app to run the tests. To do this, you can modify the default setting for JUnit tests:
Navigate to Run > Edit Configurations.
Open the Templates drop-down on the left navigation and then select JUnit.
For VM Options, add a property
-Dbaseurl=pointing to the URL of the running application.You can omit this if you are running your application locally on port 8080, as in
http://localhost:8080/jira.Under Before Launch, delete the Build task using the minus button.
It’s not necessary to rebuild the plugin after editing the tests because ScriptRunner will recompile the test if necessary.
Uncheck the Activate Tool Window box.
It’s not useful to switch to the tool window because any failures will be shown in the main Log window.
Any exceptions are shown in the tool window, but log messages are not redirected to it, so there may not be a need to look at the tool window.
Use the IDEA Test
You can run the code by clicking the annotations in the margin, as shown below:
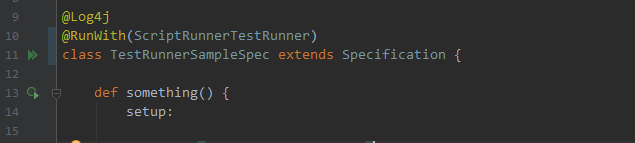
The keyboard shortcut to run the code is to put the cursor in the test
classname ormethodname, and then press Ctrl + Shift + F10 for Windows or Ctrl + Shift + R (on Mac OSX).