Update Page Restrictions

In Confluence without ScriptRunner, editing restrictions added to a parent page are not inherited by child pages; however, view restrictions are inherited. Pages need to be restricted individually for editing.

Using the Update Page Restrictions built-in script, you can replace the editing restrictions to all of the child pages. It is quick and easy to select multiple page trees or individual pages to set page restrictions in bulk, rather than doing it one by one. By selecting a parent page, you’ll apply all the restrictions to that page and all of its descendants. Running this script will replace any existing restrictions that the selected content has. 

Run the script

Follow these steps to run the built-in script:

  1. Navigate to General Configuration > ScriptRunner > Built-In Scripts.
  2. Select Update Page Restrictions.
  3. Select the Space you want to work with. 
  4. When Page(s) appears, you can select specific pages within the space to work with, or you can select the entire space.
  5. You have three options to choose for Restriction Level:
    1. Anyone can view and edit
    2. Anyone can view; only users and groups chosen in this script can edit
      When you select this option, two more fields appear: Groups and Users, where you determine which users and groups can edit. 
    3. Only users and groups chosen in this script can view and edit
      When you select this option, two more fields appear: Groups and Users, where you determine which users and groups can view and edit.
  6. Select Run
    Instead, you can select Preview to view changes before implementing them.
    A blank Update Page Restrictions script form

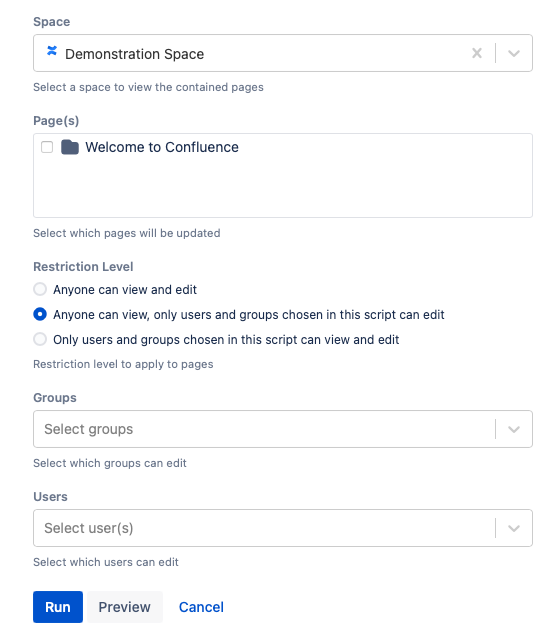
Once you select Run, the Results of the script appear. Restrictions are applied to the selected page and all ancestors of this page. However, this feature does not override the Confluence permission hierarchy. If you change the restrictions of a page or a set of pages, the restrictions of an ancestor of the page with a higher level of restrictions are observed.

Read more about page restrictions in the Confluence Page Restrictions documentation.

Known limitation

When page restrictions are applied using the Built-in Script: Update Page Restrictions in Confluence, pages may disappear from Space Search for some users.

This only affects groups whose names contain capital letters (for example, SR-users) that are managed in external systems, such as LDAP or Atlassian Crowd.

Why this happens

  • Confluence uses groups to decide which pages a user can see.

  • Group names from LDAP/Crowd are case-sensitive.

  • The Update Page Restrictions Script automatically converts group names to lowercase when saving page restrictions.

  • Space Search checks group names exactly as stored.

  • Because SR-users and sr-users are treated as different names, the search does not recognize the user’s permission.

This behavior does not occur when restrictions are added manually through the UI.

How to avoid the issue

You can use manual restrictions when capital letters are involved in group names.

If the group name contains any capital letters, add the group to page restrictions manually using the page UI. This ensures the group name is saved correctly and search continues to work.

If possible, use lowercase group names.

You can also follow Atlassian's guide on enforcing lowercase groups for an application. 

How to fix the issue if it can't be avoided

Option 1: Re-add the group via the UI

  1. Open the affected page

  2. Remove the group from page restrictions

  3. Re-add the group using the UI.

Option 2: Admin script fix (large spaces)

If many pages are affected:

  • An admin can run a corrective script in the Script Console (for example, using ScriptRunner).

  • The script reapplies restrictions using the correct group name casing.

  • Search functionality is restored without changing user access.

This is the recommended fix at scale.

import com.atlassian.confluence.pages.Page import com.atlassian.confluence.security.ContentPermission import com.atlassian.confluence.user.AuthenticatedUserThreadLocal import com.atlassian.sal.api.component.ComponentLocator import com.atlassian.confluence.core.ContentPermissionManager import com.atlassian.user.GroupManager import static com.atlassian.confluence.security.ContentPermission.EDIT_PERMISSION import static com.atlassian.confluence.security.ContentPermission.VIEW_PERMISSION import static com.atlassian.confluence.security.ContentPermission.createGroupPermission void addEditPermission( Page page, String group ) { addPermission(page, group, EDIT_PERMISSION) } void addViewPermission( Page page, String group ) { addPermission(page, group, VIEW_PERMISSION) } void addPermission( Page page, String group, String permissionType ) { def contentPermissionManager = ComponentLocator.getComponent(ContentPermissionManager) Collection<ContentPermission> permissions = [] permissions.add(createGroupPermission(permissionType, group)) contentPermissionManager.setContentPermissions(permissions, page, permissionType) } def currentUser = AuthenticatedUserThreadLocal.get() def groupManager = ComponentLocator.getComponent(GroupManager) def group = groupManager.getGroup("SR-users") def pages = Pages.search("space = SR").findAll() as Collection<Page> try{ pages.each { page -> addEditPermission(page, group.name) addViewPermission(page, group.name) } }catch(Exception e){ e.printStackTrace() }

Examples

Restrict editing and viewing of certain pages  to a certain group

Using this built-in script, you can restrict certain pages within a space to specific user groups. In the following example, we will restrict pages in a Customer Analytics section in the Analytics space to the customers group. Only they will be able to edit and view the pages.

To set up the script, follow these steps: 

  1. Navigate to General Configuration > ScriptRunner > Built-In Scripts.
  2. Select Update Page Restrictions.
  3. Enter Analytics for Space
  4. Select Customer Analytics for Pages
  5. Pick Only users and groups chosen in this script can view and edit for Restriction Level
  6. Enter customers for Groups.
  7. Select Run.
    The Update Page Restrictions form with the example content

Result

After running the script, you will see the result of the script:

Results of the script

On this page