
Bulk Purge Trash Job
When you delete a Confluence page, it is moved to the space's trash. Deleted pages can be restored from the space's trash, but they also continue to take up database storage space. It is good housekeeping practice to regularly clear a space's trash to minimize database storage requirements.
You can use Bulk Purge Trash to create a job that runs on a set schedule to purge the trash from all the spaces specified in the job.
Usage
Once you have selected Bulk Purge Trash from the jobs list, you fill in the following form to configure the job:
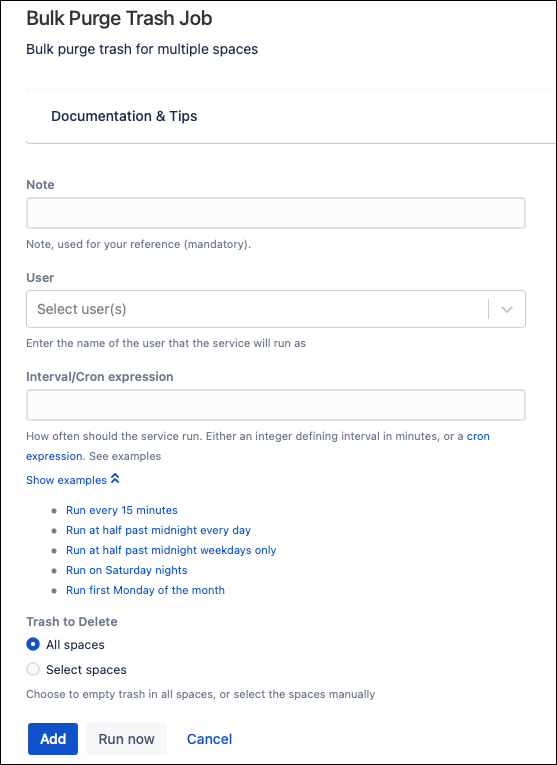
The fields you have to complete are:
- Note: Provide a name to display on the jobs table. You should make this name meaningful so that anyone looking at the jobs table can easily understand what the job does.
- User: Select which user account to use to purge the trash. If you are purging from multiple spaces, you must ensure that the user account specified has appropriate permissions on all spaces.
- Interval/Cron expression: Choose the interval between job executions. You can provide your own cron expression or select one of the pre-defined examples.
- Trash to delete: Select the appropriate radio button to purge trash from all spaces or specify which trash to delete.
Once you have completed the form, you can:
- Click Run Now to run the job immediately.
- Click Add to add the job to the jobs list without running it immediately.
- Click Cancel to return to the Create Jobs screen without creating a Bulk Purge Trash job.
Clicking the Run Now button displays a results table showing whether the job was completed successfully and the log for the job execution.
You can also view job and execution history from the jobs table.