Custom Event Listener
Adding a custom listener
- Navigate to General Configuration > ScriptRunner > Event Listeners.
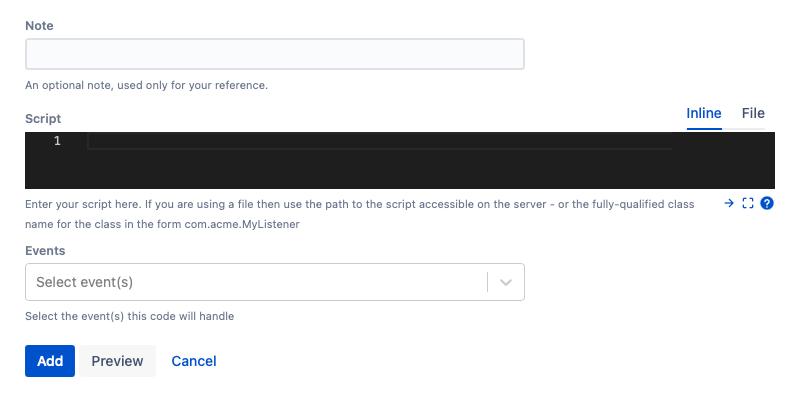
Choose the Custom Event Listener to use your own scripts to respond to events.
Enter an optional Note to identify your script.
- Enter a Script, either Inline or from a File.
- Select Event(s) for the listener to fire on.
- Select Add.
You can also Preview to view your results before saving the listener.
Writing code for custom event listeners
Script binding
The script binding is a set of variables you can use in your custom script. An event variable in the script binding corresponds to the event which triggered the listener. For example, if you are listening for PageCreateEvent the event variable will be a PageCreateEvent object.
Multiple Events
You can choose to have your handler listen for multiple events. If you need to do different things depending on the type of event, you can check that with instanceof. Alternatively, you can type the event variable to the most specific superclass. In the previous example, that would be PageEvent.
In the following example, the event is getting page content for both PageCreateEvent and PageUpdateEvent. Since PageEvent is a common superclass for both PageCreateEvent and PageUpdateEvent, you could cover both events by using the following code:
// The event is passed in the binding. This line is only used to give type information when using an IDE, and has no functional impact.
def event = event as PageEvent
def content = event.content.bodyAsString

// do something with the page content
Examples
Add a comment when a banned word is used
Some organizations have a particular style guide or would like to enforce specific rules. This event listener example looks at the content of new pages for banned words. If the page content contains any on a list of banned words, a comment is automatically added with an alternative suggestion.
Follow these steps to create the listener:
- Navigate to General Configuration > ScriptRunner > Event Listeners.
- Select Custom Event Listener.
- Enter Add a comment when a banned word is used for Note.
- Enter the following Script:
import com.atlassian.confluence.event.events.content.page.PageEvent import com.atlassian.confluence.pages.CommentManager import com.atlassian.sal.api.component.ComponentLocator def event = event as PageEvent // use event.getPage().getSpace() if you want to restrict only to certain spaces def commentManager = ComponentLocator.getComponent(CommentManager) def body = event.content.bodyAsString def alternatives = [ "air hostess": "flight attendant", "amuck" : "amok", ] def commentBody = alternatives.findAll { badWord, goodWord -> body.contains(badWord) }.collect { badWord, goodWord -> "<li><b>${badWord}</b> should be avoided. Consider using: <b>${goodWord}</b>.</li>" }.join("") if (commentBody) { commentManager.addCommentToObject(event.content, null, "<p>Please consider the following issues: <ul>$commentBody</ul> </p>") } - Leave Events blank because the event is defined in the code.
- Select Add.
Result
The following image contains a comment generated in response to a banned word:
Add an inline comment when a banned word is used
Similar to the previous example, you can configure your listener to add inline comments instead. As you get these comments, you can dismiss them.
Follow these steps to create the listener:
- Navigate to General Configuration > ScriptRunner > Event Listeners.
- Select Custom Event Listener.
- Enter Add an inline comment when a banned word is used for Note.
- Enter the following Script:
import com.atlassian.confluence.event.events.content.page.PageEvent import com.atlassian.confluence.pages.CommentManager import com.atlassian.sal.api.component.ComponentLocator def event = event as PageEvent // use event.getPage().getSpace() if you want to restrict only to certain spaces def commentManager = ComponentLocator.getComponent(CommentManager) def body = event.content.bodyAsString def alternatives = [ "air hostess": "flight attendant", "amuck" : "amok", ] def commentBody = alternatives.findAll { badWord, goodWord -> body.contains(badWord) }.collect { badWord, goodWord -> "<li><b>${badWord}</b> should be avoided. Consider using: <b>${goodWord}</b>.</li>" }.join("") if (commentBody) { commentManager.addCommentToObject(event.content, null, "<p>Please consider the following issues: <ul>$commentBody</ul> </p>") } - Leave Events blank because the event is defined in the code.
- Select Add.
Result
The following image is an example of an inline comment:
Create a page in a space when a user is created
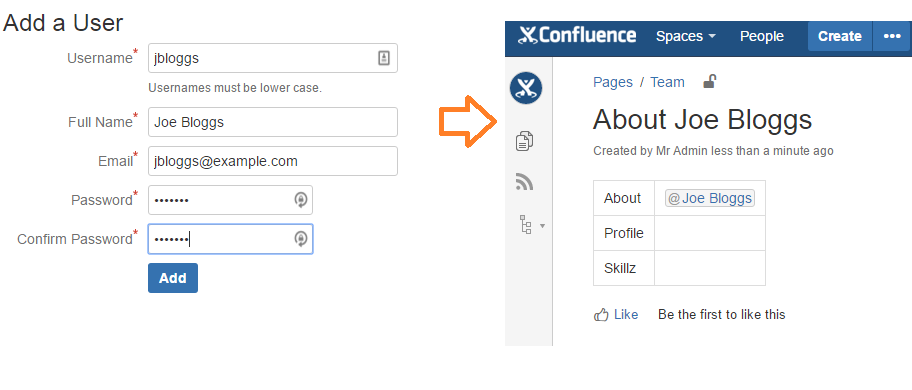
This event listener example automatically creates a user profile page in the Team space. You can use this profile page to list their skills and profile.
Follow these steps to create the listener:
- Navigate to General Configuration > ScriptRunner > Event Listeners.
- Select Custom Event Listener.
- Enter Create a page in space when a user is created for Note.
- Enter the following Script:
import com.atlassian.confluence.core.DefaultSaveContext import com.atlassian.confluence.event.events.user.UserCreateEvent import com.atlassian.confluence.pages.Page import com.atlassian.confluence.pages.PageManager import com.atlassian.confluence.spaces.SpaceManager import com.atlassian.confluence.user.ConfluenceUser import com.atlassian.sal.api.component.ComponentLocator import groovy.xml.MarkupBuilder try { def event = event as UserCreateEvent def user = event.user as ConfluenceUser def pageManager = ComponentLocator.getComponent(PageManager) def spaceManager = ComponentLocator.getComponent(SpaceManager) def teamSpace = spaceManager.getSpace("TEAM") def writer = new StringWriter() def builder = new MarkupBuilder(writer) builder.table { tbody { tr { td("About") td { "ac:link" { "ri:user"("ri:userkey": user.key) } } } tr { td("Profile") td("") } tr { td("Skillz") td("") } } } def parentPage = teamSpace.getHomePage() assert parentPage def targetPage = new Page(title: "About ${user.fullName}", bodyAsString: writer.toString(), space: teamSpace, parentPage: parentPage ) pageManager.saveContentEntity(targetPage, DefaultSaveContext.DEFAULT) parentPage.addChild(targetPage) pageManager.saveContentEntity(parentPage, DefaultSaveContext.MINOR_EDIT) } catch (anyException) { log.warn("Failed to create page for new user", anyException) } - Pick UserCreateEvent for Events.
- Select Add.
Result
The following image is an example of a profile page created when the jbloggs user is created:
Collect stats
This event listener example automatically sends statistics to statsd for page views, space views, and users/pages views.
Follow these steps to create the listener:
- Navigate to General Configuration > ScriptRunner > Event Listeners.
- Select Custom Event Listener.
- Enter Collect stats for Note.
- Enter the following Script:
import com.atlassian.confluence.event.events.content.page.PageEvent import com.atlassian.confluence.user.AuthenticatedUserThreadLocal import groovy.transform.Field @Field final def host = "http://192.168.59.103/" @Field final def port = 8125 def event = event as PageEvent def currentUser = AuthenticatedUserThreadLocal.get() // keys to create unique nodes for counters def spaceKey = event.page.spaceKey def pageId = event.page.id as String def userKey = currentUser.name def nodeId = "confluence.stats.views" // build the unique metric keys def pageViewMetricKey = "${nodeId}.page.${pageId}" def spaceViewMetricKey = "${nodeId}.space.${spaceKey}" def userViewMetricKey = "${nodeId}.user.${userKey}.${pageId}" // increase by one the counters for the following metric keys increaseByOne(pageViewMetricKey, userViewMetricKey, spaceViewMetricKey) void increaseByOne(String... keys) { def dataToSend = "" def value = 1 //increase counter by one //syntax for counter according to https://github.com/etsy/statsd/blob/master/docs/metric_types.md for (key in keys) { dataToSend += "${key}:${value}|c\n" } def data = dataToSend.getBytes() def address = InetAddress.getByName(host as String) def packet = new DatagramPacket(data, data.length, address, port as int) def socket = new DatagramSocket() try { socket.send(packet) } finally { socket.close() } } - Pick PageViewEvent for Events.
- Select Add.
Result
The following image is an example of the statistics for page views:


