Dynamic Forms
Use the Dynamic Forms feature to simplify the process of adding variables to your ScriptRunner Groovy scripts.
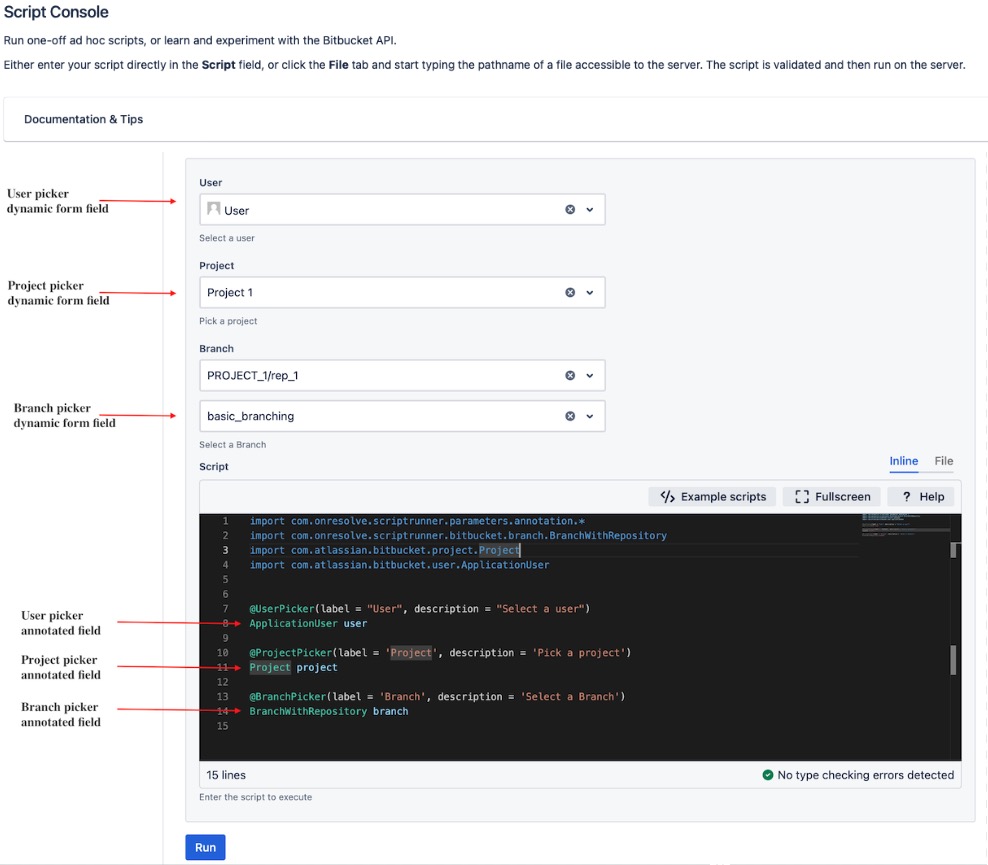
With Dynamic Forms, you can annotate your variables in a script so they appear as selectable form fields. You can then save that script as a file to be shared with multiple users, allowing one script to be used for various use cases.
Why is the Dynamic Forms Feature Useful?
Inline scripts are often copied and pasted, with minor changes made for different use cases, which requires maintenance for each script usage. Using Dynamic Forms, you can create flexible scripts with annotated variables that can be stored as files, reducing maintenance requirements while allowing for script customization. Additionally, these annotations allow variable values within a script to be changed easily by those with limited code familiarity.
Where can you use the Dynamic Forms Feature?
Dynamic Forms are everywhere! You can use them on Jobs, Listeners, Pre Hooks, Post Hooks, Merge Checks, and just about everywhere you can write code.
Available Dynamic Form Field Types
The following dynamic form field types are available:
| Name | Description | Target Type |
|---|---|---|
User Picker | Field allowing user selection. | |
Short Text | Field allowing a short text input. | String |
Select List | Single-select list field. Custom select list If you cannot find an annotation that is suitable for your purpose, you can use | String |
Checkbox | A checkbox field. | Boolean |
Project Picker | Field allowing project selection. | |
| Repository Picker | Field allowing repository selection. | com.atlassian.bitbucket.repository.Repository |
| Branch Picker | Field allowing branch selection. | com.onresolve.scriptrunner.bitbucket.branch.BranchWithRepository
|
| Tag Picker | Field allowing branch selection. | com.onresolve.scriptrunner.bitbucket.tag.TagWithRepository
|
Don't see a field you want? Contact Adaptavist Support to raise a feature request.
Creating a Dynamic Form
There are three main steps in creating a dynamic form that can be used across multiple features by multiple users:
The steps below describe how we expect most users to use the Dynamic Forms feature. This feature can be used in whatever way you find most useful.
- Create the dynamic form in the Script Console to make sure it works as expected.
- Save the dynamic form as a file.
- Use the saved file in a Job, Listener, Pre Hook, Post Hook, Merge Check, or other ScriptRunner feature.
The above steps are detailed below.
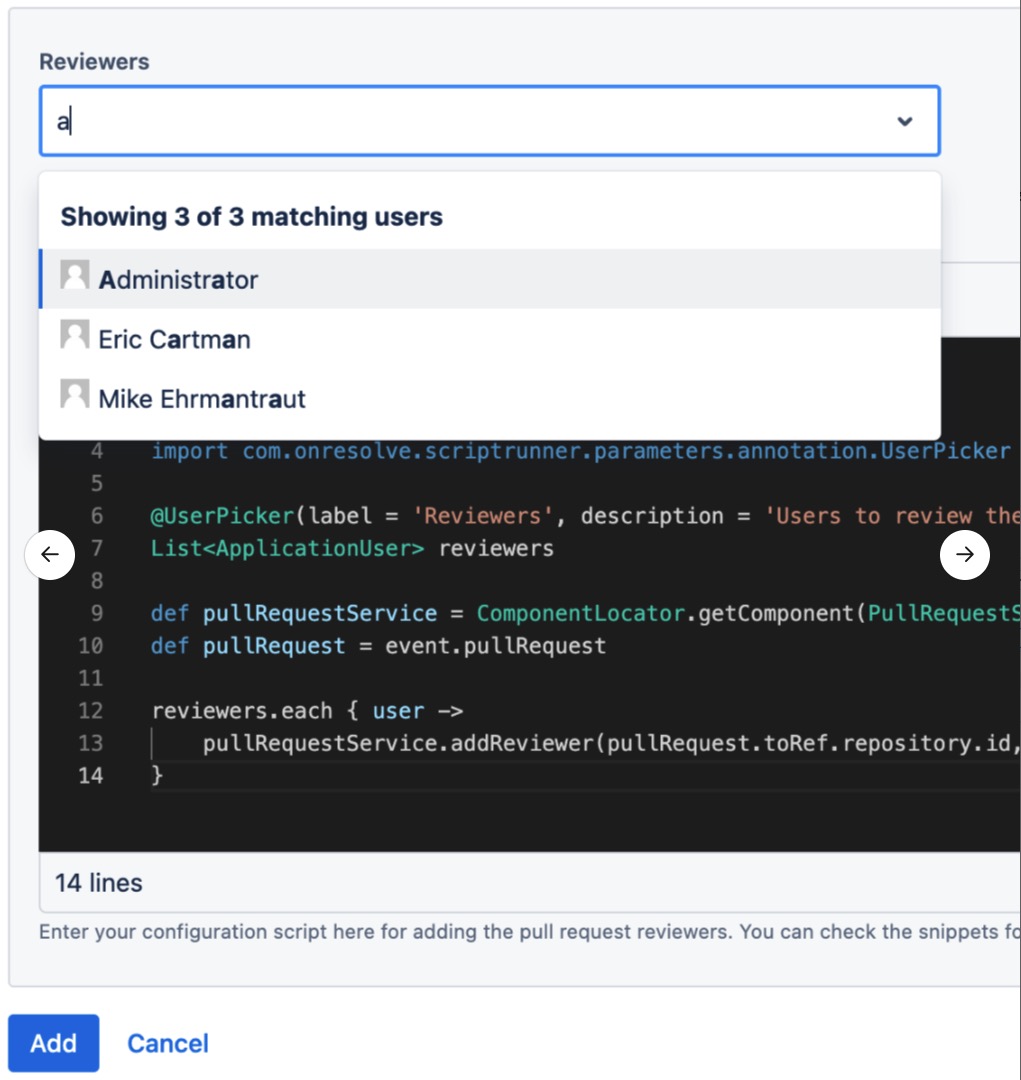
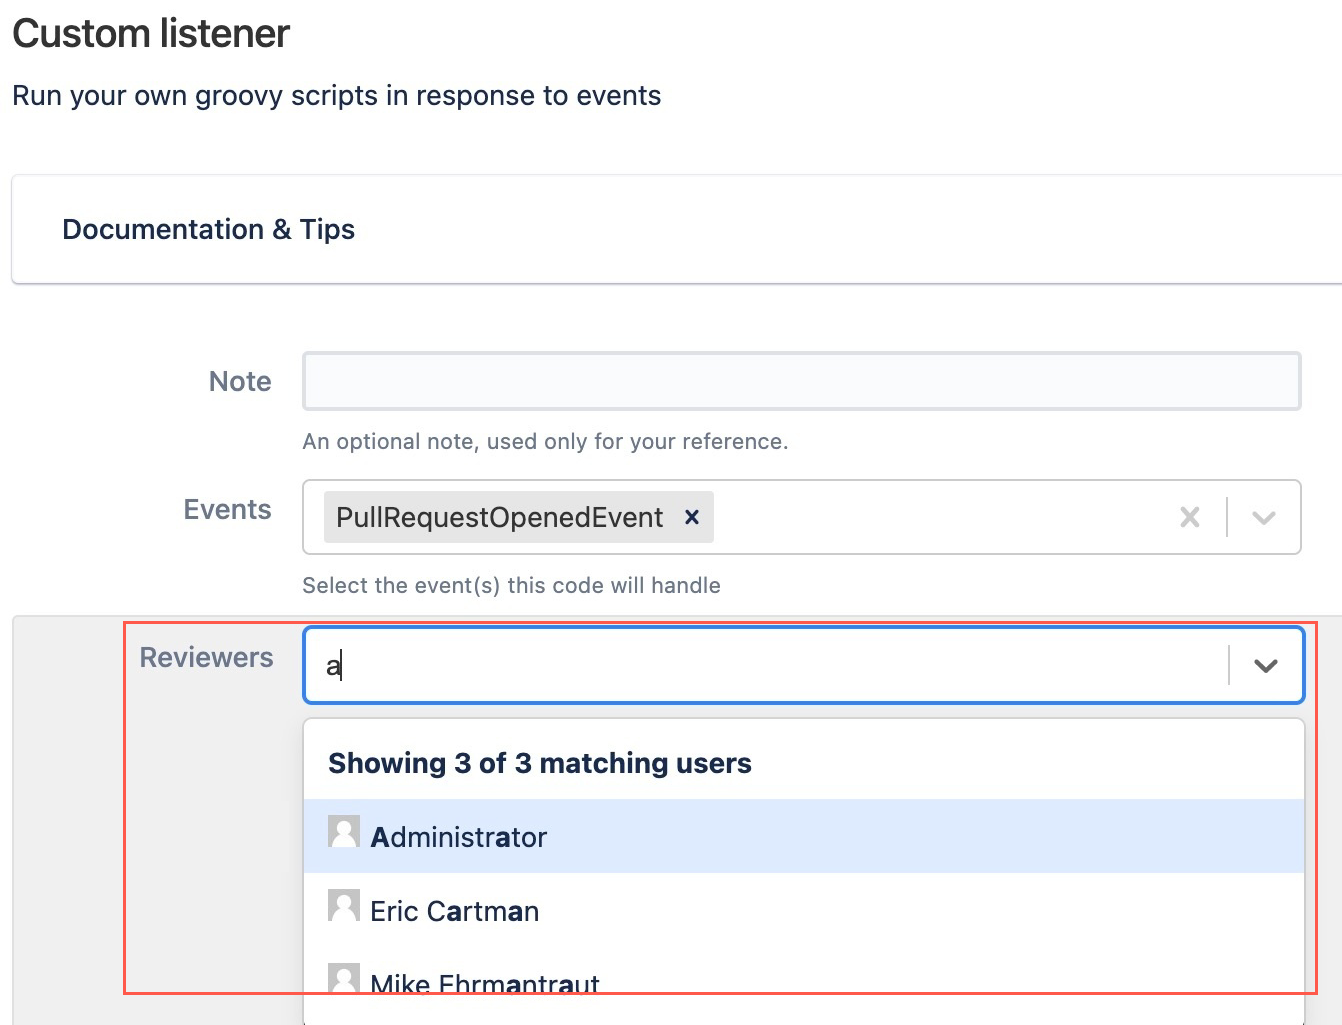
For the examples below we use a script that allows you assign reviewers for a pull request. In this example the User field is annotated to create the Reviewers form field.
Create a dynamic form
Navigate to ScriptRunner.
Select Console.
Write your new script, annotating the variables you want to display as form fields above the script. In this example we're using the following script:
import com.atlassian.bitbucket.pull.PullRequestService
import com.atlassian.sal.api.component.ComponentLocator
import com.atlassian.bitbucket.user.ApplicationUser
import com.onresolve.scriptrunner.parameters.annotation.UserPicker

@UserPicker(label = 'Reviewers', description = 'Users to review the PR', multiple = true)
List<ApplicationUser> reviewers

def pullRequestService = ComponentLocator.getComponent(PullRequestService)
def pullRequest = event.pullRequest

reviewers.each { user ->
    pullRequestService.addReviewer(pullRequest.toRef.repository.id, pullRequest.id, user.name)
}
Use the Annotations provided to help construct your own annotated script.
Save the dynamic form as a file
Copy the script you created in the Script Console.
- Go to the Script Editor to open your Scripts Root folder.
Select the folder in which you want to save the script, and select the Create New File icon.
Enter a file name in the Add Groovy File window. In this example we use the name
Assign_reviewers_for_PR.Select Add.
Paste your inline script into the file, and click Save. This script is now available as a file and can be shared with multiple Bitbucket users on the same instance.
Use the dynamic form file elsewhere
- Navigate to the feature where you want to use the dynamic form.
- Enter the relevant details into the feature.
- Select File when going to enter an Inline script.
- Select the dynamic form file you wish to use.
The form field/s automatically display. In the example image above, the Reviewers form field displays.
Transforming an Existing Inline Script into a Dynamic form
To enable sharing of annotated scripts, all inline scripts must be saved as files.
Navigate to your existing inline script, and add in required annotations.
We recommend you edit the inline script in the Script Console. That way you have full visibility of the form fields.
Copy the script.
Use the Script Editor to open your Scripts Root folder.
Select the folder in which you want to save the script, and click the Create New File icon.
Enter a file name in the Add Groovy File window.
Select Add.
Paste your inline script into the file, and click Save. This script is now available as a file and can be shared with multiple Bitbucket users on the same instance.
Annotations
User Picker
Add a user picker field into your script.
    import com.atlassian.bitbucket.user.ApplicationUser
    import com.onresolve.scriptrunner.parameters.annotation.*

    @UserPicker(label = "User", description = "Select a user")
    ApplicationUser user
User multi-pickers are also supported.
    import com.atlassian.bitbucket.user.ApplicationUser
    import com.onresolve.scriptrunner.parameters.annotation.*

    @UserPicker(label = "Users", description = "Select users", multiple = true)
    List<ApplicationUser> users
Short Text
Add a short text field to a script.
    import com.onresolve.scriptrunner.parameters.annotation.ShortTextInput

    @ShortTextInput(label = "Branch name", description = "Enter the branch name")
    String branchName
Select List
Add a single-select list with configurable options.
    import com.onresolve.scriptrunner.parameters.annotation.Select
    import com.onresolve.scriptrunner.parameters.annotation.meta.Option

    @Select(
        label = "Color",
        description = "Select color",
        options = [
            @Option(label = "Green", value = "green"),
            @Option(label = "Blue", value = "blue"),
        ]
    )
    String value
Multi-select lists are also supported.
    import com.onresolve.scriptrunner.parameters.annotation.Select
    import com.onresolve.scriptrunner.parameters.annotation.meta.Option

    @Select(
        label = "Colors",
        description = "Select colors",
        options = [
            @Option(label = "Green", value = "green"),
            @Option(label = "Blue", value = "blue"),
            @Option(label = "Red", value = "red"),
        ],
        multiple = true
    )
    List<String> values
Using optionsGenerator in a select list
If you cannot find an annotation that is suitable for your purpose, you can provide an optionsGenerator closure when using @Select to generate a list of custom options. For example:
            import com.onresolve.scriptrunner.parameters.annotation.Select

            @Select(
                label = "Color",
                description = "Select color",
                optionsGenerator = {
                    [
                        ['yellow', 'Yellow'],
                        ['red', 'Red'],
                    ]
                }
            )
            String value
You must return a List of Lists containing exactly two String elements:
- The first element must be the option value (that is, what is injected into your variable).
- The second element must be the display value.
The closure code must be completely self-contained, apart from import declarations. Therefore, you cannot use variables or methods declared outside the closure.
We recommend you keep the contents of these closures short and simple.
The following is a Jira example, using optionsGenerator, that lists all projects in a specific project category:
            import com.atlassian.jira.component.ComponentAccessor
            import com.onresolve.scriptrunner.parameters.annotation.Select

            @Select(
                label = "Project",
                description = "Select the Space project",
                optionsGenerator = {
                    def projectManager = ComponentAccessor.projectManager
                    def category = projectManager.getProjectCategoryObjectByName('Space Projects')
                    projectManager.getProjectObjectsFromProjectCategory(category.id).collect { project ->
                        [project.key, project.name]
                    }
                }
            )
            String value
Checkbox
Add a checkbox to a script.
    import com.onresolve.scriptrunner.parameters.annotation.Checkbox

    @Checkbox(label = "Delete branch", description = "Select the checkbox to delete the branch")
    Boolean shouldDeleteBranch
Project Picker
Add a project picker to a script.
    import com.atlassian.bitbucket.project.Project
    import com.onresolve.scriptrunner.parameters.annotation.ProjectPicker

    @ProjectPicker(label = 'Project', description = 'Pick a project')
    Project project
Project multi-pickers are also supported.
    import com.atlassian.bitbucket.project.Project
    import com.onresolve.scriptrunner.parameters.annotation.ProjectPicker

    @ProjectPicker(label = 'Projects', description = 'Pick some projects', multiple = true)
    List<Project> projects
Repository Picker
Add a repository picker to a script.
    import com.atlassian.bitbucket.repository.Repository
    import com.onresolve.scriptrunner.parameters.annotation.RepositoryPicker

    @RepositoryPicker(label = 'Repository', description = 'Select a repository')
    Repository repository
Repository multi-pickers are also supported.
    import com.atlassian.bitbucket.repository.Repository
    import com.onresolve.scriptrunner.parameters.annotation.RepositoryPicker

    @RepositoryPicker(label = 'Repositories', description = 'Select repositories', multiple = true)
    List<Repository> repositories
Branch Picker
Add a branch picker to a script.
    import com.onresolve.scriptrunner.bitbucket.branch.BranchWithRepository
    import com.onresolve.scriptrunner.parameters.annotation.BranchPicker

    @BranchPicker(label = 'Branch', description = 'Select a Branch')
    BranchWithRepository branch
Tag Picker
Add a tag picker to a script.
    import com.onresolve.scriptrunner.bitbucket.tag.TagWithRepository
    import com.onresolve.scriptrunner.parameters.annotation.TagPicker

    @TagPicker(label = 'Tag', description = 'Select a tag')
    TagWithRepository tag


