Visibility Permissions
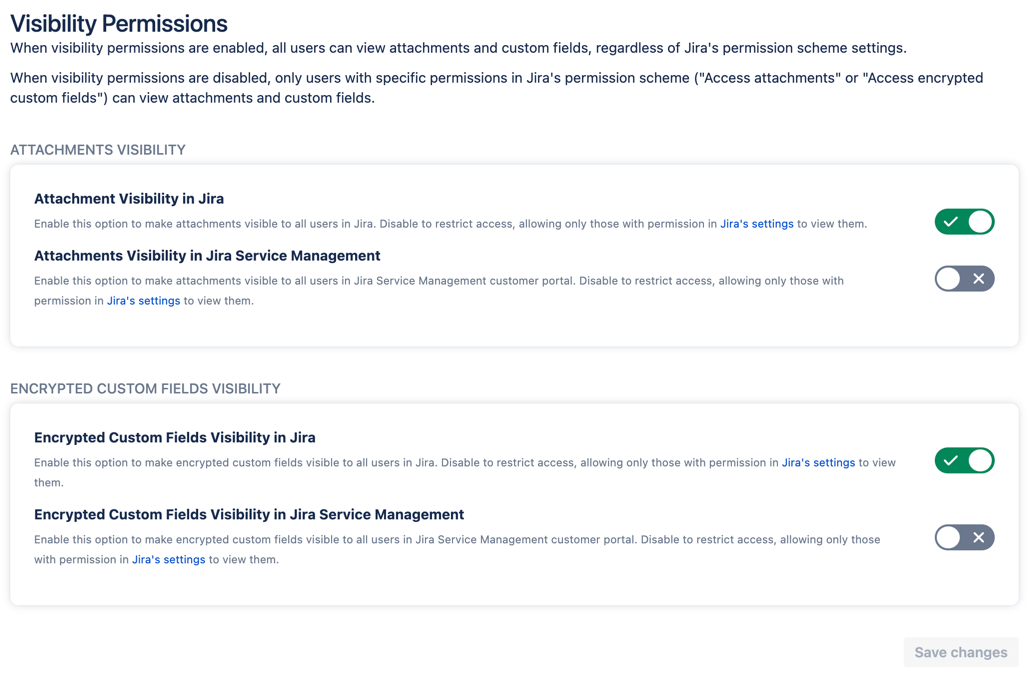
Visibility permissions let you decide who can see attachments and encrypted custom fields. Until you change these settings, Jira will continue to work as before you installed Encryption for Jira.
Older versions of Encryption for Jira do not contain all the visibility options of this version. If you update from one of these older versions, any new visibility options will be initially set to Off to ensure no private data is accidentally shared. After you have upgraded, you can change the permissions to suit your needs.
Navigate to Visibility permissions by selecting Next in the Manage permissions tile on the Home page or selecting Visibility permissions in the left-hand menu.
Visibility Permissions
Issue Cloning
Since version 2.0.0 of Encryption for Jira, when Issues with Attachments are cloned, Encryption for Jira will ensure the attachment author is preserved on the cloned Issue.
(The default Jira behavior is that the cloning user becomes the author of those Attachments, which circumvents Attachment Visibility Permissions.)
When the toggles are green, users can see the attachments or encrypted custom fields, but only users with access permissions can see them when they are off.
Select Save changes after making your selection.
Attachments Access Permissions
With Attachment Permissions, admins can decide who can open/download attachments. To set these permissions, complete the following steps.
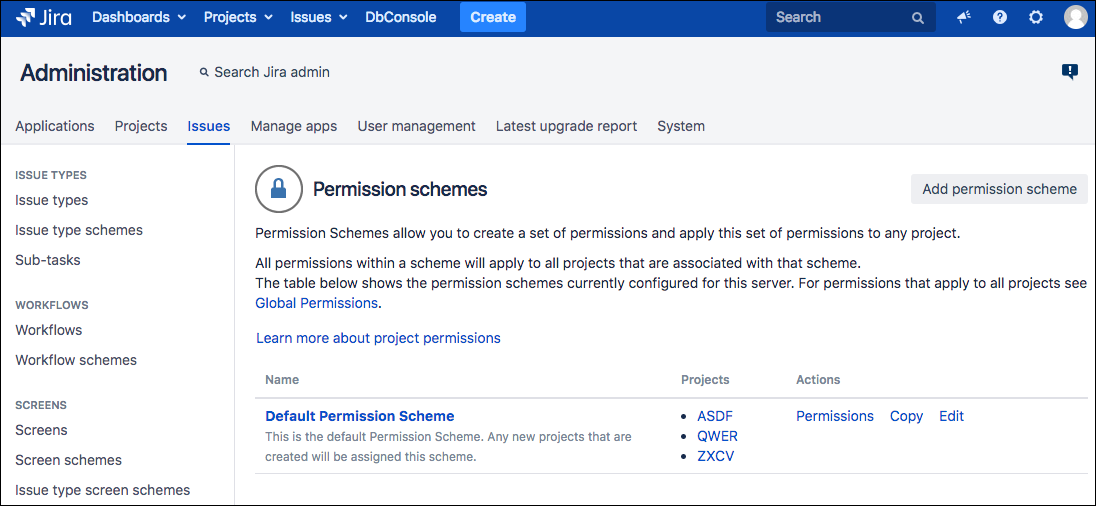
- Click the Jira Administration icon and select Issues from the dropdown menu.
- Select Permission Schemes from the left sidebar.
- Click the Permissions link for the permission scheme you want to configure.
- Scroll down to the Attachments Permissions section.
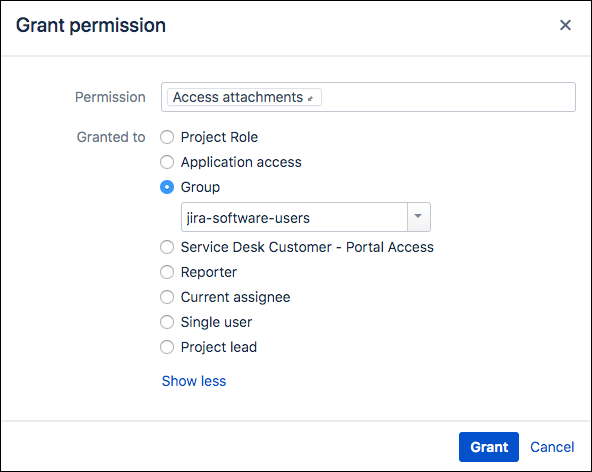
- Click Edit next to Access Attachments, then add the users (or groups or project roles) who can open the attachments.
- Use the options to give access to the required users.
Reporters can access their attachments whether or not they are specified in the permission.
All users can open their own attachments while they have access to the issue.
- Click Grant.
Encrypted Custom Fields Access Permissions
Custom Field Permissions provide admins more control over the encrypted custom fields.
Due to limitations in Jira, encrypted fields cannot be hidden on the Client Portal. When disabled, they will still appear, but any values entered on them won't be saved.
This feature lets you decide who can view/edit encrypted custom fields. To set these permissions, complete the following steps.
Click the Jira Administration icon and select Issues from the dropdown menu.
Select Permission Schemes from the left sidebar.
- Click the Permissions link for the permission scheme you want to configure.
Scroll down to the Issue Permissions section.
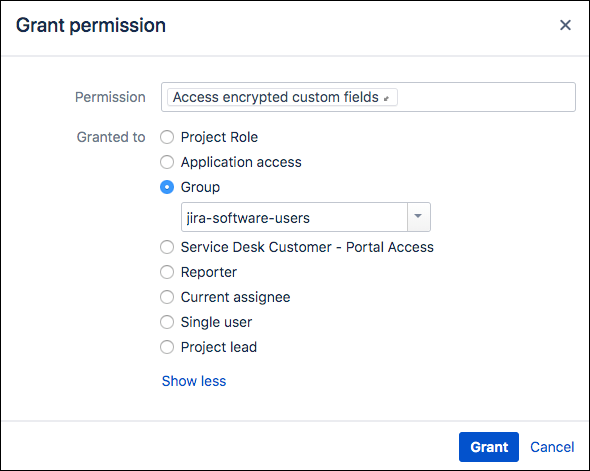
Click Edit next to Access Encrypted Custom Fields, then select the required permission (group or users).
Click Grant.
Users without this permission:
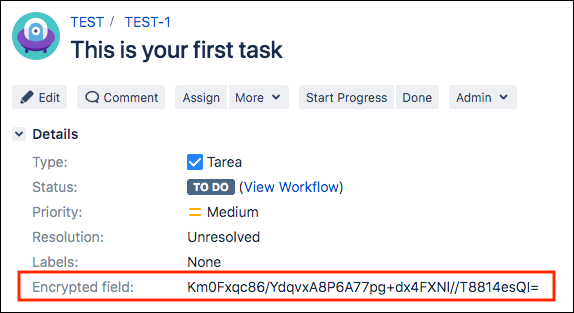
Will see the encrypted value instead of the real value of the custom field.
Won't be able to add or edit the values of encrypted custom fields.
Won't see the Encrypted Fields History activity tab.
Bulk Change Permission Schemes - Using ScriptRunner
For Jira instances with multiple permission schemes, granting permissions can be time-consuming. A groovy script allows you to update the permission type for all the permission schemes for a specified group, user, or project simultaneously.
Administrators can modify the following script to grant the "ACCESS_ATTACHMENT" or the "ACCESS_ENCRYPTED_CUSTOMFIELDS" permission type to the named user, group, or project role across all permission schemes. To do so, follow the steps below:
Go to the Jira Administration menu and select Manage Apps.
Select Script Console under the ScriptRunner section of the left sidebar.
Paste the script included below this list of steps, but update the following values:
String permissionType: must be "group", "user" or "projectrole". For instance: String permissionType = "group".
String target: the target user, group or project role.
If permissionType = "group" then target must be the name of the desired group.
If permissionType = "user", then target must be the desired username.
If permissionType = "projectrole" then target must be the ID of the desired project role.
String accessPermission: the permission type. It must be "ACCESS_ATTACHMENT" or "ACCESS_ENCRYPTED_CUSTOMFIELDS".
If you enter an invalid group or username, the entry is still created, and the permission schemes will continue working as configured. However, if you enter an invalid project ID, the entry is created, but the permission schemes could become corrupted. If this happens, you will need to manually remove the wrong rows from the database.
Click Run. The execution result is displayed on the Logs tab.
Modify and run this script for each group, user, or project role to which you would want to grant permission. If you run the script more than once for a target, do not worry; the record is created only once.
We recommend that you first run this script in a test instance.
Script to paste for Step 3 above:
groovyimport com.atlassian.jira.component.ComponentAccessor
import com.atlassian.jira.permission.PermissionSchemeEntry
import com.atlassian.jira.permission.PermissionSchemeManager
import com.atlassian.jira.scheme.SchemeEntity
import com.atlassian.jira.security.plugin.ProjectPermissionKey
import org.ofbiz.core.entity.GenericValue
import com.google.common.base.Objects
import org.apache.log4j.Logger
import org.apache.log4j.Level
def log = Logger.getLogger("com.adaptavist.jira.plugin.encryption.permissionscript")
log.setLevel(Level.DEBUG)
String permissionType = "group" //eg "group" or "user" or "projectrole"
String target = "jira-users" // the group, username or project role ID
String accessPermission = "ACCESS_ATTACHMENT" // "ACCESS_ATTACHMENT" or "ACCESS_ENCRYPTED_CUSTOMFIELDS"
PermissionSchemeManager permissionSchemeManager = ComponentAccessor.getPermissionSchemeManager()
ProjectPermissionKey permissionKey = new ProjectPermissionKey(accessPermission)
SchemeEntity schemeEntity = new SchemeEntity(permissionType, target, permissionKey)
def grantsNumber = 0
for(GenericValue scheme : permissionSchemeManager.getSchemes()) {
log.debug "Permission scheme '" + scheme.get("name") + "' (" + scheme.get("id") + ") - start"
boolean permissionExists = false
for (PermissionSchemeEntry permissionSchemeEntry : permissionSchemeManager.getPermissionSchemeEntries(permissionSchemeManager.getSchemeObject((String)scheme.get("name")), permissionKey)) {
if (permissionSchemeEntry.getType().equals(permissionType) && Objects.equal(target, permissionSchemeEntry.getParameter())) {
permissionExists = true
}
}
if(permissionExists) {
log.debug "Permission scheme '" + scheme.get("name") + "' (" + scheme.get("id") + ") - '" + accessPermission + "' permission already exists for '" + target + "' " + permissionType
} else {
permissionSchemeManager.createSchemeEntity(scheme, schemeEntity)
grantsNumber++
log.debug "Permission scheme '" + scheme.get("name") + "' (" + scheme.get("id") + ") - granted '" + accessPermission + "' permission to '" + target + "' " + permissionType
}
log.debug "Permission scheme '" + scheme.get("name") + "' (" + scheme.get("id") + ") - end"
}
log.debug grantsNumber + " schemes updated"`


