
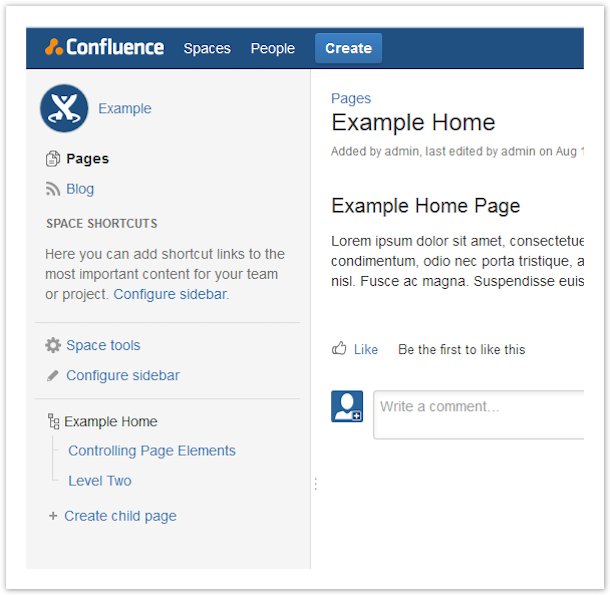
Left-Hand Sidebar
Customize the Left-Hand Sidebar
In ThemeBuilder, the sidebar is added as one macro that pulls in the default Confluence content for this area. If you want to change the sidebar, you need to rebuild the content in a new custom panel.
Replace the Default with a Custom Content Panel
In ThemeBuilder panel editor:
Select the skin you want to edit.
Click the New Panel button.
Change the Name and Description to help you identify the panel.

Edit the With Sidebar panel to replace the macro that inserts the Confluence sidebar with your new, custom sidebar.
Select and remove the code:

<ac:macro ac:name="panel-element"> <ac:parameter ac:name="element">page.ia-sidebar</ac:parameter> </ac:macro>
Click the Insert Macro button and select the Builder Panel macro from the Macro Browser.
Add the name of your new sidebar to the Panel field.

Click Insert and check that the new macro is in the correct position, replacing the Panel Element macro. See Scrolling Sidebar below for additional code you may want to add here.

Click Apply to save those changes and then open a new browser tab or window to view a page that has this skin applied.

The left-hand sidebar is now blank and ready for you to add your custom content.
Add Custom Content to Your Panel
See ThemeBuilder Debugging Tools for help with this section.
Now that you have a blank space to work with, you may add custom content to the sidebar. Adding ?skin=root to the page URL allows us to go back to the default ThemeBuilder skin to see the existing content and decide what to add or exclude. You could also refer to a print or screenshot of the default page.
Scrolling Sidebar
To have a scrolling sidebar, you must wrap your content in this HTML div code:
 <div class="acs-side-bar ia-scrollable-section">
...your content here
</div>
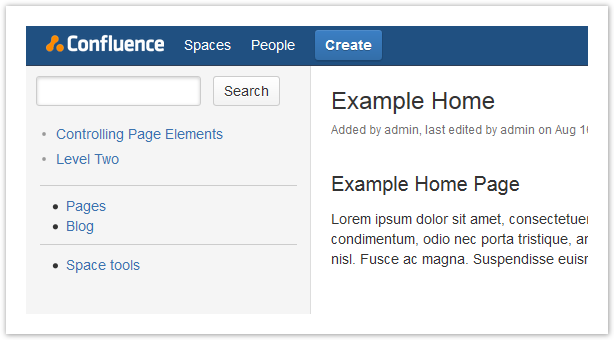
Examples
These examples show you how to add a Pagetree menu and links to Space Tools, Pages, and Blogposts.
Pagetree Menu
The Pagetree macro displays simple vertical navigation that has many configurable parameters, including:
A This Space Only search box
Content from different spaces or the current one
One-click Expand All or Hide All links.
Used here with the parameters root=@home and searchbox=true, it provides functional left-hand navigation as a custom sidebar.
To create a Pagetree menu:
Go to the Custom Sidebar panel.
Use the Insert Macro button to find and add the Pagetree macro.
Add
@homein the Root Page field, scroll down and select the Include Search Box above Page Tree checkbox.Click Insert and you should see this code in your panel:
 <ac:macro ac:name="pagetree">
<ac:parameter ac:name="root">@home</ac:parameter>
<ac:parameter ac:name="searchBox">true</ac:parameter>
</ac:macro>
Add custom CSS to the Pagetree menu. See the Custom CSS page if you need help with this task.
 .plugin_pagetree {
margin: 10px;
}
Page and Blogs Navigation
You can use the Web Section macro to place the sidebar navigation. This example uses a styled <hr /> for spacing between the custom sidebar elements.
 .ia-fixed-sidebar hr {
margin-left: 14px;
width: 90%;
}
In the Custom Sidebar panel, place the cursor where you want to add the Pages and BlogPosts links.
Use the Insert Macro button to add a Web Section macro.
See Menu - Web Item and Menu - Web Section for finding and using the menu location values.
To recreate the sidebar Pages and Blog links, use
system.space.sidebar/main-linksin the Location field, and deselect the Show Icons checkbox.
The code is:
 <ac:macro ac:name="web-section">
<ac:parameter ac:name="location">system.space.sidebar/main-links</ac:parameter>
<ac:parameter ac:name="icons">false</ac:parameter>
</ac:macro>
Click Save. Browse to a page with the custom sidebar. The Page and Blog links now show under the Pagetree menu.

Space Tools
You may want only to show the Space Tools link to certain users or groups, so this example will use the Panel Show macro only to display that link to Confluence Administrators. You can use any group in Confluence with Builder Show, Builder Hide, User, Decorator, Mode, and many others. ThemeBuilder Debug Comments will show many of these values in the source of a page.
The process here is similar to the one used to add the Pages and Blogs links, but we will wrap the menu macro in another macro that will only show the contents within the specified condition.
Place the cursor where you want the Space Tools link to show in the Custom Sidebar panel.
Click Insert macro and select the Builder Show macro in the Macro Browser.
Scroll down to the Groups field and add the group's name you want to show this content to.

Click Insert to place the macro in your panel.
Place the cursor between the
<ac:rich-text-body>tags and create a space for the following macro.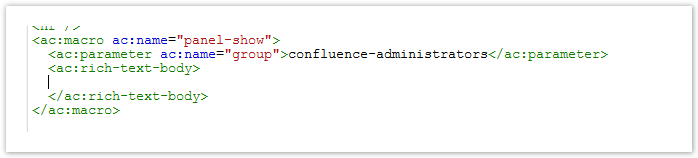
Click the Insert Macro button and insert the Web Section macro. Use the values
system.space.sidebar/advanced-linksin the Location field, and deselect the Show Icons checkbox.Insert the macro, and it should look like the example below (don’t forget, if you have problems with the formatting of panel code, you can use the Prettify button to re-indent everything).
 <ac:macro ac:name="panel-show">
<ac:parameter ac:name="group">confluence-administrators</ac:parameter>
<ac:rich-text-body>
<ac:macro ac:name="web-section">
<ac:parameter ac:name="location">system.space.sidebar/advanced-links</ac:parameter>
<ac:parameter ac:name="icons">false</ac:parameter>
</ac:macro>
</ac:rich-text-body>
</ac:macro>
Click Apply on the panel editor. Go to browse your page and see the Space Tools link added.
Browse the page as a user not in the target group to confirm that the logic is working.
Summary
This is just a snapshot of the changes that can be made in this area. Combining menu macros and CSS styling can completely change how this area is used and valued within Confluence. Please let us know if you have any suggestions for tutorials we can add.